Warning, Caution, Awi!^mehrrs, optional a – Panasonic MC-V6602 User Manual
Page 11
Attention! The text in this document has been recognized automatically. To view the original document, you can use the "Original mode".
A
WARNING
Personal Injury Hazard when Using Attachnwnta.
DO NOT place hands or feet underneath the unit when using dte attachment tools. The
agitator begins to revolve rapidly when using attachments.
AWi!^MEhrrS, Optional A
mes
A
CAUTION
When using the attachments, tfie agitator begins rotstfng. DO NOT allow the cleaner to
remain In Just one place for a period of time, as the agitator may damage the floor sur
face. Avoid placing the cleaner on furniture, the fringed area of rugs, deep pile carpet-
Ing, or carpeted stairs. The Ideal position for the cleaner when using attachments is
for the unit tobe on a level area with the handle In the full upright position. See the
HANDLE ADJUSTMENTS section.
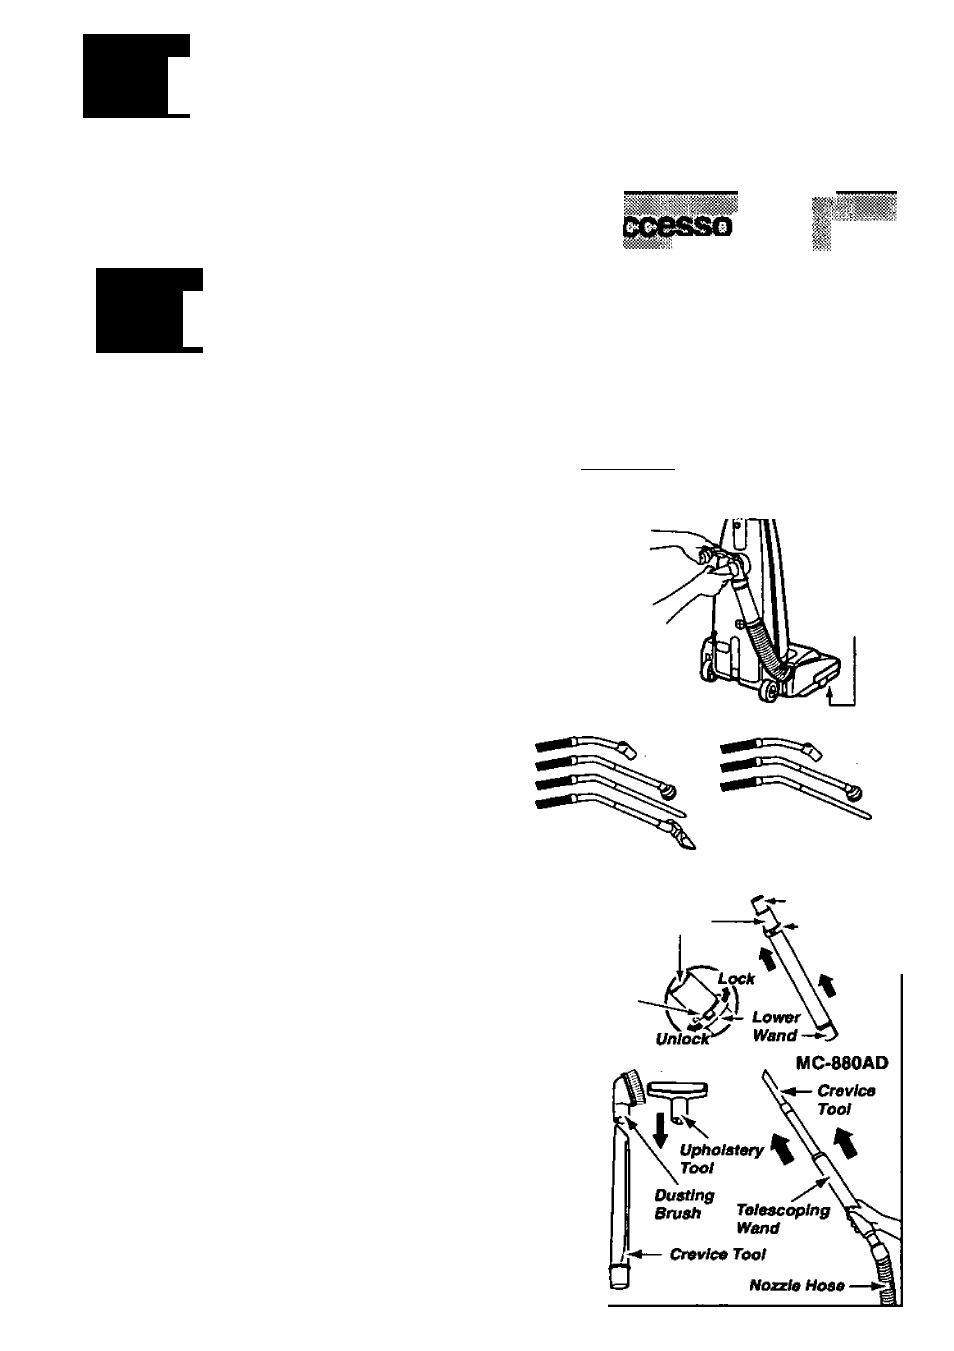
TO CONNECT OPTIONAL HOSE, ALL KITS
To connect the accessory hose to your vacuum cleaner, sirnply lift
up the suction inlet cover located on the back of your cleaner and
insert the hose end into the opening as illustrated. Be sure the
hose is fitted snugly in the opening for proper operation.
Note: If the opening is dusty, first wipe with a clean cloth. Insert
the tapered hose end fully and give it a slight twst for a snug fit.
TO CONNECT OPTIONAL CLEANING TOOLS
1. Connect any of the cleaning tools to the end of
the extension wand/wands or directly to the hose
assembly in the following manner. Push the clean
ing tool onto the extension wand/wands or hose
assembly and twist slightly for a firm connection.
To remove the cleaning tool from the extension
wand/wands or hose assembly, simply pull it apart.
Agitator
(Underneath)
MC-770AD and
MC-690AD
MC-670AS and
MC-680AS
2. Remove the telescoping wand, MC-880AD, from its storage
position. Remove the crevice tool from its storage posi
tion in the wand by pulling up. Turn the wand locking ring
to the UNLOCK position. Extend the wand to its full
length. Turn the wand locking ring to the LOCK position.
Upper
Wand
Wand
Locking
Ring
Crevice Tool
Wand
Lacking
Ring
3. Attach the wand to the hose, twisting slightly as you insert it.
To achieve the maximum reach, approximately 10 feet, with
the attachments, add the crevice tool to the end of the
wand. The dusting brush or the upholstery tool can be
attached directly to the wand, hose, or to the end of the
crevice tool. For the correct way to position the dusting
brush or the upholstery tool see №e illustration.
‘Always clean attachments before using on fabrics.
Attachments used in dirty areas, such as under a refrigerator,
should not be used on other surfaces until they are washed.
They could leave marks. See the CLEANING EXTERIOR AND
ATTACHMENTS section.
-
11
-