Maintenance, Top/ceiling mount – Outdoor Great Room Cordless Sun Shade User Manual
Page 4
maintenance
Your sun shade has been made of the finest materials and, when properly cared for, will last
a very long time. To clean your shade, simply rinse with water, scrub with soap or any non-
abrasive cleaner, rinse and allow to dry. Call us for missing parts or mechanical problems.
Do not store shade wet. In moist areas roll shade down frequently to air dry.
caution: use of solvents or abrasive cleaners may damage the fabric and will void your
warranty. do not use bleach or chlorine.
no. de ref.
descriPciÓn
cÓdiGo de Pieza
cantidad
1
mecanismo de polea
4-cu
1
2 conexión de la polea
1-cP
1
3
cubierta de polea
4-Bc
2
4 Vara
1
5
tapa para baranda inferior con anillos
11-Brc 2
6
amarres elásticos
11-BunGee td
2
7
riel inferior
1
8 tela
1
9
unidad terminal inactiva
4-iu
1
10
tapón terminal inactivo
1-iP
1
11
tubo de aluminio
1
12
receptor elástico
11-receiVer
2
13
tornillos para madera (fig. 6)
4-Ws
8
(2) Conexión de la polea
(1) Mecanismo de polea
(4) Cadena
(3) Cubierta de
mecanismo de polea
(5) Cubierta de
riel inferior
(6) Anillos de anclaje
(7) Riel inferior
(8) Tela
(9) Unidad
terminal inactiva
(10) Tapón terminal
inactivo
(11) Tubo de aluminio
(2) Conexión de la polea
(1) Mecanismo de polea
(4) Cadena
(3) Cubierta de
mecanismo de polea
(5) Tapa para baranda
inferior con anillos
(7) Riel inferior
(8) Tela
(9) Unidad
terminal inactiva
(10) Tapón terminal
inactivo
(11) Tubo de aluminio
(4) Vara
(2) Conexión de la polea
(1) Mecanismo de polea
(3) Cubierta de
mecanismo de polea
(5) Tapa para baranda
inferior con anillos
(7) Riel inferior
(8) Tela
(9) Unidad
terminal inactiva
(10) Tapón terminal
inactivo
(11) Tubo de aluminio
(2) Clutch Plug
(1) Clutch Unit
(4) Chain
(3) Bracket Covers
(5) Bottom
Rail Cap
(6) Tie Downs
(7) Bottom Rail
(8) Shade
(9) Idle
End Unit
(10) Idle End Plug
(11) Aluminum Tube
(2) Clutch Plug
(1) Clutch Unit
(4) Chain
(3) Bracket Covers
(5) Bottom
Rail Cap
(7) Bottom Rail
(8) Shade
(9) Idle
End Unit
(10) Idle End Plug
(11) Aluminum Tube
queremos felicitarlos por su compra de su persiana Coolaroo de The Outdoor GreatRoom Company. usted debe estar orgulloso
de saber que ahora es dueño de la mejor persiana que su dinero puede comprar. hemos tratado de hacer este manual lo mas
sencillo posible y fácil de entender. Por favor asegúrese de leer las instrucciones antes de instalar su persiana.Si después de
leer el manual todavía tiene alguna pregunta, no dude en llamar a nuestra línea de ayuda 1-866-303-4028. Seria un placer
para nosotros poder asistirle con cualquier pregunta. Esperamos que disfrute de su persiana.
© por Gale Pacific Limited. todos los derechos reservados. Coolaroo® es una marca registrada de Gale Pacific Limited.
Fig. 1
Tiempo aproximado de montaje:
20 minutos
x2
2 personas pueden
ser necesarias
instrucciones de instalación
para persianas solares sin
cordón para exteriores
3/16"
herramientas adicionales necesarias
#6 5/8"
Anclas
(opcionall)
(opcional)
(12) receptor
elástico
(6) amarres
elásticos
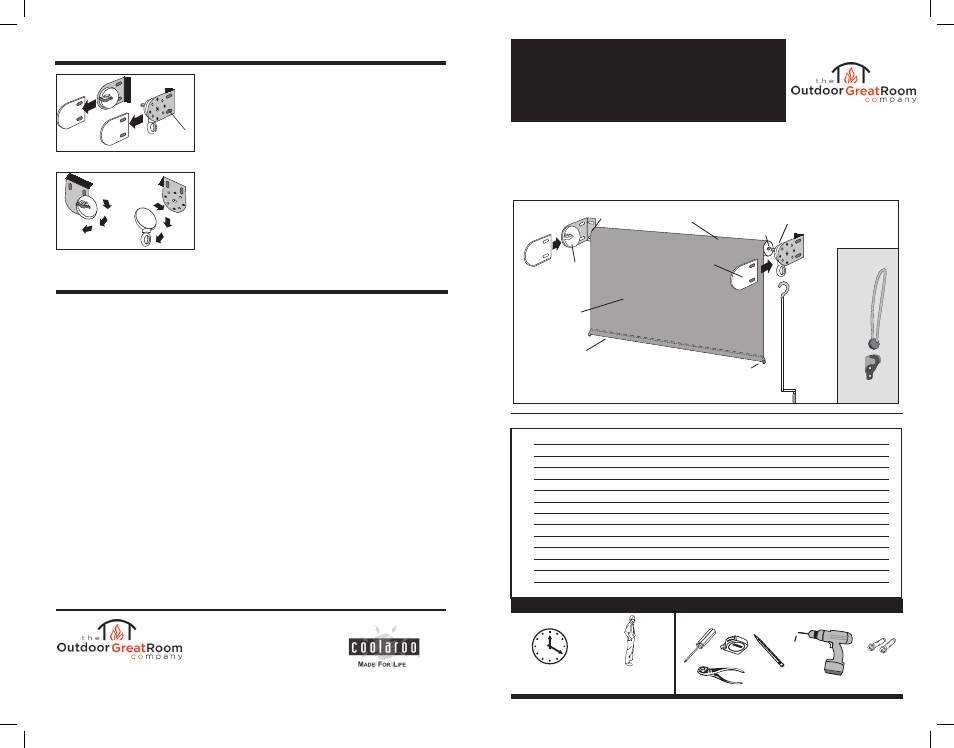
Fig 11
remoVe (4)
screWs
Fig 10
chanGinG to a
top/ceiling mount
If you want your Clutch Unit to hang from the top (for
example, the ceiling), you will need to make a simple change
to your Clutch Unit and Idle End Unit before you install your
shade. To make this change, start by sliding off the Bracket
Covers on both the Clutch Unit and Idle End Unit (Fig. 10).
Remove the four screws from both brackets. Turn the Clutch
Unit 90 degrees so the clutch eyelet hangs straight down if
the Clutch were hanging from the top, and turn the Idle End
Unit so the opening is facing away from the window. (Fig. 11).
Put screws back in, and slide the Bracket Cover back on.
2015 Silver Bell Road, Suite 195
Eagan, MN 55122
1-866-303-4028
outdoorrooms.com