Outdoor Great Room Venturi FlameTM Technology User Manual
For the swirl-fire, Collection of fire pits
O p e r a t i n g I n s t r u c t i o n s
For the Swirl-Fire
TM
Collection of Fire Pits
U s i n g V e n t u r i F l a m e
TM
T e c h n o l o g y & G e l F u e l
Read these instructions carefully for correct operation of your new table -top fire pit. Our
Swirl-Fire Collection
of fire pits run on clean-burning gel fuel. By simply adding our
Venturi Flame top, a stunning swirling fire appears. No valves, no fans, no problems!
IMPORTANT STEPS TO FOLLOW DURING SET-UP
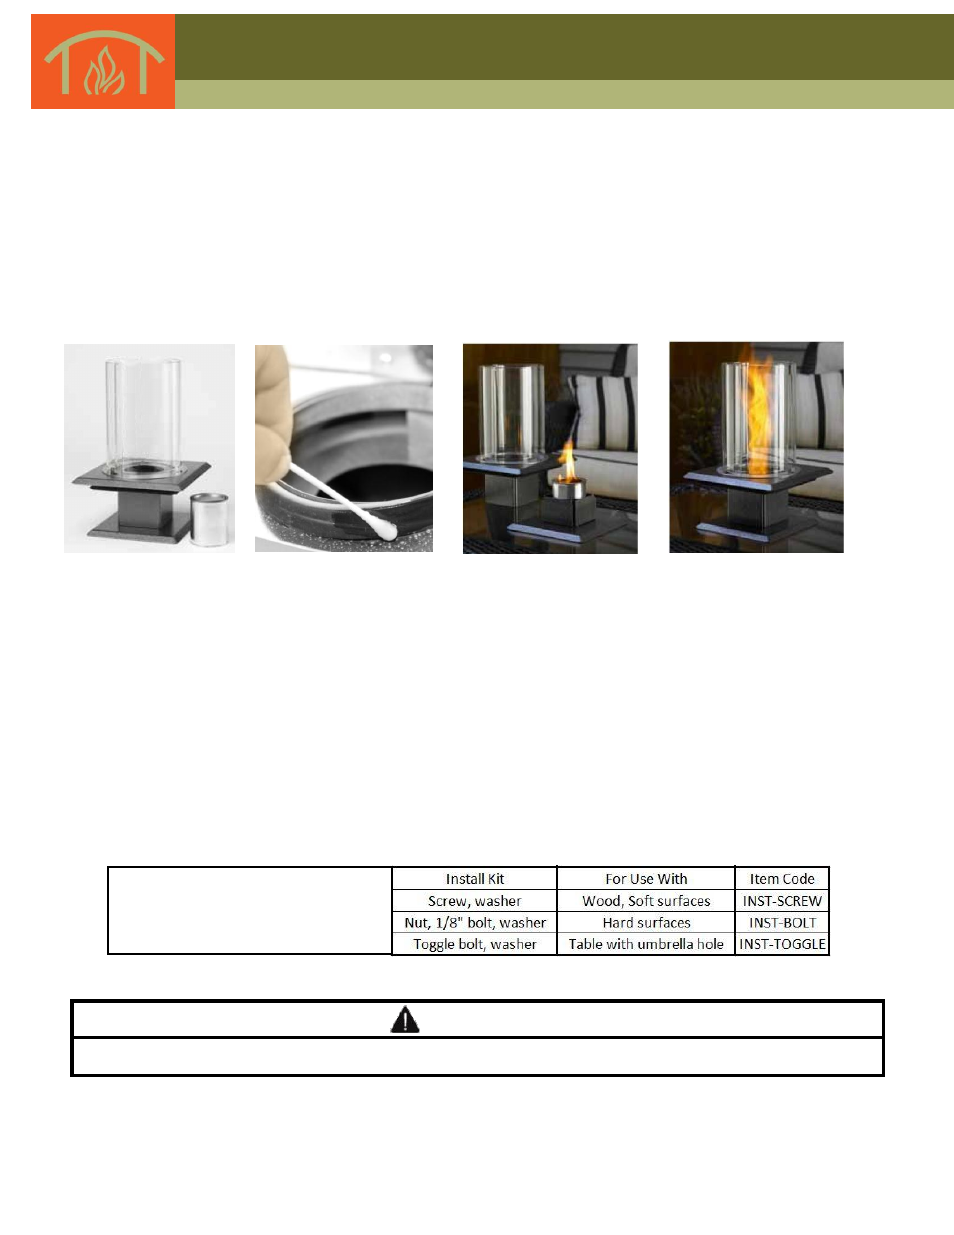
1.
Remove all packaging items including any residual packaging on the glass using glass
cleaner and paper towels.
2.
Place gel fire container on a secure, stable table or platform
3.
Secure to desired surface using one of the following methods.
DO NOT OVERTIGHTEN FASTENERS
For wood and other soft surfaces, insert a long screw through base and into surface.
Insert 1/8” bolt through base and surface, secure with nut and/or washer from bottom.
If installing on a table with an open umbrella hole, a toggle bolt drywall anchor can be used.
Insert bolt through hole in base and umbrella hole, screw on anchor. If anchor is not wide
enough, use a large washer on bottom side of table.
4.
To ease installation of glass cylinder, wet a cotton swab and wipe entire outside of silicone ring
before gently sliding cylinder onto base. ( see Figure 1.2)
5.
Remove the label from the gel fuel can.
6.
Remove the can lid and place the can in the gel fire container.
7.
Ignite the gel fuel with a wand lighter or long match and allow the gel to burn for 5-10
seconds (see Figure 1.3).
8.
Place the turbo disc assembly (glass cylinder and base) on top of the base
and make sure it is securely in position (see Figure 1.4).
Figure 1.1
Figure 1.2 Figure 1.3 Figure 1.4
Note: Model above shown with optional cool temp safety glass shield
WARNING
Never attempt to force the glass onto base. Always wear clean leather gloves when handling and installing glass.
To order an installation kit, see chart
at right for help selecting the
appropriate kit for chosen surface.