Outdoor Great Room Cordless Sun Shade User Manual
Cordless sun shade installation instructions
ref. no.
Part descriPtion
Part no.
Qty. reQuired
1
clutch
4-cu
1
2
clutch Plug
1-cP
1
3
Bracket covers
4-Bc
2
4
Wand
1
5
Bottom rail caps with rings 11-Brc
2
6
Bungee tie downs
11-BunGee td
2
7
Bottom rail
1
8
shade
1
9
idle end unit
4-iu
1
10
idle end Plug
1-iP
1
11
aluminum tube
1
12
Bungee receiver
11-receiVer
2
13
Wood screws (see fig. 6)
4-Ws
8
Congratulations on the purchase of your Coolaroo® Sun Shade from The Outdoor GreatRoom Company. You
should be proud to know you have purchased the best sun shade money can buy. We have gone to great lengths
to make this instruction manual as simple and user friendly as possible. Please be sure to read the manual in its
entirety before installing your shade. If after reading the manual you still have questions, or you are missing pieces,
please give us a call at 1-866-303-4028. We’ll be happy to answer any of your questions.
(2) Clutch Plug
(1) Clutch Unit
(4) Chain
(3) Bracket Covers
(5) Bottom
Rail Cap
(6) Tie Downs
(7) Bottom Rail
(8) Shade
(9) Idle
End Unit
(10) Idle End Plug
(11) Aluminum Tube
(2) Clutch Plug
(1) Clutch Unit
(4) Chain
(3) Bracket Covers
(5) Bottom
Rail Cap
(7) Bottom Rail
(8) Shade
(9) Idle
End Unit
(10) Idle End Plug
(11) Aluminum Tube
(2) Clutch Plug
(1) Clutch Unit
(4) Wand
(3) Bracket Covers
(5) Bottom
Rail Cap
(7) Bottom Rail
(8) Shade
(9) Idle
End Unit
(10) Idle End Plug
(11) Aluminum Tube
© by Gale Pacific Limited. All rights reserved. Coolaroo® mark is a registered trademark of Gale Pacific Limited.
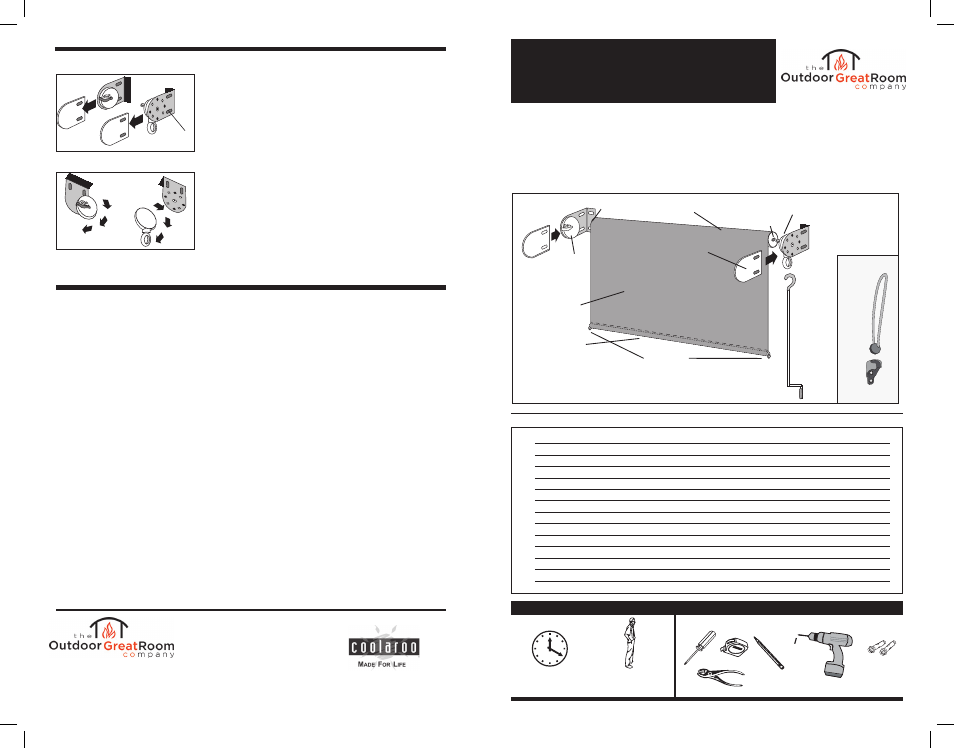
Figure 1
conserVaciÓn
Su persiana solar esta hecha con los materiales mas finos y, cuidada apropiadamente, durará
muchísimo tiempo. Para limpiar su persiana, simplemente enjuague con agua; restregando
con un cepillo muy suave y un jabón o limpiador que no sea muy abrasivo. Favor de no usar
ningún limpiador con base de cloro, ya que esto podría malograr sus persianas. Después de
limpiar, solo enjuague y deje secar. Llámenos si tiene alguna pregunta o problema mecánico.
Favor de no guardar su persiana mojada. Déjela secar al aire libre.
cuidado: el uso de solventes o tintorería abrasiva puede dañar la tela y anular su
garantía
camBiando a montada en el techo
Si usted quiere que su persiana cuelgue encima o en el techo,
necesitara hacer cambios a los soportes antes de instalar su
persiana. Para hacer ese cambio, comience deslizando las
tapas de soporte en el soporte de polea y el soporte parado
(Fig. 10). Quite los cuatro tornillos de los dos soportes. Gire
el soporte del polea 90 grados para que el mecanismo de
polea cuelgue directamente hacia abajo haciendo que el
polea cuelgue en el techo y gire el soporte parado para que la
apertura este enfrente del lado más lejos de la ventana (Fig.
11). Vuelva a poner los tornillos y deslice la tapa de soporte.
Fig. 11
quIte LoS
tornILLoS
Fig. 10
5.04.004.202 02 2013
Approximate Installation Time:
20 minutes
x2
2 people may
be required
cordless sun shade
installation instructions
3/16"
Additional Tools Needed
#6 5/8"
Anchors
(optional)
(optional)
(2) Clutch Plug
(1) Clutch Unit
(4) Chain
(3) Bracket Covers
(5) Bottom
Rail Cap
(6) Tie Downs
(7) Bottom Rail
(8) Shade
(9) Idle
End Unit
(10) Idle End Plug
(11) Aluminum Tube
(2) Clutch Plug
(1) Clutch Unit
(4) Chain
(3) Bracket Covers
(5) Bottom
Rail Cap
(7) Bottom Rail
(8) Shade
(9) Idle
End Unit
(10) Idle End Plug
(11) Aluminum Tube
(12) receiver
(6) Bungee
tie downs
2015 Silver Bell Road, Suite 195
Eagan, MN 55122
1-866-303-4028
outdoorrooms.com