Parts replacement – Nexen MBU-875 930200 User Manual
Page 13
13
FORM NO. L-20134-J-1211
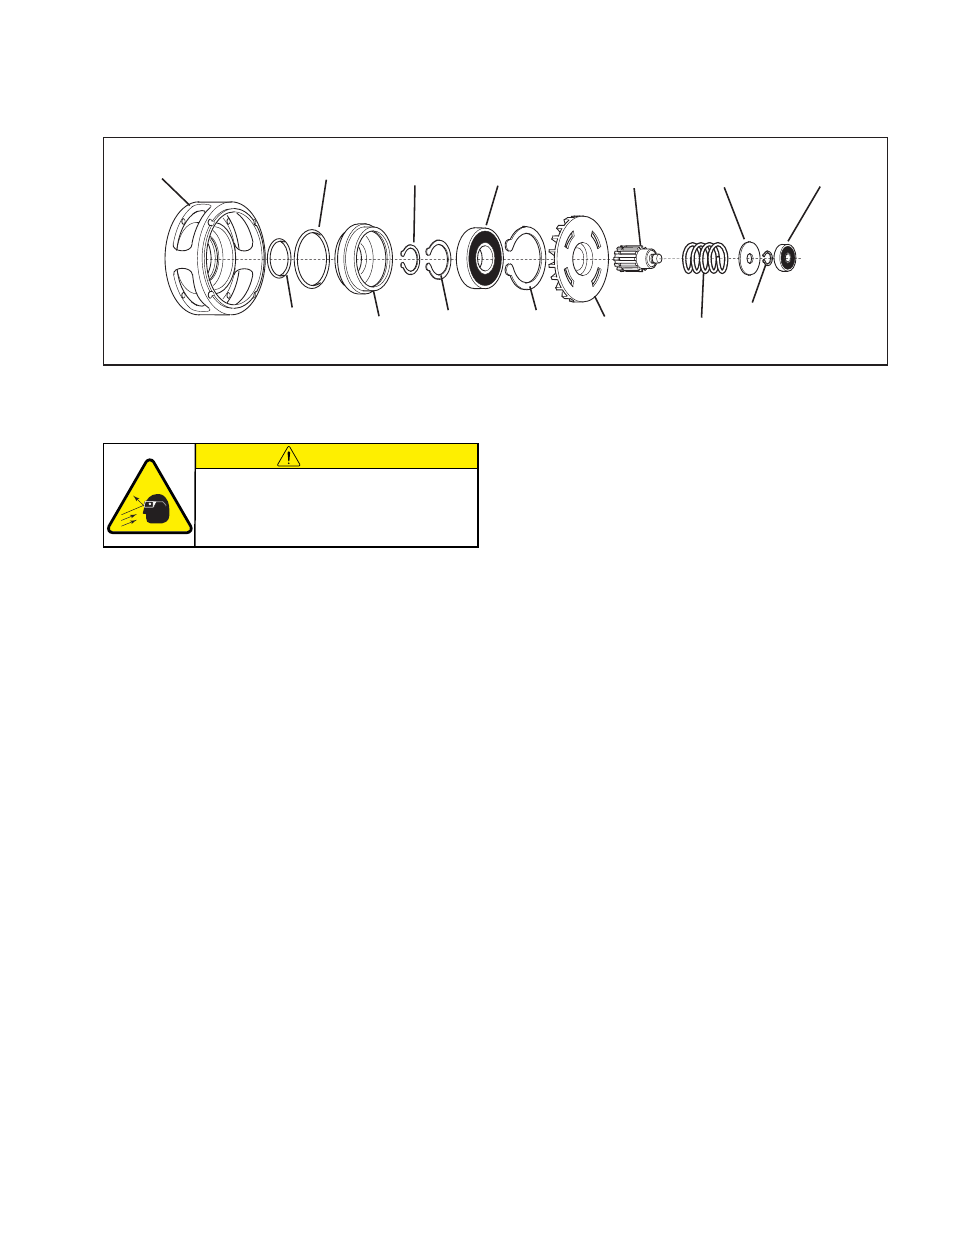
MODULAR DRIVE UNIT (MDU)
Models 625 and 875
1. Remove the old Ball Bearing (Item 27) (See Figure 12).
2. Remove the Retaining Ring (Item 36) from the Hub (Item 6)
(See Figure 12).
3. Slide the Hub (Item 6), Compression Spring (Item 14),
Spring Retainer Washer (Item 16) and Retaining Ring (Item
34) out of the Friction Disc (Item 7) (See Figure 12).
4. Press the Piston (Item 4), Friction Disc (Item 7), and Ball
Bearing (Item 26) out of the Housing (Item 1) (See Figure
12).
5. Remove the old O-ring Seals (Items 41 and 43) from the
Piston (Item 4) and Housing (Item 1) (See Figure 12).
6. Remove the Retaining Ring (Item 37) from the Friction Disc
(Item 7); then, using a bearing puller, remove the Piston (Item
4) and old Ball Bearing (Item 26) from the Friction Disc (Item
7) (See Figure 12).
7. Remove the Retaining Ring (Item 40) from the Piston (Item
4) and press the old Ball Bearing (Item 26) out of the Piston
(See Figure 12).
8. Clean the bearing bore of the Piston (Item 4) with fresh
solvent, making sure all old Loctite
®
residue is removed (See
Figure 12).
9. Apply an adequate amount of Loctite
®
680 to evenly coat
the outer race of the new Ball Bearing (Item 26) and press
the new Ball Bearing into the Piston (Item 4) (See Figure
12).
10. Reinstall the Retaining Ring (Item 40) (See Figure 12).
11. Support the inner race of the new Ball Bearing (Item 26);
then, press the Friction Disc (Item 7) into the Piston (Item
4) and new Ball Bearing (Item 26) (See Figure 12).
12. Reinstall the Retaining Ring (Item 37) (See Figure 12).
13. Lubricate the new O-ring Seals (Items 41 and 43) and the
O-Ring contact surfaces of the Piston (Item 4) and Housing
(Item 1) with a thin film of fresh O-Ring lubricant (See Figure
12).
14. Install the new O-Ring Seals (Items 41 and 43); then, slide
the Piston (Item 4) and Friction Disc (Item 7) into the Housing
(Item 1) (See Figure 12).
15. Inspect the Compression Spring (Item 14) for signs of fatigue
and replace it if necessary (See Figure 12).
16. Apply a thin film of Never-Seez
®
to the splines of the Hub
(Item 6); then, slide the Hub, Compression Spring (Item 14),
Spring Retainer Washer (Item 16) and Retaining Ring (Item
34)into the Friction Disc (Item 7) (See Figure 12).
17. Reinstall the Retaining Ring (Item 36) (See Figure 12).
18. Slide a new Ball Bearing (Item 27) onto the Hub (Item 6)
(See Figure 12).
FIGURE 12
14
27
16
34
6
7
40
26
37
36
4
43
41
1
PARTS REPLACEMENT
(continued...)
CAUTION
Special attention should be exercised
when working with retaining rings. Always
wear safety goggles when working with
spring or tension loaded fasteners or
devices.