Assembly instructions 3/3, Step 3 – Home Styles 5060-94 User Manual
Page 4
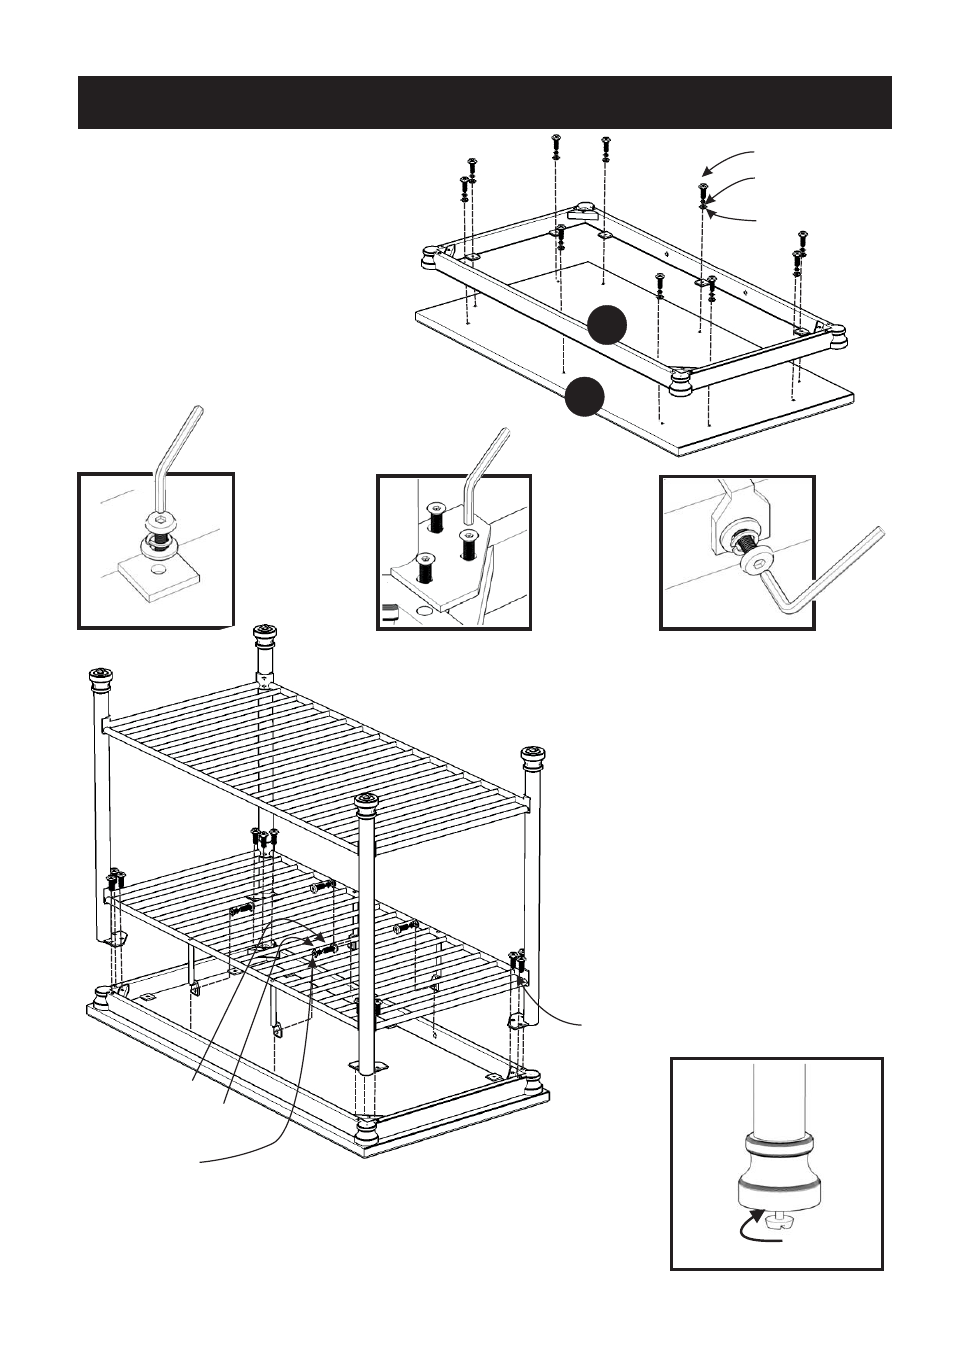
Assembly Instructions 3/3
To level the unit, adjust the adjustable
levelers on the bottom of unit. (see Figure 6)
B
STEP 3
Attach the base unit on to Top unit
with Head Cap Bolts (short) and Flat
Washers, Spring Washers, Head Cap
Bolts. (see Figure 4), (see Figure 5)
Tighten all bolts completely.
Turn the unit over to its’ upright
position.
(Figure 6)
Head Cap Bolt (short)
Note: Unit must be level to work properly.
Spring Washer
Flat Washer
(Figure 3)
(Figure 4)
(Figure 5)
STEP 3
Place Top (A) upside down on a soft cloth.
Attach the Apron Frame (B) to Top (A)
with Flat Washers, Spring Washers and
Head Cap Bolts. (see Figure 3)
A
Head Cap Bolt
Spring Washer
Flat Washer
Head Cap Bolt
See also other documents in the category Home Styles Kitchen:
- 9200-1611 (5 pages)
- 9200-1411 (5 pages)
- 9200-1211 (5 pages)
- 9200-1111 (5 pages)
- 9100-1711 (5 pages)
- 9100-1611 (5 pages)
- 9100-1411 (5 pages)
- 9100-1211 (5 pages)
- 9100-1111 (5 pages)
- 9001-0711 (5 pages)
- 9001-0611 (5 pages)
- 9001-0411 (5 pages)
- 9001-0211 (5 pages)
- 9001-0111 (5 pages)
- 5257-95 (5 pages)
- 5254-95 (5 pages)
- 5252-95 (5 pages)
- 4508-95 (5 pages)
- 5520-958 (2 pages)
- 5061-95 (4 pages)
- 5134-95 (4 pages)
- 5411-61 (3 pages)
- 5411-615 (3 pages)
- 5033-94 (2 pages)
- 5033-94 (6 pages)
- 5033-958 (2 pages)
- 5010-948 (7 pages)
- 9100-1077G (5 pages)
- 9100-1071 (4 pages)
- 9100-1066G (5 pages)
- 9100-1027G (5 pages)
- 9100-1072 (4 pages)
- 9100-1023 (4 pages)
- 9001-0066G (5 pages)
- 9001-0047G (6 pages)
- 5588-948 (2 pages)
- 5588-948 (9 pages)
- 5543-948 (2 pages)
- 5543-948 (9 pages)
- 5542-948 (2 pages)
- 5542-948 (9 pages)
- 5181-64 (5 pages)
- 5180-64 (5 pages)
- 5033-358 (1 page)
- 5020-65 (6 pages)