Xpres Subli-Print Epson 1400: Manual User Manual
Page 2
SUBLI-PRINT
®
EPSON STYLUS 1400
INSTRUCTION MANUAL
CONTENTS
Driver Installation and set up
Installing and setting up the Epson Stylus 1400 printer
p3
CorelDRAW set up
Installing and setting up the Xpres
Subli-Print colour profile
p4-5
Printing
Printing with the Xpres Subli-Print colour profile
p5-6
Bulk Feed System
Installing the Subli-Print bulk feed system
p7
Templates
Working with CorelDRAW sublimation templates
p11
Tips on using templates
p12
Sublimation ink
Tips on using Subli-Print ink
p12
Sublimation paper
Sublimation paper usage and tips
p12
CorelDRAW
Introducing CorelDRAW and its tools
p13
CorelDRAWs most common tools
p14
Common CorelDRAW tasks
p14
Printables
Sublimation printables hints and tips
p15
Troubleshooting
General troubleshooting and tips
back cover
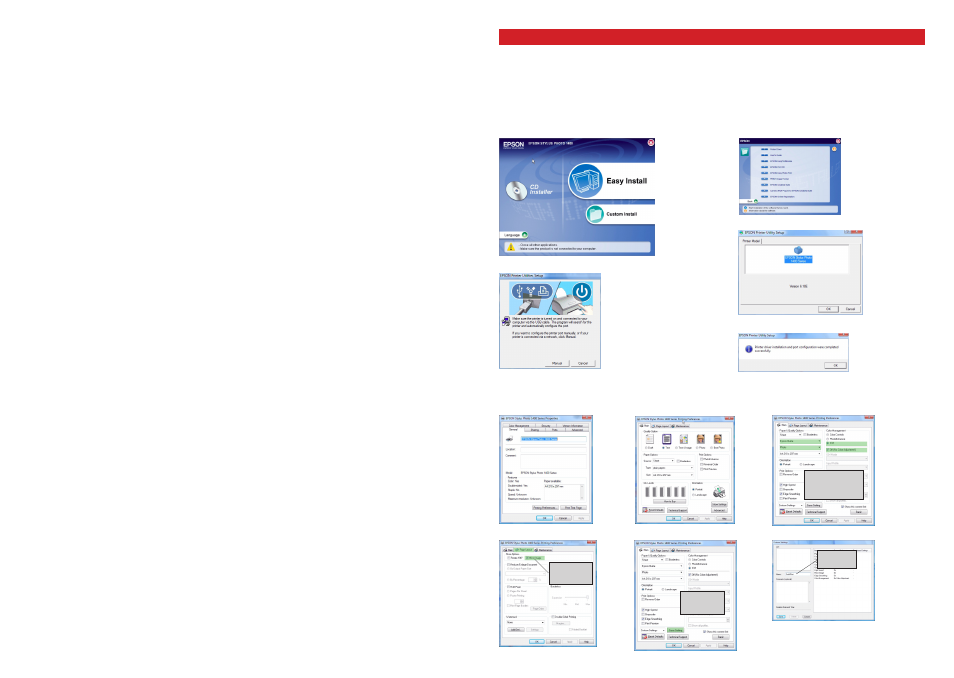
Insert the Epson Stylus 1400 software CD-ROM into your CD-ROM drive. The CD will auto run. Select ‘Custom Install’ from
the menu, as in
diagram 1
below. When
diagram 2
appears click ‘Printer Driver’. It will display
diagram 3
, click OK and it will
copy files to your computer. Make sure the USB cable is connected to the PC and printer, then turn on the printer as
instructed in
diagram 4
. After the utility has found your printer it will confirm this as in
diagram 5
. The Epson Stylus 1400 has
now been successfully installed. Click OK.
Now follow the Epson Stylus 1400 driver setup below.
diagram 1
diagram 2
Browse to the Printers and Faxes folder. Right click on the Epson 1400 printer and click on ‘Properties’.
Click on ‘Printing preferences as in
diagram 6
, then follow the diagrams below.
Installing & Setting up the Epson 1400 printer
diagram 4
*
diagram 3
diagram 5
*
*
*
diagram 6
*
diagram 9
*
1
*
2
click mirror
image
diagram 7
*
diagram 8
*
1
3
*
*
1
Epson Matte
2
Photo
3
ICM
4
Off (no colour adjustment)
2
4
diagram 10
*
1
click save
setting
*
2
diagram 11
name it
Subli-print
*
Click ‘Save’ then click OK until
all open boxes are closed.
2
3