Quick start guide, Aha electrode placement, Iec electrode placement – Welch Allyn Cardio Perfect Resting ECG - Quick Reference Guide User Manual
Page 2: 3 prepare your patient, 4 connect electrodes 5 create a new patient, 7 review data and print report, 6 record a test
1 Install Software and USB Drivers
2 Connect your Recorder
•
Connect the PC interface cable (ProLink) to a USB port on your computer.
•
Connect the other end to the black connector on the recorder.
•
Connect the patient cable to the blue connector on the recorder.
3 Prepare Your Patient
The quality of an ECG is dependent on the preparation and the resistance
between the skin and the electrode. To ensure a good quality ECG and
minimize the skin/electrode resistance, remember the following points:
•
Ensure that the patient is warm and relaxed.
•
Shave electrode area before cleaning.
•
Thoroughly clean the area with alcohol.
•
Let dry prior to applying electrodes.
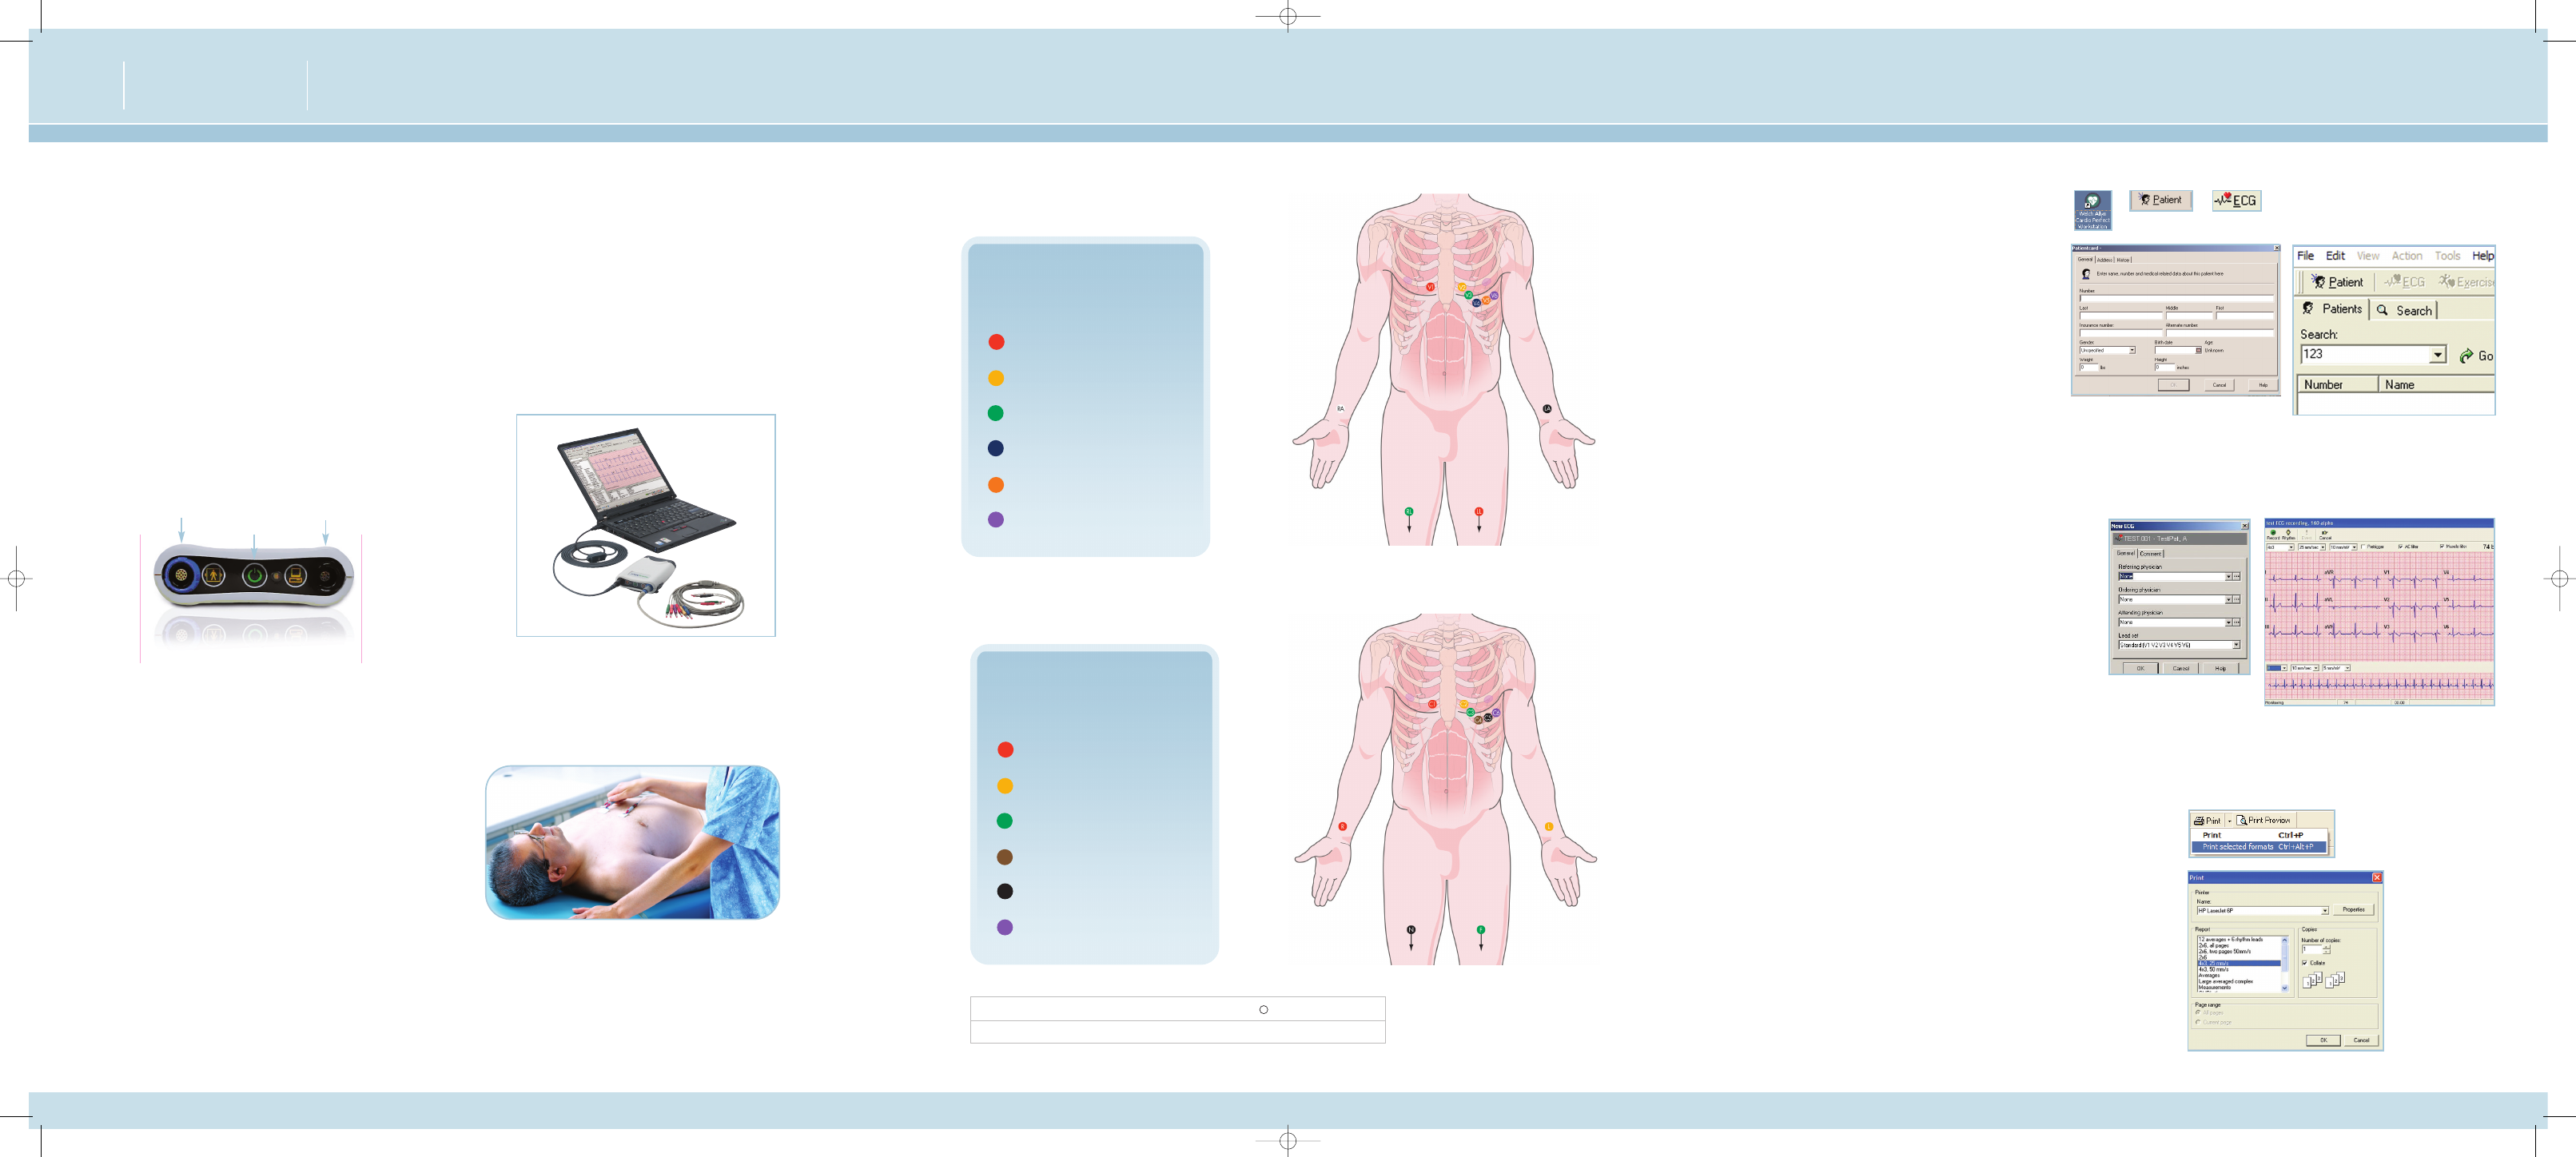
4 Connect Electrodes
5 Create a New Patient
•
Open the CardioPerfect Workstation Software.
•
Select Patient.
•
Fill in Patient Card.
•
Click on the ECG Icon.
•
To select a patient from the database:
1. In the Search box, type parts of the patient
name or number.
2. Click the Go button.
3. Click on the patient for whom you want to
record the test.
7 Review Data and Print Report
•
You can choose from multiple ECG report templates.
•
If automatic printing is checked in the ECG Print settings,
the report will print now.
•
If you did not select Automatic printing in the Settings,
click on the down arrow next to the Print icon and choose
“Print Selected Formats” to initiate printing.
•
If you just want to print one type of report, click on the
Print icon, and select the desired report page.
This Quick Start Guide is intended for use with CardioPerfect Workstation
version 1.6.0 or higher. For complete directions for use and warnings, please
consult your user manual located on the software CD.
AHA Electrode Placement
RA and LA electrodes should be placed on
the wrists.
RL and LL electrodes should be placed a
few inches above the ankle.
V1
Fourth intercostal space at
the right border of the sternum
V2
Fourth intercostal space at
the left border of the sternum
V3
Midway between locations
V2 and V4
V4
At the mid-clavicular line in
the fifth intercostal space
V5
At the anterior axillary line on
the same horizontal level as V4
V6
At the mid-axillary line on the
same horizontal level as V4 and V5
6 Record a Test
Select physician names and lead configuration, and click OK.
Auto ECG
•
Click the Record button to start a 12-lead resting ECG.
Rhythm/Manual ECG
•
Click the
Rhythm
button to start a recording of up to 300 seconds.
•
Click
Event
button to mark areas of interest.
•
Click the
Rhythm
button a second time to stop the rhythm recording.
•
Click the
Cancel
button to cancel.
Note: The pretrigger option helps catch events by already saving
5 seconds of traces before you start the recording.The notch filter
removes noise that is caused by AC power interference.
C A R D I O P E R F E C T
™
P C - B A S E D E C G
QUICK START GUIDE
Patient Cable Connection
PC Interface Connection
On/Off Switch
AAMI
IEC
V1
●
C1
●
V2
●
C2
●
V3
●
C3
●
V4
●
C4
●
V5
●
C5
●
V6
●
C6
●
RA
●
●
R
●
LA
●
L
●
RL
●
N
●
LL
●
F
●
IEC Electrode Placement
R and L electrodes should be placed on
the wrists.
N and LF electrodes should be placed a
few inches above the ankle.
C1
Fourth intercostal space at
the right border of the sternum
C2
Fourth intercostal space at
the left border of the sternum
C3
Midway between locations
C2 and C4
C4
At the mid-clavicular line in
the fifth intercostal space
C5
At the anterior axillary line on
the same horizontal level as C4
C6
At the mid-axillary line on the
same horizontal level as C4 and C5
MC3817 CardioPerfect ECG QSG 7/23/07 4:50 PM Page 4