Torque cell calibration – Dynojet 250: Torque Module User Manual
Page 18

Torque Module Installation and User Guide for Model 250 Dynamometers
C H A P T E R 2
Torque Cell Calibration
2-2
. . . . . . . . . . . . . . . . . . . . . . . . . . . . . . . . . . .
TORQUE CELL CALIBRATION
The Torque Module must be calibrated prior to use. Follow the directions on the
screen exactly. Failure to perform the directions accurately will result in improper
torque values.
1
Verify you are in the MakeRun screen.
2
Verify you are connected to the dyno electronics.
Note: For more information on connecting to the dyno electronics, refer to the
WinPEP 7 User Guide (on your WinPEP CD or at
www.dynojet.com/manuals.shtml) or the WinPEP 7 Online Help.
3
Select Tools
MakeRun Options
Torque Cell Calibration.
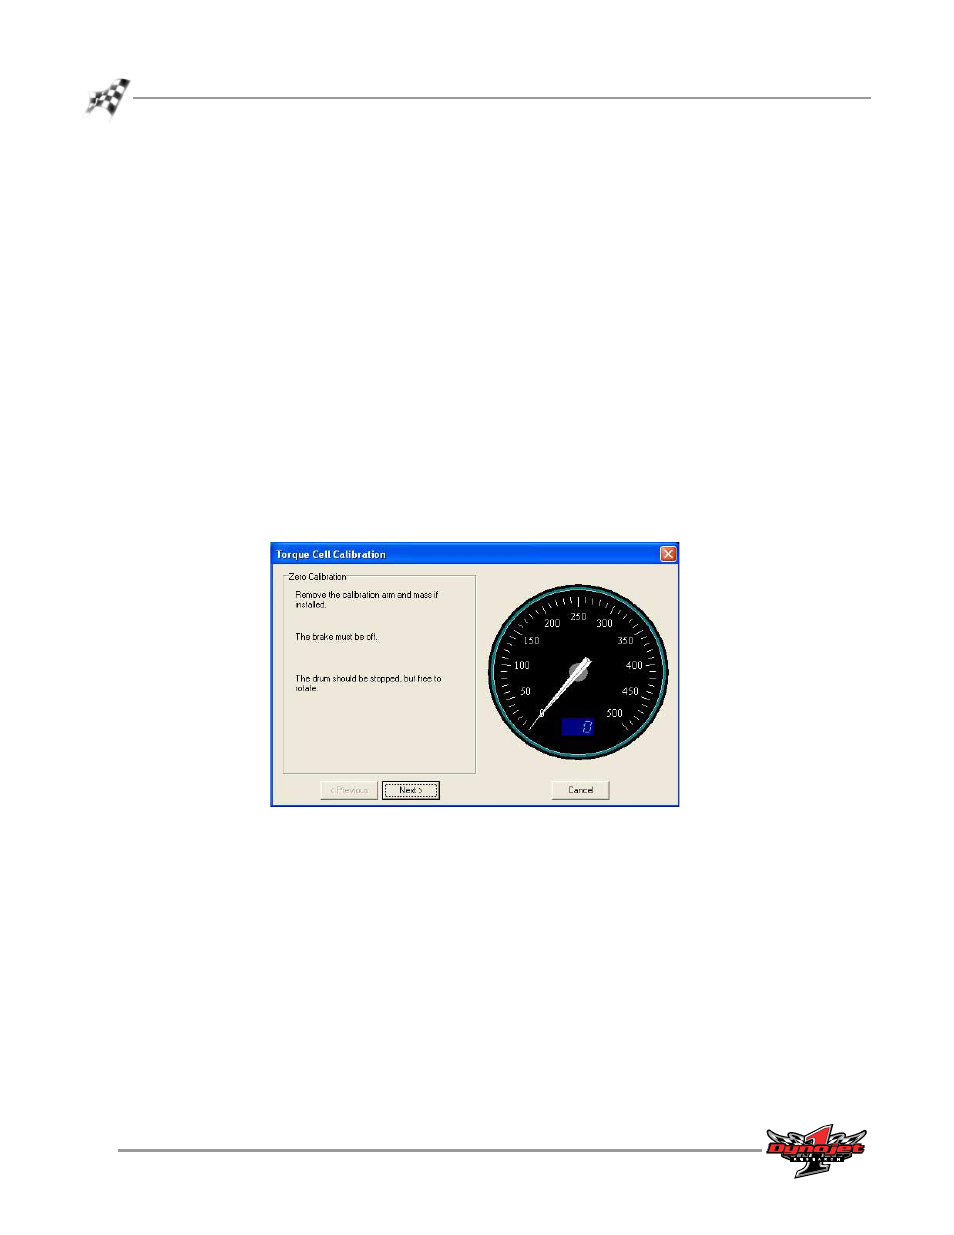
Note: Before proceeding, be sure the eddy current brake is free and clear of any
obstructions. There should not be anything resting on the eddy current brake or
the dynamometer drum during this procedure.
4
Click Next to perform the Zero Calibration.
The Calibration window will appear. The hardware is now zeroing out the torque
cell. If the unit does not calibrate, recheck the setup and retry.
Figure 2-1: Zero Calibration Window
- 150: Kart and ATV Dynamometers (44 pages)
- 150: Dyno Drum Cover for Kart and ATV Dyno Motorcycle Option (3 pages)
- 150: WinPEP 7 (170 pages)
- 168: Eddy Current Brake (27 pages)
- 200: Eddy Current Brake (45 pages)
- 200: Replacing the Starter Ring Gear (7 pages)
- 200: Safety Switch (3 pages)
- 200: DynoWare EX+ Upgrade Installation Guide for Motorcycle Dynos (20 pages)
- 200: Throttle Stop (3 pages)
- 200: Eddy Current Brake Driveline Upgrade (17 pages)
- 200i: High Pressure Blower (20 pages)
- 200: Installation Guide (73 pages)
- 200i: Pit Installation Guide (154 pages)
- 200i: Pre-Installation Guide (52 pages)
- 200i: Installation Guide (184 pages)
- 200i: Air Brake and EEC Kit (40 pages)
- 200i: Dynamometer Wiring Schematic (2 pages)
- 200i: Folding Ramp (15 pages)
- 200i: Control Panel Interface Upgrade (S/N 201xxxx) (31 pages)
- 200i: Control Panel Interface Upgrade (S/N 202xxxx) (29 pages)
- 200i: Motorcycle Exhaust Extraction System Drawings (18 pages)
- 200iP: Pit Installation Guide (148 pages)
- 200iPX: Installation Guide (52 pages)
- 200iPX: Installation Guide (163 pages)
- 200ix: Pit Installation Guide (163 pages)
- 200ix: Extended Carriage and Trike Adapter Assembly (15 pages)
- 200iX: Upgrade Installation Guide (56 pages)
- 200ix: Extended Carriage with Trike Adapter Assembly (13 pages)
- 224: CE Package (17 pages)
- 224: Maintenance Guide (35 pages)
- 224: Installation Guide (78 pages)
- 224/4WD: Installation Guide (77 pages)
- 224: Pit Installation Guide (56 pages)
- 224x: Above Ground Four Post Lift Dimensions (1 page)
- 224x: Pre-Installation Guide (63 pages)
- 224x: 4WD Dyno Air and Wiring Schematic (2 pages)
- 224: Eddy Current Brake (73 pages)
- 224: Pit Eddy Current Brake (69 pages)
- 224xLC2: Quickstart guide for DWRT (2 pages)
- 248: Pit Installation Guide (74 pages)
- 248: Installation Guide (58 pages)
- 248: DynoTRAC User Guide with Variable Brake (14 pages)
- 248: DynoWare EX+ Upgrade (22 pages)
- 248: Optical RPM Sensor (22 pages)
- 248: Proportional Air Brake (21 pages)