Setting blocks, Side panel, Jamb – Coral Industries Style Swing Door/ILP (1/4 Frameless) - 670 User Manual
Page 4: Magnetic door stop, Push / pull handle kit
670 7/09
Cut vinyl door seal
to fill area between
sill and 2” below
center mark.
Setting blocks (X) are used in sill to provide a resting
surface for panel glass. On panel side of unit, place one
setting block in sill at edge of wall jamb. A second setting
block should be placed in sill to support other corner of panel
glass once glass in placed in unit. Measure panel glass and
position remaining setting block accordingly.
Place panel glass in wall jamb with bottom of glass resting
on setting blocks in sill, and side of glass seated in wall
jamb 3/8".
X
Setting
Blocks
OUTSIDE OF
SHOWER
Panel Glass
A
Sill
Jamb
B
The following instructions call for glass to seat in
verticals 3/8". This distance may be adjusted
from 1/4" - 1/2" to accommodate out-of-plumb walls
and allow for a better fit of parts.
5
Setting Blocks
(X)
/ Side Panel
Jamb
B
Jamb
B
Jamb
B
Setting Blocks
X
Panel Glass
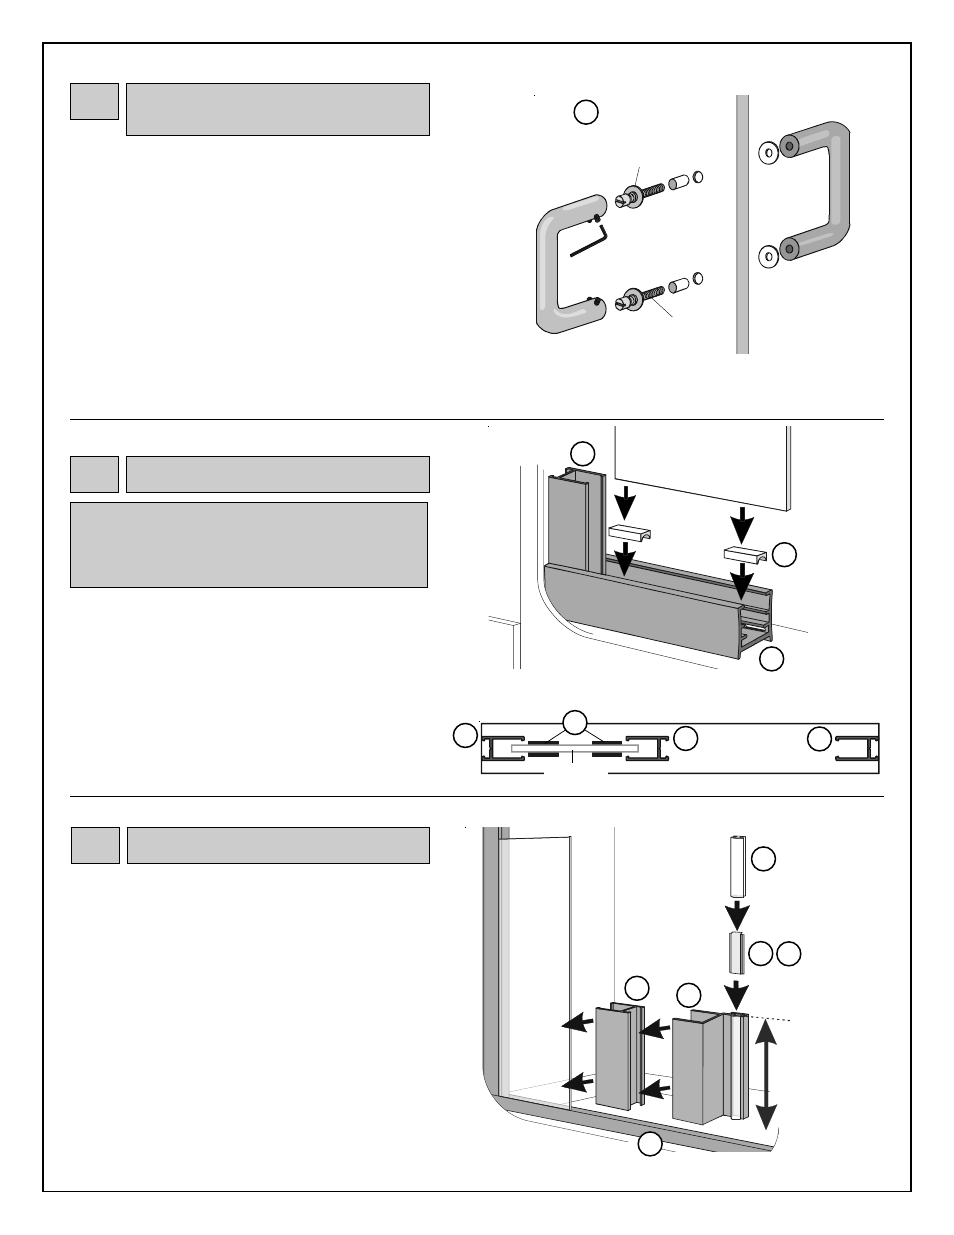
Place remaining jamb over panel glass with long legs of
jamb fitting over edge of glass 3/8", and bottom of jamb
seated in sill.
Vinyl door seal (F), in magnetic door stop (E), must be
removed from channel, trimmed into two pieces, and replaced
with metal slide (magnetic catch kit (K) or magnetic pull
handle kit (M)) in between vinyl pieces.
Mark center of magnetic door stop. Trim vinyl seal to fill
open channel of door stop from sill to 2” below center mark.
Reinsert cut vinyl into channel. Follow with metal slide and
remaining piece of vinyl. Trim vinyl flush with door stop.
Slide magnetic door stop over jamb, with bottom of door
stop seated in sill and vinyl door seal facing outside of
shower.
B
Jamb
E
Magnetic
Door Stop
OUTSIDE OF
SHOWER
F
Vinyl Door Seal
faces outside
of shower
6
Jamb
(B)
/ Magnetic Door Stop
(E)
4b
Push / Pull Handle Kit
(J)
Freestyle Series
Push / Pull handle kit (J) comes with parts assembled in the
order they will be once installed on glass. Disassemble parts.
Place bushings in holes in glass. Trim as needed so that
bushings are flush with surface of glass. Place one plastic
washer on each connector screw and insert screws (from
inside surface of glass) through bushings in glass.
Place second plastic washer on exposed end of connector
screws on outside surface of glass. Holding exterior handle in
place on outside surface of glass, tighten connector screw to
secure handle.
On inside surface of glass, slip interior handle over connector
screws and tighten with 3/32" allen wrench.
Exterior
Handle
Plastic
Washer
Handle
Connector
Screw
Bushing
Plastic
Washer
INSIDE OF SHOWER
3/32 Allen
Wrench
Interior
Handle
Push/Pull Handle Kit
J
Sill
A
K
Metal Slide
M