Permanent mounting – Code 3 21TR & 21TR Plus User Manual
Page 4
4
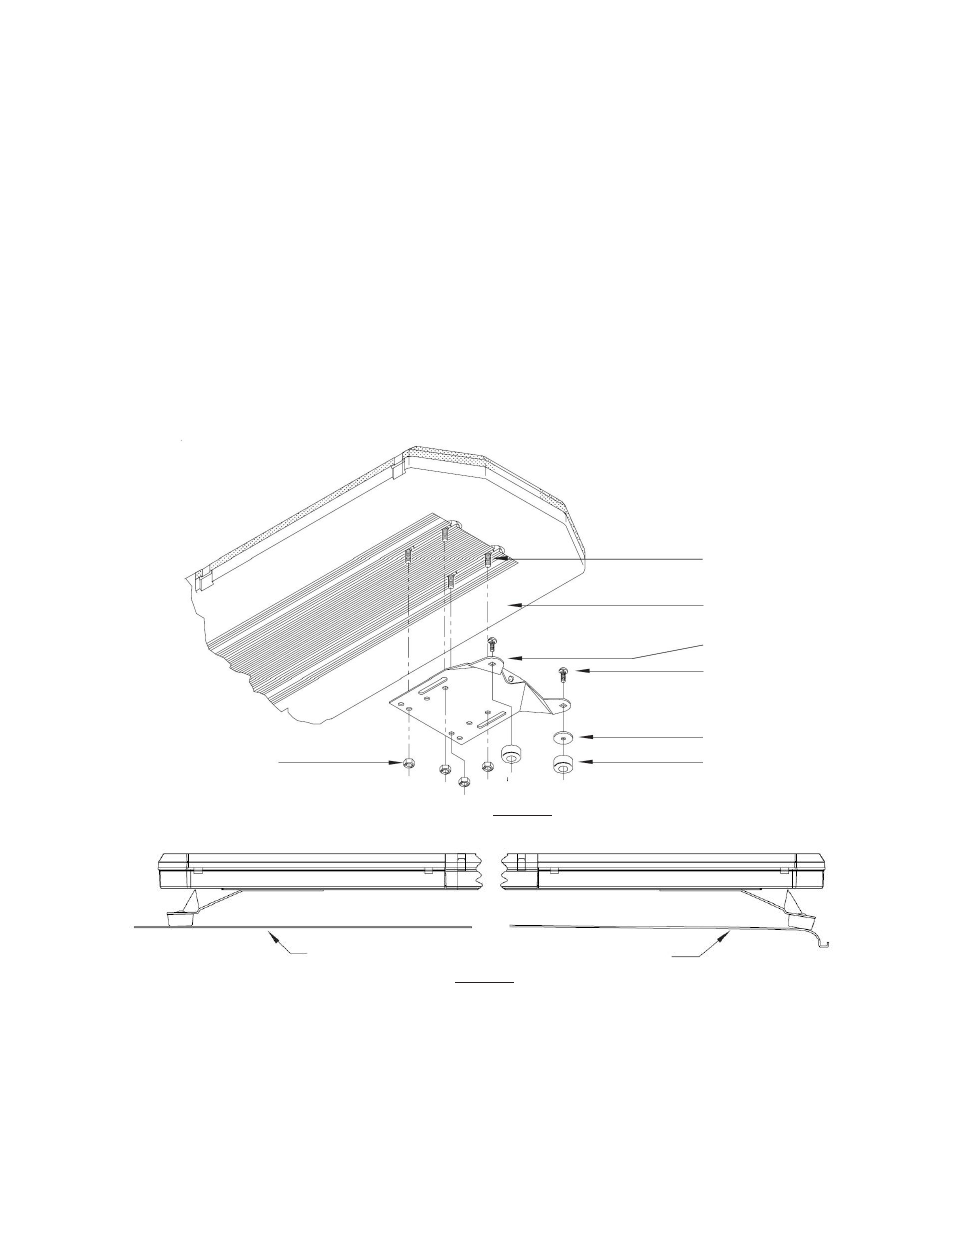
Mounting Bracket
5/16-18 Carriage Bolt
Customer Supplied Bolt
Plastic Shim (if needed)
Rubber Foot
5/16" Nut
FIGURE 3
Bottom of Lightbar
NOTE: Tighten only until the bar is secure (bar does not move when bumped sharply with the heel of the palm). It is NOT necessary to
dimple the roof to obtain a stable attachment. If the light bar "bows" more than 3/16" (determined by placing a straightedge along the
front, bottom part of the frame and measuring downward at the center of the frame), loosen the 5/16" trim nut sightly.
Re-Installation: When moving a light bar from one vehicle to another, we suggest that new rubber feet be used. These are standard
hardware items, and can usually be found at any hardware store, or can be ordered from the factory. The special hooks are stainless
steel and should be saved and reused. Mounting kit parts are available to permit remounting on vehicles of different design or make.
Consult your local dealer or Code 3 , Inc. for detailed information.
Permanent Mounting
Typical Mounting: Refer to Figure 3. Place the light bar upside down on a table or other work surface, being careful not to scratch
the lenses. Slide the 5/16" carriage bolts into the frame. Secure the mounting brackets finger tight so they support the weight of the
light bar. Place the unit on the roof of the vehicle. Place a soft pad in the center of the roof to protect the paint. The mounting brackets
must be placed so that they are resting on the curved section of the roof, see Figure 4. This is the strongest part of the roof. Once
the light bar is centered, tighten mounting brackets to light bar. Using a tape measure and a level, center the light bar from side
to side and locate a position of the roof where the light bar is level. The shims provided may be used here to help level the light
bar. Also, the tabs on the mounting bracket may be bent at any angle to match the curvature of the roof (see Figure 4).
FIGURE 4
Once the light bar is level and centered, mark the holes through the mounting tabs and remove the light bar from the vehicle. Make
sure that the drill will not damage anything when penetrating the roof. Drill the mounting holes and remove any burrs. Attachment
can be made using 1/4" cap screws, toggle bolts, or other fasteners as may be convenient. Use sealant as necessary to prevent water
leakage into the vehicle.
Curved Roof
Flat Roof
Place Feet on
Curved Portion