Fuel tps rpm btn, 040 off off n2o – BoonDocker POLARIS: Non-turbo Control Box 2011-12 PRO RMK 800 User Manual
Page 14
BoonDocker Performance – 2379 Heyrend Way, Idaho Falls, ID 83402 – 208-542-4411 / 877-522-7805
www.boondockers.com – email:
– fax: 208-524-7381
Revised 1-20-11
Copyright © 2011 Boondocker
Page 14 of 17
Be sure that this description matches your actual nitrous system. Some internal settings and some user menus and settings
are affected by this configuration. Do not attempt to run a Non-regulated nitrous setup with the Control Box in ADJ
mode or a Regulated nitrous setup in NON mode! Go to the SetUp menu (under the MAP Menu) to change this setting.
If you do not have nitrous capability, then this configuration does not matter.
The fuel adjustment setting in the N2O menu is used to control how much fuel is added during nitrous use. The nitrous
pressure transducer input is used to automatically scale the fuel adjustment up or down from this base setting according to
nitrous pressure. However, you still must go through the nitrous tuning procedure before you can safely use nitrous.
Warning: Only adjust the control Box settings according to the steps below. The best way to tune an engine is
with the use of an oxygen sensor and gauge (available from Boondocker). This adjustment process should only
be performed by an experienced tuner. If you are not an experienced tuner, find someone who is. Remember,
safety first!
The steps below should be performed with a full nitrous bottle. On systems without a nitrous pressure regulator, make sure
the bottle is at proper operating temperature (70-90deg F) and pressure (700-1000psi). Make sure the engine is at normal
operating temperature.
*** Do not exceed 2 seconds of nitrous use until the fuel adjustment is complete and correct! ***
1. First configure the nitrous system for Button use. Section VI describes different ways to configure your system
for nitrous activation, but we’re going to shortcut that for now.
Select N2O from the Main Menu, move the cursor so it is under Btn and press the Up Arrow until N2O appears.
Press “SEL” to return you to the Main Menu. Select N2O from the Main Menu again. Look at the N2O Menu
to be sure that TPS and RPM are turned OFF.
N2O Menu for Button Activation for initial Nitrous Tuning:
Fuel TPS RPM Btn
040 OFF OFF N2O
2. Follow this step only if you have an adjustable N2O pressure regulator: Select N2O from the Main Menu. With
the cursor under Fuel, when you press the up, down, or “SEL” key, the following menu appears:
340 180psi FDly
050 025 000
•
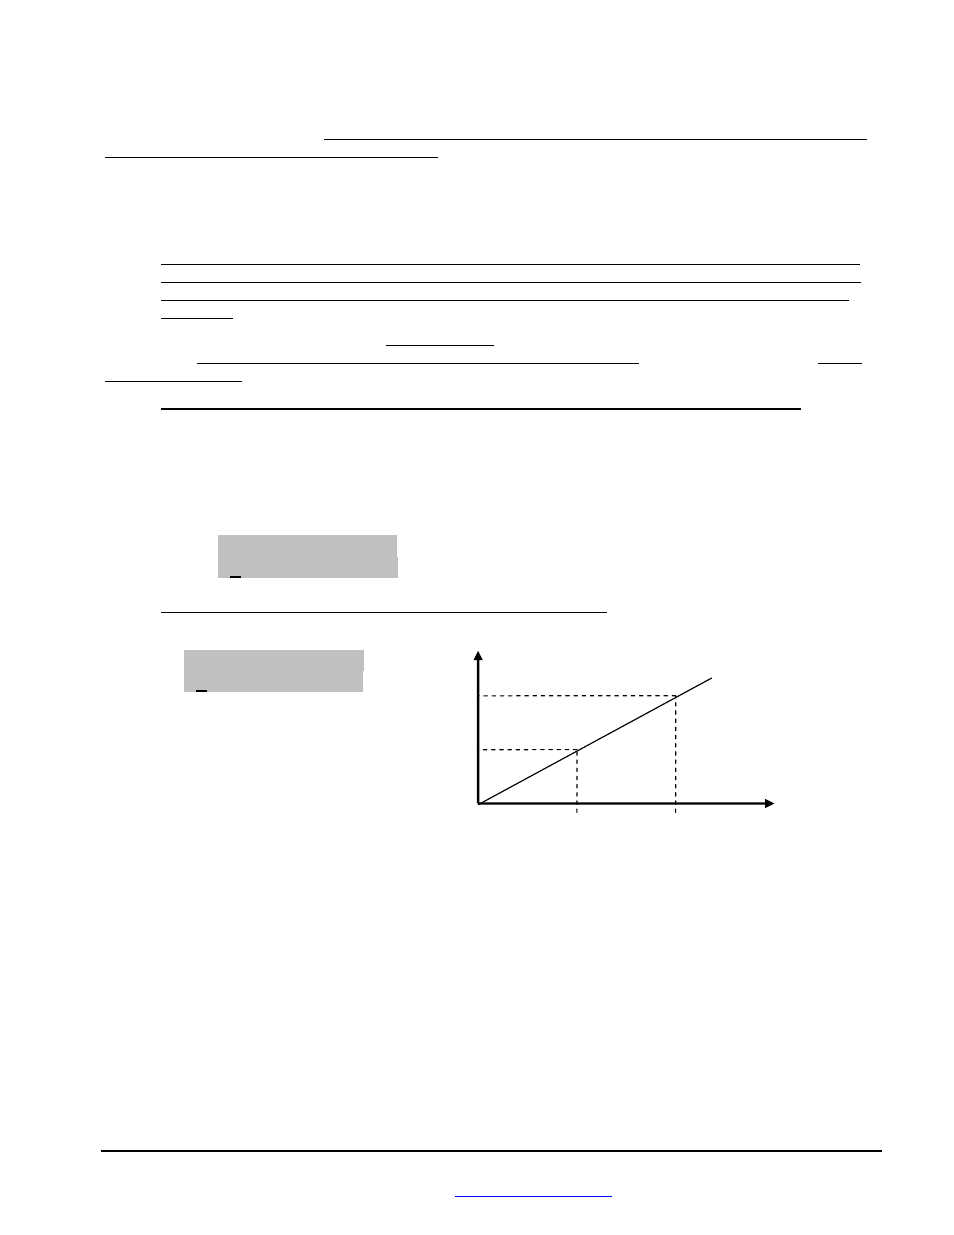
The 340 and 180 fuel settings are
used to create a Fuel Adjustment
Line (see graph) which allows
nitrous fuel to be automatically
adjusted according to N2O
pressure. Raising or lowering
either of these values will change
the slope of the line.
Description of N2O Fuel Screen for ADJ regulator:
340 050
High N2O pressure fuel setting (fuel adjustment is centered at 340psi)
180 025
Low N2O pressure fuel setting (fuel adjustment is centered at 180psi)
Adjust the low pressure (180psi) Fuel setting first. Set your regulator pressure to 180psi +/-20psi (approximately 1
3/4 turns out on the adjustable regulator knob). The actual N2O pressure will be displayed after nitrous has been
activated in the upper right of this screen.
Increase the low pressure (180) nitrous Fuel adjustment on the Control Box until you notice a drop in the power
increase when using nitrous. Oxygen, EGT, and rpm readings can be used to help determine when you are too rich.
Be sure you have reached this point before proceeding to the next step. Note this adjustment setting.
N2O Pressure/PSI
N2O Fuel Adjustment Line is determined by
the 180 and 340 fuel settings
50
25
180
340
Fuel
Adjust