Alumax L-RTSZ24 User Manual
Page 9
9
INSTRUCTION MANUAL
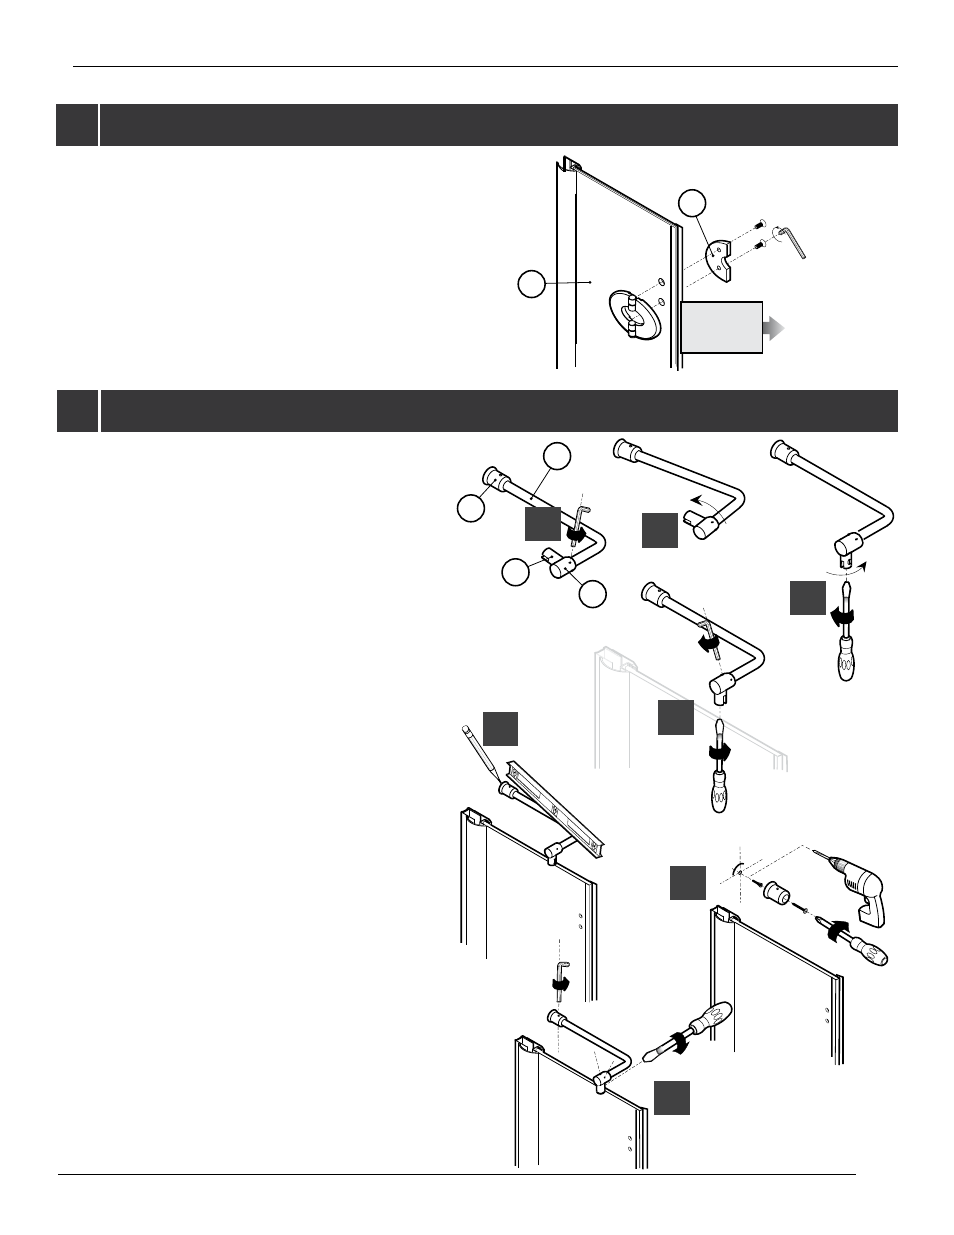
INSTALL THE HINGES.
5
FASTEN THE SUPPORT BAR.
6
5A.
Fasten one side of the hinges (#5) to the fixed panel.
Do not tighten all the way for this step to allow other
door adjustments.
6A.
Loosen the set screws located in the connector (#1c).
6B.
Pivot the connector to orient the glass clip (#1d)
towards the fixed panel.
Unscrew the glass clip. Align the slotted hole to the
fixed panel. The slotted screw head should be on the
inside of the shower.
Tighten all the screws.
6E.
Rest the support bar (#1) on the fixed panel inside
the tub. Level it and trace an arc on the wall.
6F.
Locate the screw position using the cylindrical part.
With a 1/4˝ drill bit, drill a hole in the wall and insert a
wall plug (#10).
6G.
Put the bar back in place. Tighten all the screws.
3
5
6D.
INTERIOR
SHOWER SIDE
1a
1b
1d
1c
6A
6B
6C
6D
6E
6F
6G
- 300c (9 pages)
- 300cv (8 pages)
- 300d (9 pages)
- 338 (9 pages)
- 340 (9 pages)
- 340 Deluxe (9 pages)
- 390c Supplement (5 pages)
- 390cv Supplement (4 pages)
- 391 (12 pages)
- 392 (11 pages)
- 393 (11 pages)
- 394 (11 pages)
- 640S (8 pages)
- 640 (8 pages)
- 640D (7 pages)
- 641 Side Panel (6 pages)
- 694 (6 pages)
- 700c (7 pages)
- 733 (8 pages)
- 738 (8 pages)
- 738 Towel Bar (1 page)
- 740D (8 pages)
- 790c Supplement (4 pages)
- 791 (11 pages)
- 792 (12 pages)
- 793 (12 pages)
- 793 Buttress Supplement (1 page)
- 794 (11 pages)
- 794s (9 pages)
- 795 (10 pages)
- 890 (9 pages)
- 890c (8 pages)
- 1040 (9 pages)
- Deluxe Towel Bar (1 page)
- Transportation Latch (1 page)
- DesignLine Hinge (5 pages)
- P-DR1W-48-60 (14 pages)
- P-DR1W-72 (15 pages)
- P-DR1WT-60 (14 pages)
- P-DR2W-48-60-CRP (18 pages)
- P-DR2W-48-60-CW (19 pages)
- P-DR2W-72-CRP (19 pages)
- P-DR2W-72-CW (19 pages)
- P-DR3W-60 (32 pages)
- P-DRA1Y (16 pages)