To install the shifter lever knob, To install headlight, Assembly – Craftsman 536.885020 User Manual
Page 9
Attention! The text in this document has been recognized automatically. To view the original document, you can use the "Original mode".
ASSEMBLY
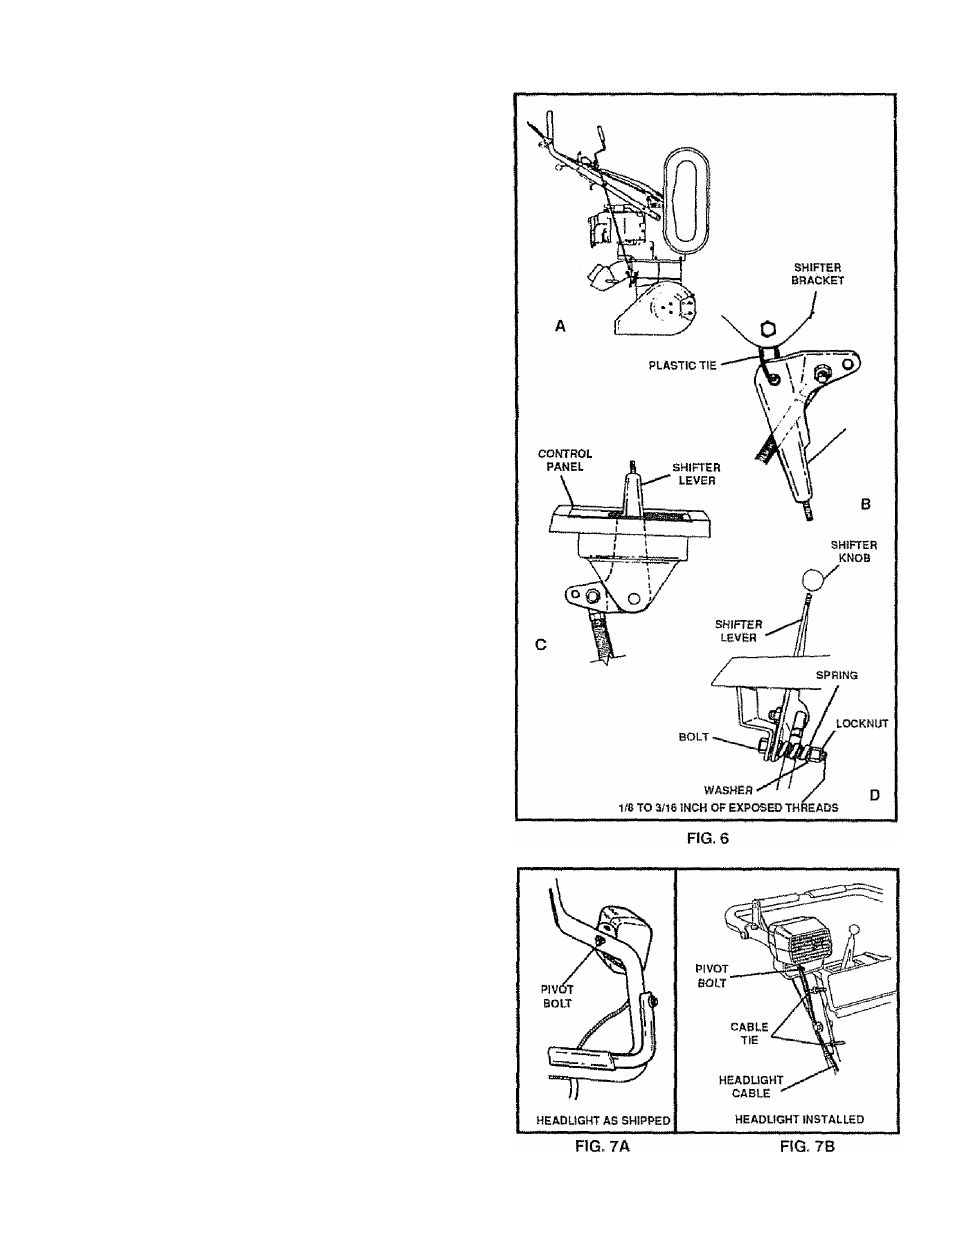
TO INSTALL THE SHIFTER LEVER
KNOB
® Stand the snow thrower up on the front of the auger
housing, as shown in Fig 6A,
@ Cut the plastic tie which holds the shifter lever
assembly to the shift bracket {Fig 5B).
» Fiemove the locknut, washer, spring and bolt {Fig,
60).,
# Reposition the shifter iever into the slot in the
control panel, as shown in Fig, 6C and reinstall the
bolt, spring, washer and locknut.
a Tighten the locknut untii 1/8" to 3/16" (2 or 3 threads)
of the bolt protrude past the locknut,
a Thread the shifter lever knob onto the threaded end of
the shifter lever until it ¡slight (Fig. 6D)
a Move the shifter lever through ali the speeds to ensu re
proper tension of the spring., if the shifter lever sticks
in any of the notches, loosen the locknut 1/4 turn at a
time until the shifter lever moves freely,
TO INSTALL HEADLIGHT
The headlight is mounted on right side of upper handle and
is installed upside down for shipping purposes
@ Remove the pivot bolt (Fig. 7A). place headlight in
correct position (as shown in Fig. 7Band in Fig 2) and
retighten nut.
® Tie the headlight cable to upper and lower handles
with the plastic cable ties supplied in the parts bag by
threading the pointed ends of each tie through the
square ends and pulling tightly around the headlight
cable and the handle.
NOTE: One side of the plastic tie has small notches in it,
while the other side is smooth The notched side must be
on the inside of the loop which is formed when the ends are
put together
@ Try to loosen the cable tie If it can be loosened, it has
been attached with the smooth side on the inside of
the loop Remove the cable tie and reverse Us direction.
@ Cut off excess cable tie.