Two Brothers Racing Yamaha R6S User Manual
V.a.l.e, Yamaha r6, Yamaha r6s
V.A.L.E.
V a r i a b l e a x i s l o c k i n g e x h a u s t
TM
Parts List
IMPORTANT - PLEASE READ CAREFULLY
We recommend that this performance part be installed by a qualified
motorcycle technician. If you have any doubts as to your ability to
install this performance part, please consult with your local motorcycle
dealer. Read all instructions first before starting installation. Make sure
the motorcycle and exhaust system are completely cool before starting
the installation. Also, make sure the bike is secure on a centerstand
or ideally a service lift during installation. Be sure to save all stock
components for possible use later.
Installation Instructions
1.
Make sure the bike is completely cool before starting the
installation. Make sure the bike is secure on the sidestand
or ideally a rear service stand.
2.
To prevent scratching the lower cowling place a blanket
or towel below it. Remove and lower the cowling onto
this and then slide it out from under the bike.
3.
Loosen the exhaust clamp where it bolts to the engine.
Remove the stock exhaust system at the rear canister
support bracket. CAUTION-the stock exhaust is heavy,
be careful not to drop it! Be sure to remove the exhaust
gasket from the end of the header as well: you will NOT
be reusing this. Save this gasket in the event you wish to
reinstall the OEM exhaust.
4.
Attach V.A.L.E.™ X-Lite™ retaining ring & slip tube to
muffler canister: Use the 4 (four) 6x14mm socket head
cap screws and 6mm split lock washers to loosely
join the slip tube to the muffler canister. Do not fully
tighten yet.
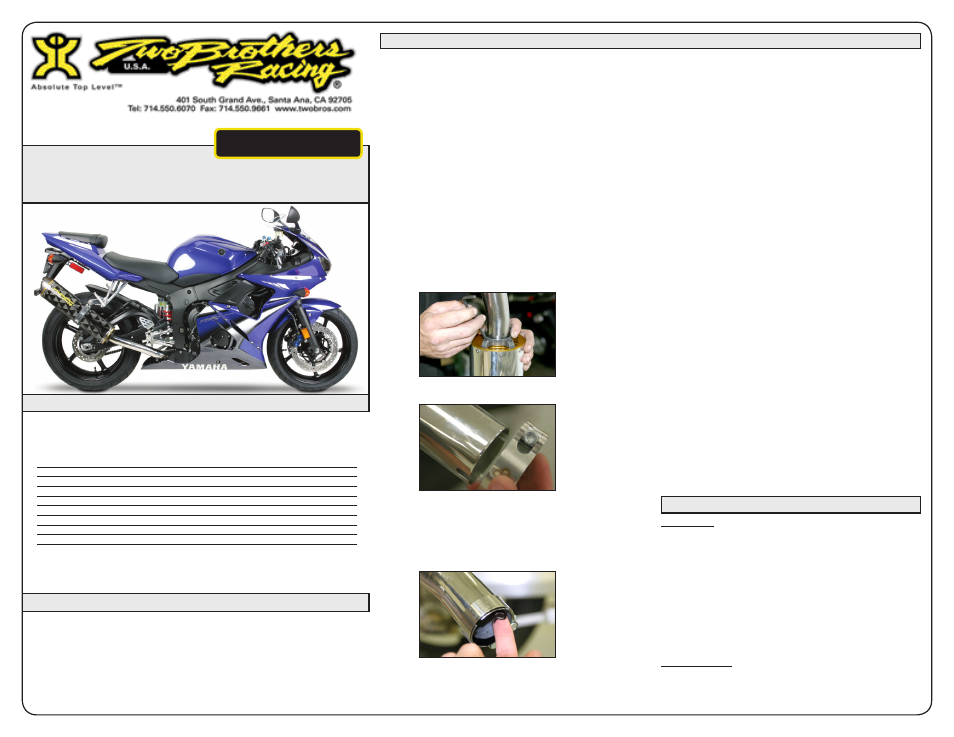
5.
Slide the supplied barrel clamp onto the slip tube.
6.
Place a bead of the hi-temp sealant on the outside edge
of the s-bend that goes into the canister. Slide the TBR
canister onto the end of the slip tube. Wipe off the excess
sealant that will squeeze out. Connect the new slip tube/
muffler assembly to your stock header, using the supplied
barrel clamp. Leave loose for now.
7.
Carefully slide the muffler clamp over the muffler. (Note:
The stainless steel canister clamp and the name badge
on the canister come from the factory with a clear plastic
protective film. Please remove this film before operation.)
Locate both tabs of the canister clamp outside of the
passenger footpeg bracket. Use the OEM bolt to sercure
it. Leave loose for now.
8.
Make sure everything is aligned and tighten all hardware
starting with the barrel clamp, then the 6x14mm cap
screws (tighten these in an “X” pattern) then finally the
OEM muffler mounting bolt.
9.
Reinstall the lower cowling.
10. Before you run the bike, clean off all fingerprints and
dirt, as any oily residue will etch the metal and become
somewhat permanent when the system gets hot. Also,
remove any plastic film from the name badge(s) and or
canister clamp(s). Run the bike and enjoy. It is normal
for some white smoke to appear the first time you start
the bike. This is packing/manufacturing oil from inside
the pipe burning off. Check for gaps or leaks. If you find a
leak, a little high temperature silicon sealant should fix it.
After 50 to 100 miles, recheck all fasteners for tightness.
2003-05
Yamaha R6
2006-09
Yamaha R6S
Standard Mount V.A.L.E. Slip-On Exhaust System with M-2/5 Canister
Part # 005-220406V / 005-220407V / 005-220408V / 005-220419V / 005-220420V
Qty. Description
Part Number
1
M-2/5 Muffler Canister
Varies
1
Slip Tube
005-2204NV
1
Muffler Mounting Clamp
Varies
1
HARDWARE KIT
005-22-3
1
X-Ring Kit
005-7-2-3KIT
1
Barrel Clamp
005-27-65MSH
1
Permatex Ultra Black Gasket Maker
031-P22072
1
TBR Sticker Kit
015-10212
Care & Cleaning / Warranty
Care & Cleaning
Keep system free of dirt and moisture. Store in a cool, dry place. For cleaning
use a mild spray cleaner. Always apply cleaner or polish with a soft, clean cloth.
Stainless Header System: Polished stainless steel pipes will turn a light golden
hue after a few heat cycles, this is a normal characteristic of high quality
stainless steel.
Carbon Fiber Mufflers: Always make sure the fiberglass packing inside is in
good condition and not burned out, as exhaust heat inside an empty canister
will deteriorate the Carbon Fiber sleeve. TBR sells repack kits (TBR part # 005-
10038) that include new rivets and repack material as well as a drill bit (#30),
making it easy to do yourself. Also, NEVER dyno test your bike with carbon
fiber mufflers installed - the intense heat and lack of cooling air can quickly
cause the CF material to burn. Two Brothers Racing does not provide a warranty
for burned carbon fiber.
Aluminum Mufflers: Use an aluminum or mag wheel polish such as Mother’s to
restore the bright finish to factory spec.
Warranty Information
two brothers racing products are intended for closed course competition purposes only,
and therefore are sold “as is” without warranty. two brothers racing specifically dis-
claims any warranties of merchantability or fitness for a particular purpose and disclaims
all responsibility for consequential and incidental damages or any other losses arising
from the use of these products or parts.