Two Brothers Racing Suzuki R1 User Manual
V.a.l.e, 2007 yamaha
V.A.L.E.
V a r i a b l e a x i s l o c k i n g e x h a u s t
TM
Parts List
IMPORTANT - PLEASE READ CAREFULLY
We recommend that this performance part be installed by a qualified
motorcycle technician. If you have any doubts as to your ability to install
this performance part, please consult with your local motorcycle dealer.
Read all instructions first before starting installation. Make sure the
motorcycle and exhaust system are completely cool before starting the
installation. Also, make sure the bike is secure on a centerstand or ideally
a service lift during installation. Be sure to save all stock components for
possible use later.
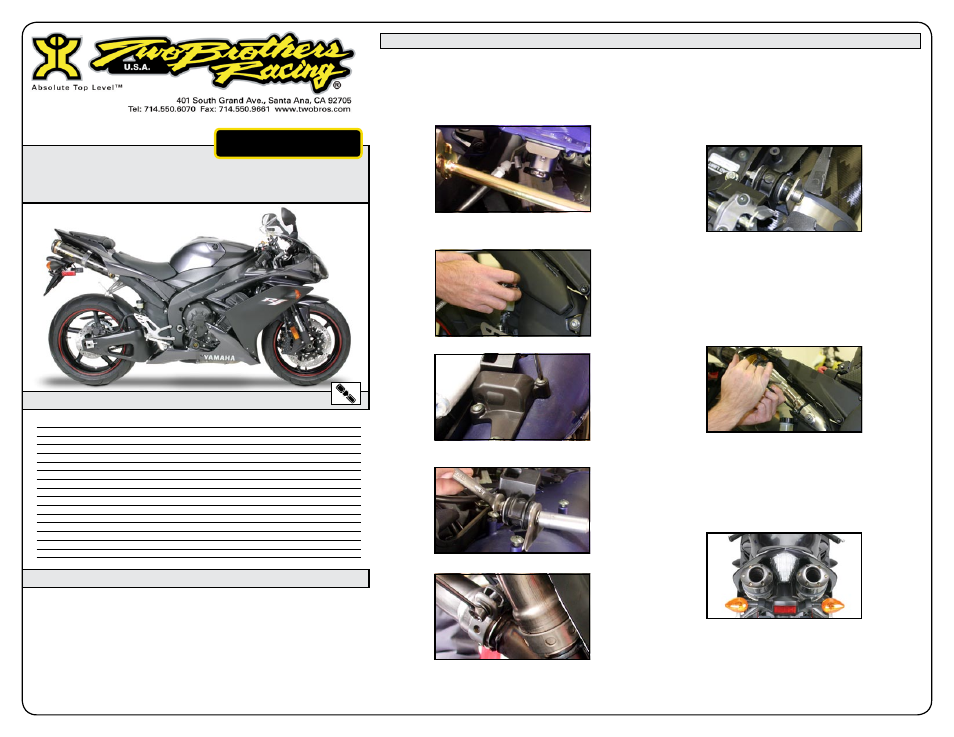
Installation Instructions
Make sure the bike is completely cool before starting the
installation. Make sure the bike is secure on a centerstand
or ideally a service lift.
Remove seats (driver and passenger).
Detach passenger seat release cable from lock.
Remove tail fairing.
Remove right side slip-tube cover.
Remove muffler bracket covers (left and right).
Remove muffler mounting hardware (left and right
mufflers).
Loosen s-bend clamps (left and right mufflers).
Remove mufflers (left and right) with a twisiting motion.
Use the 6x14mm S.H.C.S. and split lock washers to loosely
attach the s-bends to the mufflers (left and right).
1.
2.
3.
4.
5.
6.
7.
8.
9.
10.
Apply high-temp sealeant to mid-pipe and slip the mid-
pipe into the OEM header. Making sure the barrel clamps
provided are on the slip tubes.
Install the TBR mufflers with the t-bolt and muffler clamps.
Use the supplied 8x50 bolts and 8mm spacers to attach
the muffler clamps. The V.A.L.E.™inlets should be loose to
allow for alignment. You may wish to loosen and rotate the
passenger footpegs out of the way for added clearance.
Tighten mufflers in the following order: One alignment is
good. The slip tubes line-up where the paint mark is on the
stock header.
1. Muffler clamps (left and right).
2. V.A.L.E.™ inlets (left and right), torque to 7 ft. lbs.
3. T-Bolt clamps (left and right)
A long 5mm ball-end allen wrench will help with accessing
the bolts on the V.A.L.E.™ inlet. Check for proper
clearances and alignment and adjust mufflers accordingly.
Reinstall muffler bracket covers (left and right).
Reinstall tail fairing and right side pipe cover.
Reinstall passenger seat release cable to lock.
Reinstall seats (driver and passenger).
Double check your work to ensure everything is tight and
properly installed.
Before you run the bike, clean off all fingerprints and
dirt, as any oily residue will etch the metal and become
somewhat permanent when the system gets hot. Run
the bike and enjoy. It is normal for some white smoke to
appear the first time you start the bike. This is packing/
manufacturing oil from inside the pipe burning off.
Check for gaps or leaks. If you find a leak, a little high
temperature silicon sealant should fix it. After 50 to 100
miles, recheck all fasteners for tightness.
11.
12.
13.
14.
15.
16.
17.
18.
19.
2007 Yamaha
R1
V.A.L.E.™ Slip-On Exhaust System with Dual M-2 Exhaust Canisters
Part # 005-1740406V / 005-1740407V / 005-1740408V
Qty. Description
Part Number
1
M-2 Muffler Canister (Left Side)
Varies
1
M-2 Muffler Canister (Right Side)
Varies
1
Slip-On Tube Assembly (Left Side)
005-17401SL
1
Slip-On Tube Assembly (Right Side)
005-17401SR
2
Muffler Canister Clamp
Varies
1
HARDWARE KIT
005-174-3
2
X-Lite™ V.A.L.E.™ Retaining Ring
005-7-2-2
2
8mm Spacer
005-S-8
2
Barrel Clamp
005-27-61MSH
2
8x50mm Socket Head Screw
005-SH850
8
6x14mm Socket Head Cap Screw
005-SH614
8
6mm Split Washer
005-WL6
1
Permatex Ultra Black Gasket Maker
031-P22072
1
5mm Long Handle Ball End Hex Key
005-9-18610
2
TBR Script Logo Yellow Decal 4”
015-10208-A