Two Brothers Racing Honda TRX250EX User Manual
V.a.l.e, Trx250ex
1.
Make sure the quad is completely cool before starting
the installation. Make sure the quad is secure on a
level surface and the wheels are chocked to prevent
the quad from rolling.
2.
Loosen the OEM clamp connecting the slip tube to the
header.
3.
Remove the two bolts securing the OEM muffler to the
frame.
4.
Carefully remove OEM muffler assembly from quad.
5.
Use the supplied 4 (four) 6x14mm bolts and split lock
washers to loosely attach the X-Lite™ ring to muffler
inlet. (See V.A.L.E. Assembly Detail below)
6.
Carefully slide TBR muffler assembly onto the OEM
header making sure that the TBR slip-tube is fully
inserted.
V.A.L.E.
V a r i a b l e a x i s l o c k i n g e x h a u s t
TM
Parts List
IMPORTANT - PLEASE READ CAREFULLY
Warranty
two brothers racing products are intended for closed course competition purposes only, and therefore are sold “as is”
without warranty. two brothers racing specifically disclaims any warranties of merchantability or fitness for a particular
purpose and disclaims all responsibility for consequential and incidental damages or any other losses arising from the use
of these products or parts.
We recommend that this performance part be installed by a qualified
motorcycle technician. If you have any doubts as to your ability to install this
performance part, please consult with your local motorcycle dealer. Read all
instructions first before starting installation. Make sure the motorcycle and
exhaust system are completely cool before starting the installation. Also,
make sure the bike is secure on a centerstand or ideally a service lift during
installation. Be sure to save all stock components for possible use later.
Installation Instructions
2001-09 Honda
TRX250EX
V.A.L.E.™ Slip-On Exhaust System with M-7 Aluminum Canister
Part # 005-2040406V
Qty.
Description
Part Number
1
Muffler Canister M-7
005-204-206M
1
S-Bend Tube
005-20404S
1
HARDWARE KIT
005-204-3
1
X-Lite™ V.A.L.E.™ Retaining Ring
005-7-2-2
4
6x14mm Socket Head Cap Screw
005-SH614
4
Split Lock Washer
005-WL6
1
5mm Long Handle Ball End Hex Key
005-9-18610
1
T20 Torx Bolt Hex Key
005-9-15820
1
TBR Sticker Kit
015-10212
1
Spark Arrestor (Installed)
005-106S
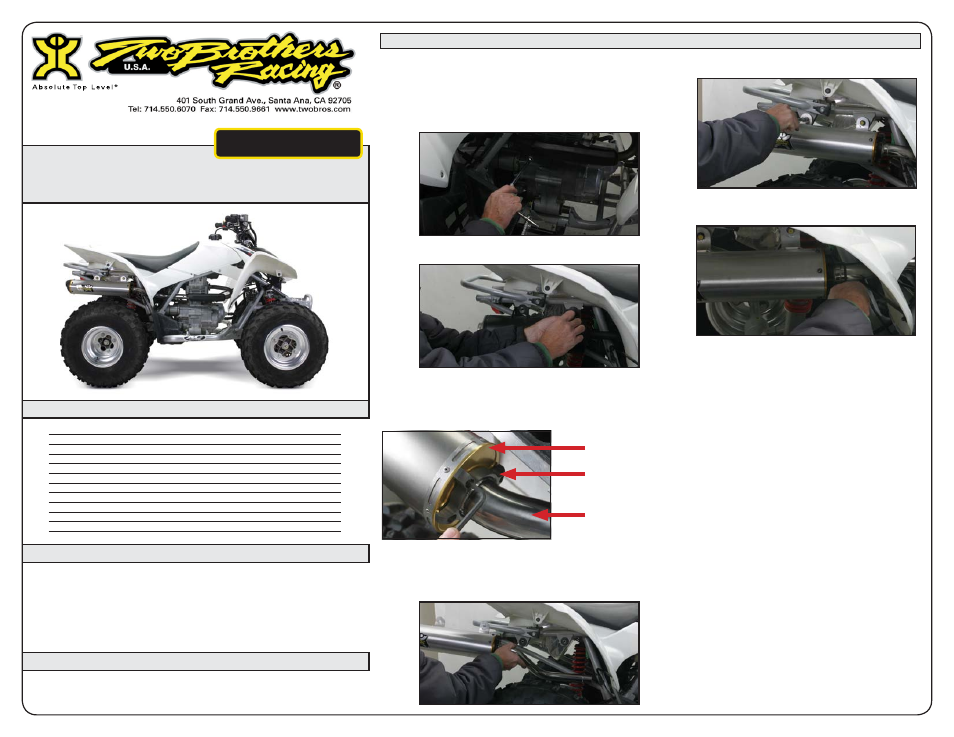
Muffler Inlet
X-Lite™ Ring
S-Bend Tube
V.A.L.E.™ Assembly Detail
7.
Attach muffler canister to frame using the OEM bolts.
Tighten the bolt securely.
8.
Securely tighten the 4 (four) 6 x 14mm hex head bolts
of the V.A.L.E. assembly.
9.
Double check to make sure that all hardware is
securely tightened.
10. Before you run the quad, clean off all fingerprints
and dirt, as any oily residue will etch the metal and
become somewhat permanent when the system
gets hot. Run the quad and enjoy. It is normal for
some white smoke to appear the first time you start
the quad. This is packing/manufacturing oil from
inside the pipe burning off. Check for gaps or leaks.
If you find a leak, a little high temperature silicon
sealant should fix it. After 50 to 100 miles, recheck all
fasteners for tightness.