Cooper Lighting AMETRIX P4R User Manual
Visor and non-visor, 1small, outdoor p4r, Installation instructions
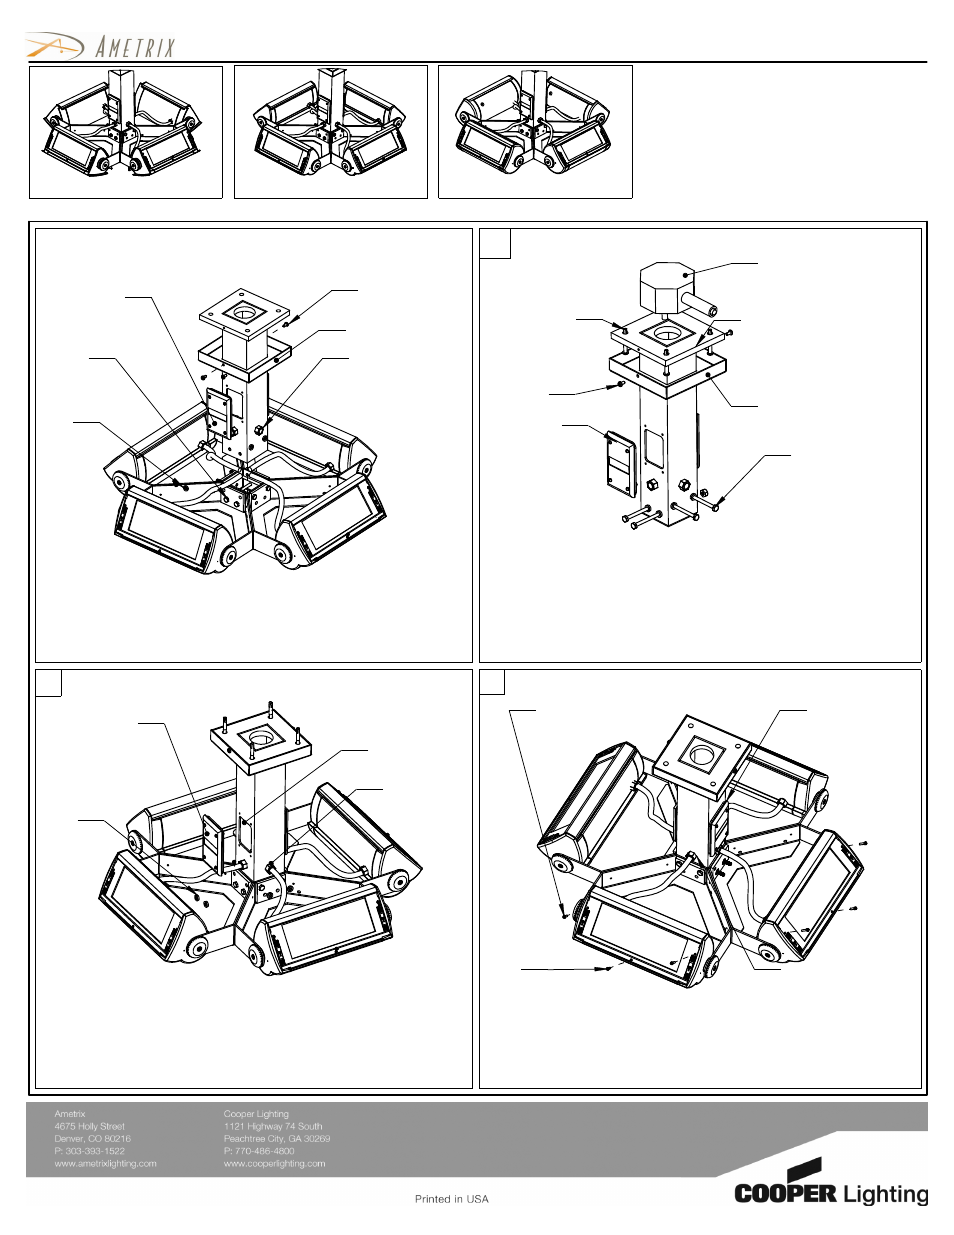
(x4)
gasket (x2)
Cover plate
(4x)
Compression fitting
#6-32 x1/2"
Sealing the outdoor fixture
#6-32 x5/8"
Socket cap screw
Socket cap screw
(8x)
1. Ensure all door screws are secure on fixture head. Refer to
supplementary sheets for torque specs and aiming
instructions.
2. Ensure gaskets on cover plates are smooth and compressed.
3. Ensure wires entering compression fittings are sealed and
secure.
3
Warning
2
that all sources of power are turned off. All
Sheet 1 of 2
performed by a certified electrician.
Visor and Non-Visor
: Before starting any work ensure
work must meet local/national codes and be
Do not
mount fixtures vertically.
Installation Instructions
Vault
C-Scroll
Roundel
These installation instructions are valid with the above Ametrix styles.
1
Small, OUTDOOR
P4R
(Pendant, 4-way, Remote ballast)
ADY071469 REV B (ECN80481)
Set screw
(2x)
Mounting Pendant to J-box
(4x)
(by others)
1/4" fasteners
J-box
(by others)
(4x)
Hex cap bolts
1/4-20 x4 1/2"
#8-32 x3/8"
Canopy
Cover plate
Use additional bracing
around J-box to support
fixture.
Canopy
1/4-20 x4 1/2"
Wiring the fixture
#8-32 x 3/8"
Wire seal
(4x)
(4x)
Hex cap bolt
Set screw (2x)
Nut
Exploded view and part call-out
5/16-18 x1/2"
Cover plate
Attention:
Quad fixture assemblies require additional bracing/structure
around J-box to support fixture.
Wiring hole
3.
With pendant secure, slide fixture assembly onto pendant
and secure with four 1/4-20 x4 1/2" hex bolts.
Hex bolts
1/4-20 x4 1/2"
(4x)
Remove cover plate and insert wires from fixture heads into
(4x)
Wiring seals
wires seals and pull through opening in pendant.
Attach appropriate wires and ensure all connections are
properly matched.
4. Push connections into pendant and secure cover plate.
Cover plate
2.
1.
1. Remove all 1/4-20 x4 1/2" hex bolts from bottom of pendant.
2. Remove both #8-32 x 3/8" set screws and allow canopy to
slide down pendant.
3. Run wires from J-box into pendant, ensure there is enough
wire to reach cover plate.
4. Using appropriate fasteners, secure fixture to ceiling. Use
additional bracing around J-box to support fixture.
5. Replace canopy and secure using both set screws.