CCI Thermal Technologies WMK - Wall Mounting Kit User Manual
CCI Thermal Technologies Water boiler
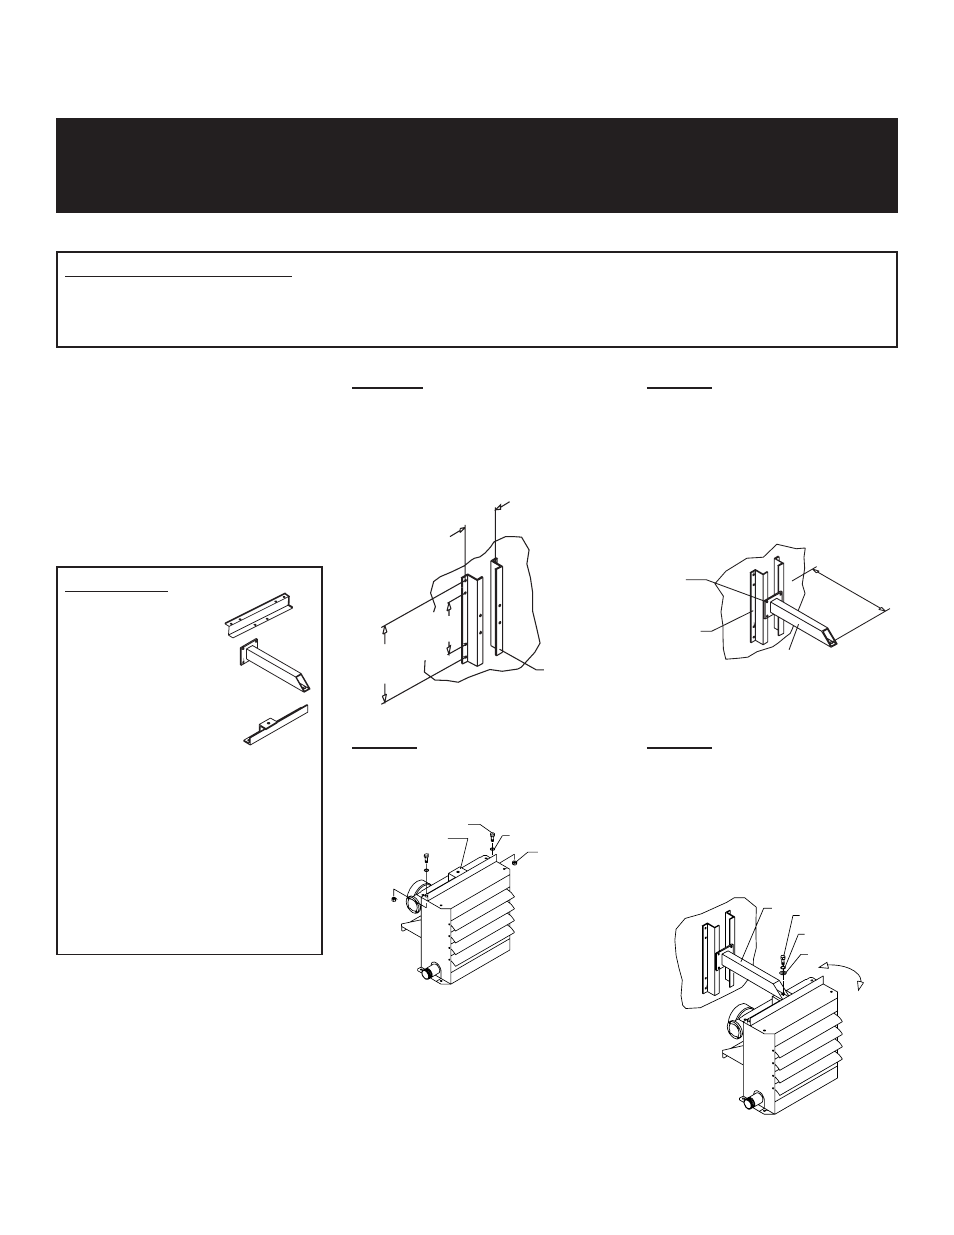
STEP 4
Lift the heater into place and fasten it to
the Arm Assembly
using a 5/8 UNC
x 1-1/4 bolt. This step will require more
than one person due to the weight of
the heater. Refer to the owner’s manual
for the weight of the heater.
CONTENTS
Item Qty. Description
2 Z-Section
1 Arm Assembly
1 Mtg Attach Assy
Bracket
4 Nut, 3/8 UNC
4 Bolt, 3/8 UNC x 1
4 Lock Washer, 3/8”
3 Bolt, 5/8 UNC x 1-1/4
2 Lock Washer, 5/8”
Wall Mounting Kit Installation Instructions
For FR/HP Heaters
STEP 3
Bolt Mtg Attach Assy Bracket
to the
heater using 5/8 UNC x 1-1/4 bolts and
lock washers.
STEP 2
Bolt the Arm Assembly
to the
Z-Sections
using 3/8 UNC x 1 bolts,
lock washers and nuts.
STEP 1
Fasten the Z-Sections
to a wall that
will support the heater’s weight using
installer supplied fasteners.
Installer required to supply:
A method to fasten the two Z-Sections
to the supporting structure. Four 3/8” diameter, grade 5 bolts are suggested,
however, any method providing the same or greater strength may be used.
Check that your heater model number corresponds to the model number shown on the mounting kit carton.
WARNING:
If the heater is installed on a structure that is to be transported, provide additional support for the
heater during transit. The suspended weight should not exceed 300lbs (136kg). Refer to the
owner`s manual for mounting specifications and conditions.
Printed in Canada. Copyright 2008. All rights reserved.
Part No. 5747-1
Heater
may be
rotated as
indicated
by arrows.
7-3/16”
(183mm)
12”
(307mm)
18”
(457mm)
Recommended
mounting
holes
21-13/16”
(554mm)
to wall
Several FR/HP models offer four
holes which can be used fo rmount-
ing the heater. Select the two holes as
described below:
- on the FR/HP 16, bolt Mtg. Attach Assy
Bracket
in the holes closest to the motor
side of heater,
- on the FR/HP 20 & 24, bolt Mtg. Attach Assy
Bracket
in the holes farthest from the motor
side of the heater.