Disassembly, Lip seal pumps, Danger – Viking Pump TSM340.1: SG-10, SG-14 User Manual
Page 5
SECTION TSM
340.1
ISSUE
D
PAGE 5 OF 11
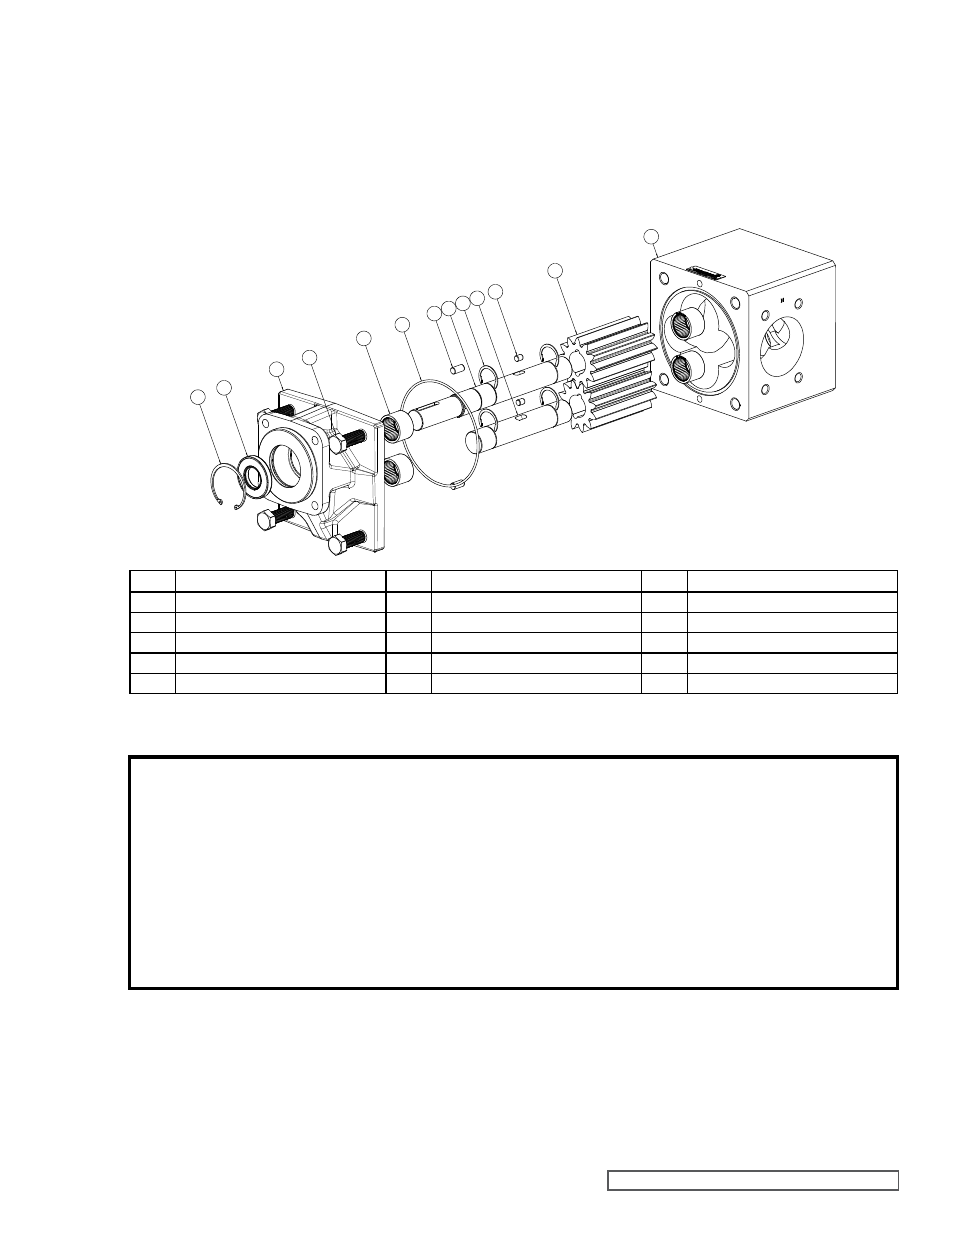
ITEM
NAME OF PART
ITEM
NAME OF PART
ITEM
NAME OF PART
2
Bracket
12
Drive Shaft
17
Alignment Pins (2 Required)
3
Bearings (4 Required)
13
Driven Shaft
19
Casing
4
Internal Snap Ring
14
Crescent Snap Rings (4 Required)
20
Capscrews (4 Required)
8
Lip Seal
15
Gear Pins (2 Required)
11
O-ring for Casing
16
Gears (2 Required)
FIGURE 2
EXPLODED VIEW – MODELS SG-10 AND SG-14 LIP SEAL PUMPS
external gear pumps. These tools are in addition to standard
mechanics’ tools such as open-end wrenches, pliers,
screwdrivers, etc. Most of the items can be obtained from an
industrial supply house or automobile tool supplier.
1. Soft headed hammer
2. Snap ring pliers
3. Arbor press
4. Blind bearing puller set
Before opening any Viking pump liquid
chamber (pumping chamber, reservoir, relief
valve adjusting cap fitting etc.) Be sure:
1. That any pressure in chamber has been
completely vented through suction or
discharge lines or other appropriate
openings or connections.
2. That the driving means (motor, turbine,
engine, etc.) has been “locked out” or made
non- operational so that it cannot be started
while work is being done on pump.
3. That you know what liquid the pump has been
handling and the precautions necessary to
safely handle the liquid. Obtain a material
safety data sheet (MSDS) for the liquid to be
sure these precautions are understood.
Failure to follow above listed precautionary
measures may result in serious injury or death.
DANGER !
DISASSEMBLY:
1. Remove pump from motor or other drive equipment. If
the pump is mounted using the footed bracket (B-mount),
remove the footed bracket so the pump is flat on the work
surface.
2. Refer to Figure 2 for the names of parts.
3. Mark bracket (2) and casing (19) before disassembly to
insure proper reassembly. Remove the capscrews (20) to
separate bracket from pump casing. It may be necessary
to tap on the ears of the bracket (where capscrews are
located) with a soft headed hammer to separate the
bracket from the casing.
4. Inspect casing o-ring (11). Replace as needed.
5. Remove driven (13) and drive (12) shaft and gear
assemblies from pump.
CLEANING PUMP: Keep pump as clean as possible. This
will facilitate inspection, adjustment and repair work.
STORAGE: If pump is to be stored, or not used for six months
or more, pump must be drained and a coat of light oil must be
applied to all internal pump parts. Viking suggests rotating
pump shaft by hand one complete revolution every 30 days
to circulate the oil. Tighten all pump assembly bolts before
putting pump in service after being stored.
SUGGESTED REPAIR TOOLS: The following tools must
be available to properly repair series SG-10 and SG-14
LIP SEAL PUMPS
4
8
2
20
3
11
17 12
14 13
15
16
19