6 rotary seal removal – Viking Pump TSM288: SL Series Lobe Pumps User Manual
Page 30
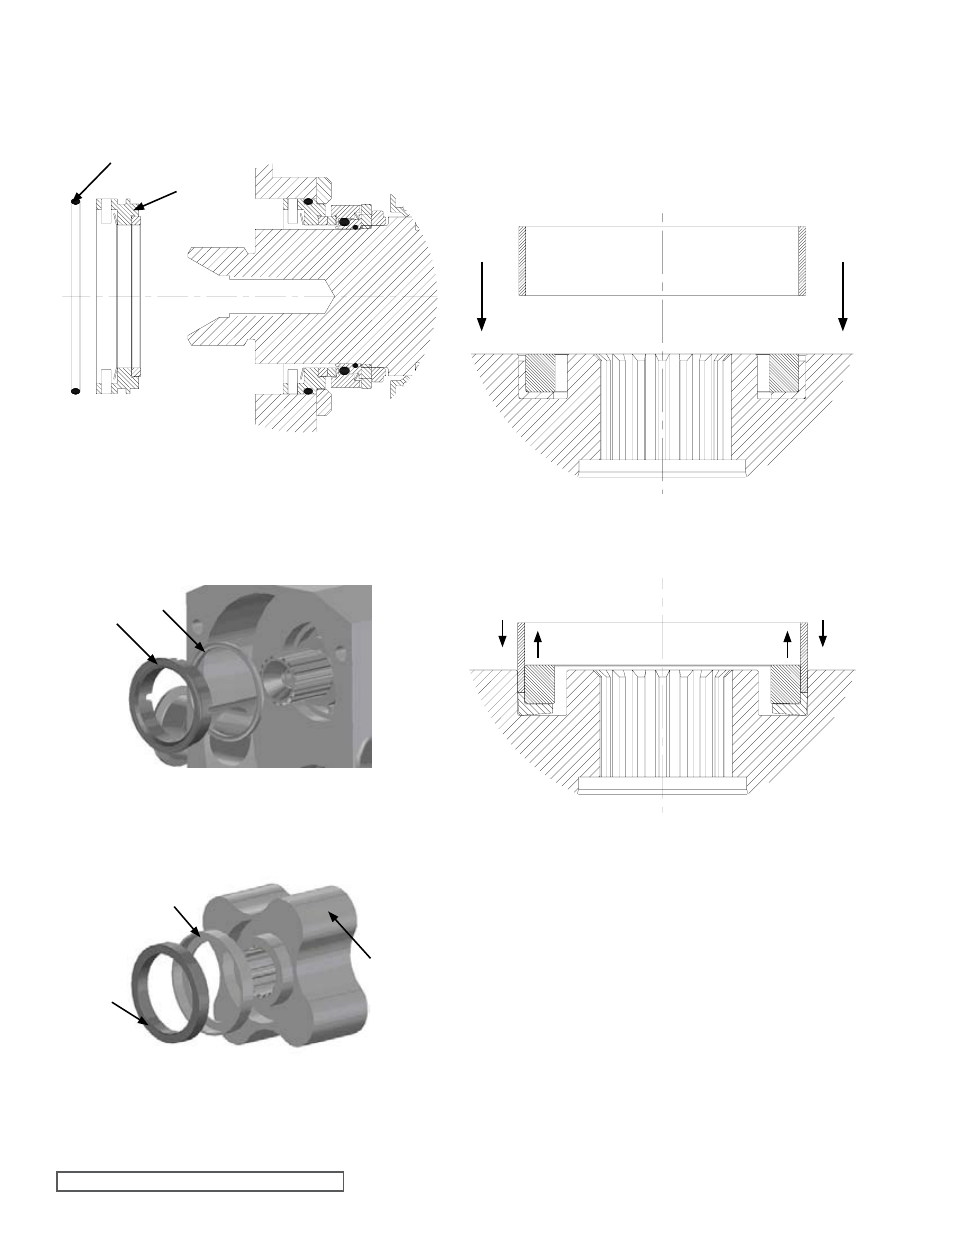
fIGURE 125
fIGURE 126
fIGURE 122
8.06
8.10
fIGURE 123
8.03
8.04
fIGURE 124
8.02
8.01
2.01
SECTION TSM 288
ISSUE
A
PAGE 30 OF 36
5.6 ROTaRY sEal REMOVal
• To remove the seal face in the rotor use the seal face
removal tool
• The tool locates on the rubber L-cup and when pressed in
the seal face will extrude up into the tool allowing ease of the
seal face removal (A press tool may be required)
• Install the O-ring (8.06) into the seal housing and then install
the seal housing (8.10) into the casing
• making sure that the location recesses line up with the seal
washers (8.08) (See Figure 47 and Figure 44)
• Install the O-ring (8.04) onto the static seal (8.03) and then
install the static seal into the casing – make sure that the
location slots line up with the pins in the seal housing
• Install the L-cup (8.01) and the rotary face (8.02) into the
rotor (2.01)
The seals are now assembled.
For rotor and head installation see pump assembly section.
- UDF400: DFO Start-UP Guide (16 pages)
- TSM000: General Information (8 pages)
- TSM110.2: Heavy Duty LV3900 (6 pages)
- TSM141.1: G-LL 125/4125 (16 pages)
- TSM141.2: LS-M 125/4125 (12 pages)
- TSM142.1: H-LL 225/4225 (14 pages)
- TSM142.2: LS-M 225/4225 (14 pages)
- TSM143: N-P 335/4335 (15 pages)
- TSM144: GG-AL 495/4195 (10 pages)
- TSM1470: HI-LO Double Pumps (8 pages)
- TSM151.1: H-LL 123/4123 (13 pages)
- TSM151.2: LS-M 123/4123 (14 pages)
- TSM153: N-R 333/4333 (16 pages)
- TSM154: GG-AL 493/4193 (10 pages)
- TSM161.3: LS-M 127/4127 (12 pages)
- TSM163: N-R 337/4337 (15 pages)
- TSM164: GG-AL 4197 (10 pages)
- TSM211: F-G 724/4724 (8 pages)
- TSM212: H-LL 724/4724 (9 pages)
- TSM230: Hygienic Series (15 pages)
- TSM270: RL41507 Industrial Rotary Lobe (10 pages)
- TSM270.1: RL 16 and 25 Standard (12 pages)
- TSM270.2: RL 16 and 25 High Pressure (12 pages)
- TSM275: AL-05 (33 pages)
- TSM280: Duralobe (Discontinued) (78 pages)
- TSM285: Classic+ Lobe Pump (36 pages)
- TSM310.1: C-FH 32/432 (7 pages)
- TSM312: G-N 32/432 (11 pages)
- TSM320.1: C-FH 56/456 (7 pages)
- TSM320.2: GG-HL 75/475 (9 pages)
- TSM340.0: SG-04, -05, -07 (10 pages)
- TSM340.1: SG-10, SG-14 (11 pages)
- TSM341.1: SG Mag Drive Series (19 pages)
- TSM343.1: Vi-Corr Mag Drive (13 pages)
- TSM343.3: Vi-Corr Pumps (20 pages)
- TSM344: CMD Mag Drive (24 pages)
- TSM350 HG-08/HG-10 Helical Gear Pumps (10 pages)
- TSM410.1: F-FH 4625 (5 pages)
- TSM410.2: H-M 4625 (10 pages)
- TSM420: HL-LL 4925 (18 pages)
- TSM430: HL-N 34/434 (9 pages)
- TSM442: GG-AL 4195-G LP-Gas (10 pages)
- TSM443: K-LL 4205-G LP Gas (8 pages)
- TSM445: LVP Vane Pumps (11 pages)