RCBS The Grand User Manual
Page 12
9
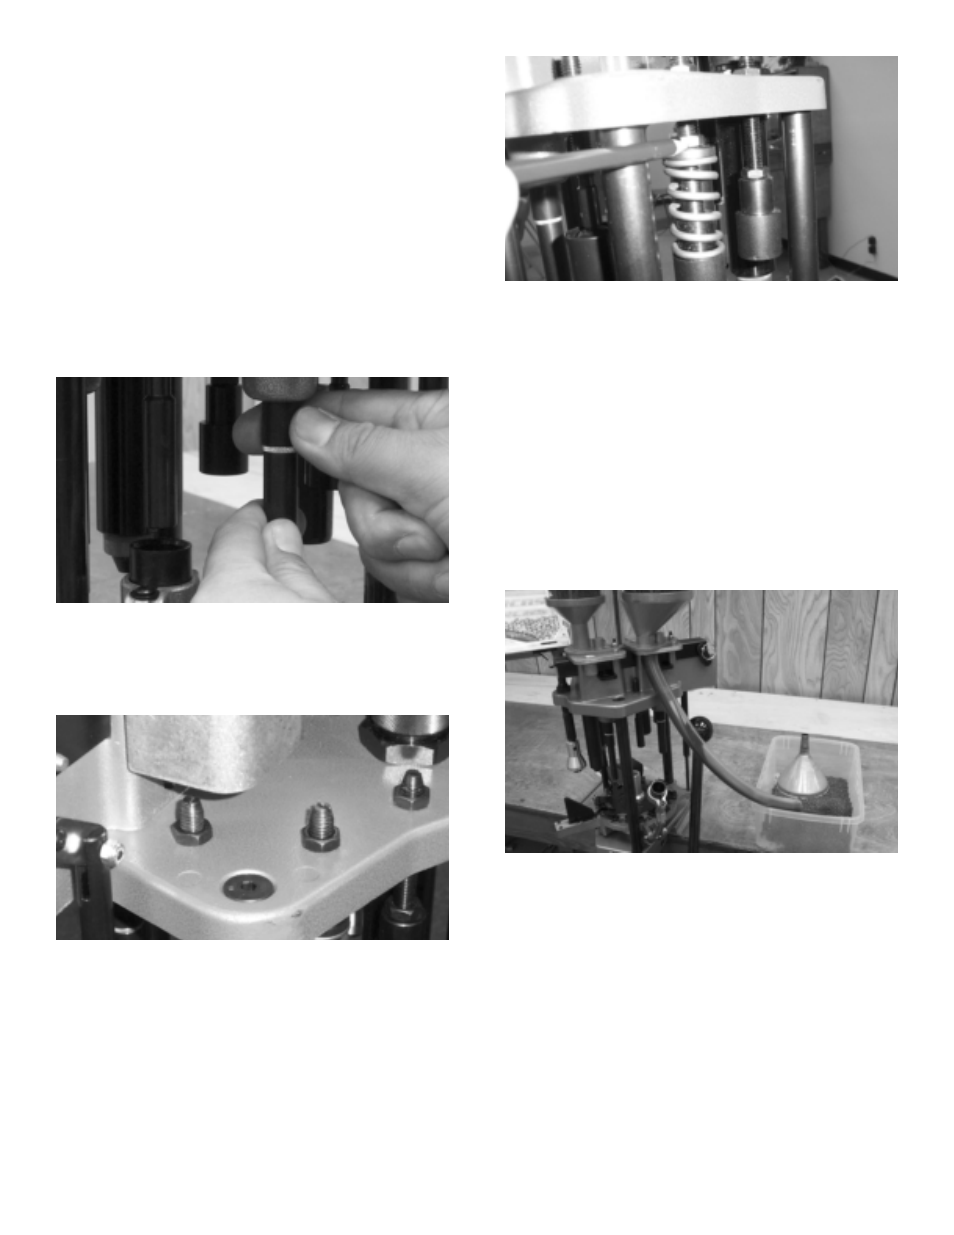
43
POWDER AND SHOT BUSHING CHANGE
The Grand shot shell press uses replaceable powder and shot
bushings to control charge weights. Carefully check the charge
weights thrown as they can vary based on powder type, age of
powder and type of shot used.
Empty charge bar for bushing change. To change Powder or
Shot bushings, but staying with the same type of powder and
size of shot, move Hoppers to the OFF position. If you are
changing type of powder or shot, DRAIN hoppers first. You must
then remove the powder and shot left in the Charge Bar. With the
press clear of hulls, place a fired hull in station 3 and a fired hull
with a wad in Station 5. Lower the Handle, dropping the charges
in the charge bar. Raise the Handle completely, remove the hulls,
empty hulls and replace back into Stations 3 and 5. Lower and
raise the Handle once more. Remove and empty the hulls. Your
Charge Bar is now cleared. Remove the Charge Bar locking pin
and the slide to the right allowing changing of the Bushings.
6. Shot Drop and Wad Seating Station Adjustment
#
5 size
shot is the largest size The Grand will dispense. Larger shot
sizes must be weighed separately and manually put into the
hull prior to the Crimp Start station. Due to varying base wad
heights and design, as well as wad design, it may be
necessary to adjust the Lower Shot Tube to obtain proper
wad seating depth. Adjust by grasping the Upper Drop Tube
with the fingers of one hand and unscrew the Lower Drop
tube with the fingers of the other hand
(photo 40). Secure with
brass lock ring. Shot Shut Off Gate movement will typically be
from
1
/
4
" out to all the way in. For 12 gauge hulls with tapered
internal bases such as Winchester AA red or gray, Remington
STS or Nitro 27, etc., a longer Lower Shot Tube has been
provided to achieve proper wad seating depth. (NOTE:
Improper wad seating depth will cause hull collapse/buckling
or crimp problems at Station 7).
For proper wad seating, 20 gauge loaders need to adjust a
gap of
1
/
4
" to
5
/
16
" between the Upper and Lower Shot Drop
tubes.
40
7. Crimp Start Adjustment Crimp start is an up or down
adjustment. Loosen the top lock nut (A) and adjust Crimp
Start assembly up or down, retighten lock nut
(photo 41).
Too much Crimp Start can cause a bulge on the side at
the top of the hull during crimp. Not enough crimp start can
leave a hole in the center of your hull after crimp.
42
8. Crimp Adjustment Crimp is also an up or down
adjustment. The crimp depth is controlled by loosening lock
nut (B)
(see photo 41), adjusting the Crimp Die assembly,
up or down and retighten lock nut. If hulls bulge or collapse
during crimp, reduce crimping spring pressure. To reduce
crimp spring pressure, adjust nut (C)
(photo 42) up towards
the bottom of the Top Plate. If the crimp is concave or
dished, add spring pressure. If the crimp is peaked, reduce
crimp spring pressure and check that wad is seated to the
correct depth. (NOTE: If wads are not seated deep
enough, the shot column will be too high in the hull thus
causing problems with crimp.)
41
➞
A
➞
C
➞
➞
B
➞
B
D
9. Final Crimp Adjustment Final crimp is an up or down
adjustment to radius the end of the loaded round. Loosen
the top lock nut (D)
(see photo 41), adjust Final Crimp die
up or down and retighten lock nut.
10. Case Eject Adjustment The Press is preset for proper
case eject. Should adjustment become necessary, using a
5
/
16
" hex key wrench, loosen the socket head cap screw in
the top of the Eject Rod Holder, position the Case Eject
Arm to just clear the final crimp die and retighten the cap
screw. (CAUTION: Do not use the Case Eject Rod to try to
tighten the Eject Rod Holder!)
DRAIN SHOT AND POWDER HOPPERS
Place the flexible drain tube on the boss below the hopper you
wish to empty. Place a container beneath the drain tube. Rotate
the Hopper to the DRAIN position and the Hopper will empty in
a matter of seconds
(photo 43).
2429_RCBS Grand Instr 1/31/05 2:34 PM Page 12