RCBS Turret Press User Manual
Installation and set up, Priming on your turret press, Primer size changeover
INSTALLATION AND SET UP
Mount the Turret Press to a sturdy workbench or table with two 3/8” bolts of sufficient length to
penetrate the press base and bench.(Note: This set up can be used for a right or left handed
person). Install the threaded portion of the handle through the toggle block. The handle must
remain tight at all times to avoid damage to the handle and toggle block. Install the Primer
Dispenser Assembly as shown in photo 1. Finger tighten the two 8-32x1/2 socket headcap
screws. Align the primer transfer bar in the slot to obtain full movement. Center primer plug and
sleeve in shell holder
and tighten the 8-
32x1/2 Socket Head
Cap Screw.
Slide the dispenser
bottom until it rests
against the Turret
frame and tighten the
two 5-40x3/8 Socket
Head Cap Screws.
Note: The small
Primer Plug was
installed at the
factory.
Slip the primer catcher
into place on the
press in the holes pro-
vided. See photo 2.
The Turret Press ram
accepts removable
type shell holders. To
install, insert the shell
holder into the ram
and twist slightly to
the left. To remove,
twist slightly to the
right. See photo 3.
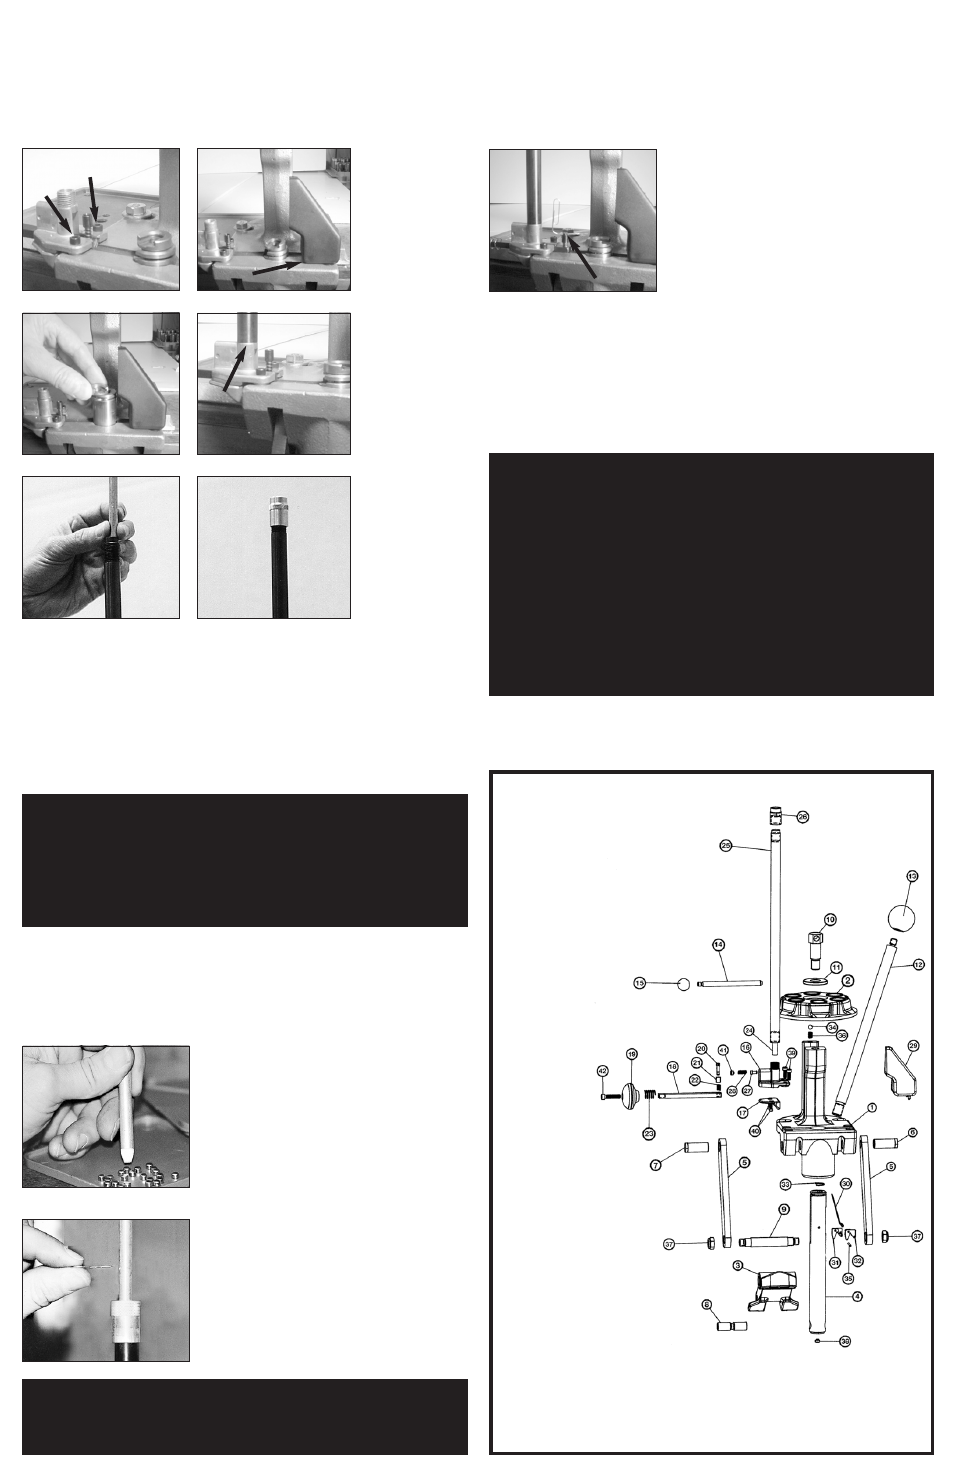
Screw the safety tube
onto the Primer
Dispenser until hand
tight as shown in
photo 4.
Insert the appropriate sized priming tube (large or small) into the safety tube as shown in
photo 5.
Seat the primer tube until it bottoms out in the Safety Tube. Approximately 1/4” of the primer
tube will protrude above the safety tube. Now install the tube cap by screwing it onto the safety
tube. See photo 6.
1
PRIMING ON YOUR TURRET PRESS
Start by sizing and depriming a case. Lower the ram approximately half the stroke. Next,
with your free hand, pull out on the primer transfer bar until it picks up a primer. With the
ram still in half stroke position, push the primer transfer bar into the slot in the press ram
until it stops. While holding the Transfer bar in, lower the ram until the primer is fully seated.
Now release the transfer bar as you lower the handle and raise the ram. This will spring the
transfer bar out of the slot in the ram.
PRIMER SIZE CHANGEOVER
Select the correct primer plug and sleeve (large or
small). Drop the Primer Plug through the sleeve. Place
the spring on the primer plug. Screw the Primer Plug
into the transfer bar. Tighten the assembly with a small
nail or a straightened paper clip through the hole in
the Primer Plug. Do not over tighten. See photo 9.
Remove the safety tube cap. Remove the empty tube
inside the safety tube. Install the correct tube, large or
small, inside the safety tube.See photo 5. Install the
safety tube cap onto the safety tube. See photo 6.
MAINTENANCE
This press was lubricated at the factory. However, it is necessary to lubricate all moving
parts from time to time with gun oil. If rust spots appear, swab lightly with gun oil and wipe
dry. Care should be taken not to apply oil where it could come in contact with primer pock-
ets or primers. Oil will deactivate primers. It is a good practice to clean the press prior to
lubrication to remove grit and other residue. You will note the ease at which the epoxy
enamel paint wipes clean. This finish is impervious to oil and is extremely chip and fade
resistant.
TURRET PRESS PARTS LIST
WARNING:
TO AVOID INJURY, READ AND FOLLOW THESE SAFE PRIMING PRACTICES:
• DO NOT attempt to prime military cartridge cases with crimped primer pockets until
the crimp has been removed with a counter sink, a special reamer or by swaging.
Primers seated into crimped pockets are subject to deformation which can cause
misfires and even detonation during seating which can cause serious personal injury.
• DO NOT attempt to seat primers against excessive resistance which may cause
detonation and possible serious personal injury. Check to be certain that the case
was not previously primed, that the fired primer was removed, that a portion of the
primer cup wall is not still in the primer pocket and that you are using the correct
size primer.
• DO NOT modify the priming system in any manner or attempt to use similar parts or
priming systems from other manufacturers. To do so could result in primer
detonations resulting in serious personal injury.
• NEVER seat a primer into a powder charged case.
• Decapping live primers is extremely dangerous and is not recommended.
Questions? Call Customer Service at
1-800-533-5000
Monday - Friday 6:30am - 4pm Pacific Time
2
3
4
5
6
9
FILLING THE PRIMER TUBE
We recommend the RCBS Primer Tray-2 to be used in conjunction with the primer feed
tube. This plastic primer tray and cover have been designed to orient primers for fast, easy
handling and primer pick-up.
Step 1. Scatter the primers onto the grooved surface of the primer tray. Then, gently shake
the tray horizontally until all the primers are positioned anvil side up. Place the cover on the
tray, while holding the tray and cover together, turn the tray upside down.
The primers will now be oriented anvil side down for
easy pick-up with the appropriate size priming tube
assembly. See photo 7.
Step 2. Insert the primer feed tube cotter pin into the
cross hole before picking up any primers.
WARNING: It is the responsibility of the operator to
insure that all primers are properly oriented.
Attempting to seat a primer upside down in a case
may cause the primer to detonate, causing serious
personal injury or damage to the equipment. Primer
residue is dangerous when exposed to heat, impact
and/or static electricity. Therefore, it is important to
keep the primer tubes clean. We recommend periodic
cleaning with soap and warm water.
Step 3. Use the plastic tipped end of the tube opposite
the cotter pin for primer pick-up. After filling, place the
tube, cotter pin end down, onto the top of the safety
tube cap. While holding the tube, remove the cotter
pin, dropping the primers into the top of the safety
tube cap. Be sure all primers are transferred into the
Priming Tube. See photo 8.
WARNING:
Care must be taken when loading the primer feed tube. Do not force primers because
of the stacked condition of the primers, if one should ignite, all the primers in the tube
will explode, causing an extreme hazard. No more than five pounds of force should be
applied when picking up primers with the primer feed tube (this can be checked using
a bathroom scale). If difficult primer pick-up should occur, investigate the cause and
clear the condition or return the primer feed tube to RCBS for correction. Always wear
eye protection when handling primers.
7
8
20
709554
APF Primer Plug Lg
709555
APF Primer Plug Sm
21
709506
APF Primer Sleeve Lg
709507
APF Primer Sleeve Sm
22
109508
APF Primer Plug Spring
23
188107
Primer Transfer Bar Spring
24
788924
Primer Tube Large
788923
Primer Tube Small
709581
Primer Tube Subassembly Lg (not shown)
709582
Primer Tube Subassembly Sm (not shown)
25
788264
Safety Tube
26
788265
Tube Cap
27
709595
APF Stop Pin
28
109596
APF Coil Spring
29
788277
Primer Catch Assembly
30
188105
Primer Deflector
31
188102
Primer Deflector Insert Left
32
188103
Primer Deflector Insert Right
33
109112
Ram Clip Spring
34
187152
Detent Ball
35
788266
Deflector Pin
36
187153
Detent Spring
37
188108
7/16 Nyloc Nuts (2)
38
187219
1/4-28x3/8 Socket Head Cap Screw
39
187227
8-32x1/2 Socket Head Cap Screw (2)
40
188109
5-40x3/8 Socket Head Cap Screw (2)
41
109591
1/4-28x3/16 Cup Point Set Screw
42
187211
10-32x1” Socket Head Cap Screw
KEY PART #
DESCRIPTION
1
788250
Press Frame
2
788251
Turret Head
3
788252
Toggle Block
4
788254
Ram
5
188719
Links (2)
6
788257
Link Pin Right
7
788258
Link Pin Left
8
788255
Ram Pin
9
788256
Toggle Block Pin
10
788260
Turret Head Bolt
11
788261
Turret Head Washer
12
788259
Press Handle
13
187414
Handle Ball
14
788262
Turret Pin
15
180054
LAMII Handle Knob
16
788253
Primer Dispenser
17
188104
Dispenser Bottom
18
788263
Primer Transfer Bar
19
198943
Palm Knob