RCBS Pro 2000 Progressive Reloading Press User Manual
Page 6
- 6 -
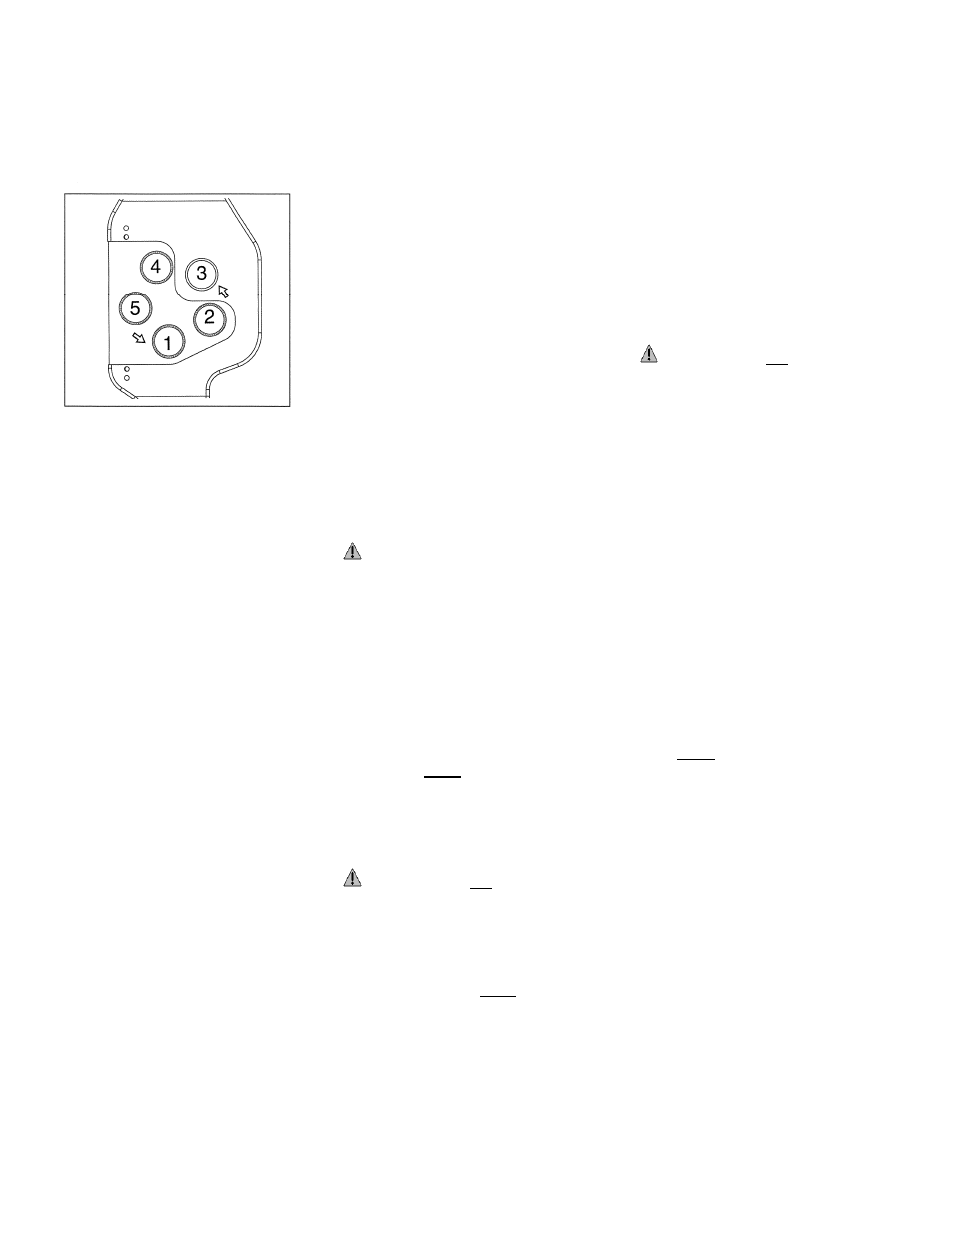
PRESS SET-UP
Refer to reloading Die instructions
and Powder Measure instructions for
individual adjustment and set-up. See
diagram for position and rotation.
Indexing is in a counter-clockwise
direction.
STATION SET-UP OPTIONS
Station 1:
1. Sizing Die
2. Lube Die is optional when
reloading bottleneck cartridges.
3. Decap Die: Size and expand in
Station 2 with an elevated
Expander Ball.
Station 2:
1. Expander Die for straight wall
cases.
2. No die for bottleneck cartridges.
3. Sizing Die if using Lube Die at
Station 1. This allows you to
elevate the Decap Rod and
Expander, which enhances the
expanding operation.
Station 3:
1. Powder charging. Refer to
Powder Measure instructions on
page 8-10.
Station 4:
1. Lock Out Die (optional for pistol
calibers 9mm and larger).
2. Powder Checker Die (optional,
for most rifle and pistol calibers).
3. Seat Die.
4. Bullet Feeder
Station 5:
1. Seat die or seat/crimp die
2. Crimp die (optional if you
choose to seat and crimp
separately).
DIE ADJUSTMENT
Standard die adjustments are listed in
this section. Refer to PRESS SET-UP
for die position. If you have questions
after reading these instructions,
please refer to the Die Instructions
included with your die set.
2-DIE SET FOR BOTTLENECK
RIFLE AND PISTOL CASES
The end of the expander ball must be
at least 3/16" inside the bottom of the
die. The Expander Ball and
Decapping pin are adjusted by
loosening the small lock nut at the top
of the die and turning the Expander-
Decapping Rod until the desired
setting is obtained. When the
Expander Ball is adjusted correctly,
the Decapping pin will protrude below
the bottom of the die just enough to
knock out the spent primer. The case
is sized (full length or neck), deprimed
and expanded in one operation. If
cast lead bullets are being used, you
will need an RCBS Neck Expander
Die as a second operation. This die
expands a sized rifle case neck to the
correct diameter and slightly flares
(bells) the case mouth for lead bullet
seating.
FULL LENGTH OR NECK SIZING
CAUTION: To prevent sticking
your cases in the sizing die, always
lube cases before sizing, unless using
a carbide sizing die.
Lower the handle and raise the ram to
the top of the stroke. Thread the
Sizing Die into the press until the die
touches the Shell Plate. Be sure all
play is removed from the press
leverage system. To do this, slightly
raise the handle to lower the shell
plate and, thread the die 1/8 to 1/4
turn further down so the press cams
over center. Set the Die Lock Ring
and you're ready to size.
BULLET SEATING WITHOUT
CRIMPING
CAUTION: Do not adjust the
Seater Die down against the shell
plate as it will distort or crush the
case.
These instructions are for seating the
bullet without crimping. To adjust the
Seater Die, place a sized case (no
primer or powder, this case becomes
a “dummy” or “setup” round), into the
Shell Plate at Station 5 and run it to
the top of the press stroke. Thread the
Seater Die down into the press until
you feel it touch the mouth of the
case. Back the die up one full turn
and lock the Die Lock Ring. This will
leave a gap between the bottom of
the die and the shell plate.
Raise the handle and re-insert the
case into Station 5. Place the bullet
onto the case mouth and slowly cycle
the handle to seat the bullet.
Measure the overall length of the
cartridge to check for proper bullet
seating depth. If the bullet is not
seated to the correct depth, adjust
the Bullet Seat Plug, up or down,
until the proper cartridge overall
length is obtained. This is a “trial and
error” operation. Once the proper
bullet seating depth is attained,
tighten the Seat Plug Lock Nut.
BULLET SEATING WITH
CRIMPING
CAUTION: Do not adjust the
Seater Die down against the shell
plate as it will distort or crush the
case.
First, follow the instructions for
BULLET SEATING WITHOUT
CRIMPING, before continuing with
this section.
We will now adjust the Seater Die to
crimp the case mouth into the bullet.
Insert the uncrimped “setup”
cartridge back into Station 5 and
lower the handle. With the uncrimped
cartridge up in the Seater Die, loosen
the Bullet Seat Plug Lock Nut and
unscrew(raise) the Bullet Seat Plug
several turns. Loosen the Die Lock
Ring and thread the Seater Die body
down until you feel it touch the mouth
of the case.
Raise the handle slightly to lower the
cartridge and adjust the Seater Die
body down another 1/8 of a turn.
Lower and then raise the handle to
run the cartridge back into the Seater
Die. Check the crimp. If more crimp
is desired, repeat the preceding step
by adjusting the die downward
another 1/8 of a turn. This is a “trial
and error” operation. Typically, you
will not lower the Seater Die body
down more than one-half a turn for
proper crimp. After you are satisfied
with the crimp, tighten the Die Lock
Ring.
Insert the “setup” cartridge back into
Station 5 and lower the handle. To
re-set for cartridge overall length,
thread the Bullet Seat Plug down
until it firmly touches the bullet.
Tighten the Bullet Seat Plug Lock
Nut.
The Seater Die is now properly
adjusted to seat the bullet and crimp
in one operation.