Introduction, Installation procedures, Cartridge installation – Watts Jumbo Plastic Housing User Manual
Page 2: Vent and pressure gauge, Initial start up, Caution, Specifications
Installation Procedures
Install filter housing using the appropriate size pipe . (Pipe fittings are
2" slip) . Follow the PVC glue and primer manufacturer’s instructions
when making all solvent weld connections . Be sure to install shutoff
valves before and after the filter housing and on any drain connec-
tions, which are to be installed . A
1
⁄
4
" FNPT port is located on top
of the filter's lid, and a pressure gauge has been provided . Locate
this gauge (in carton) and install it in gauge port using Teflon tape . A
second gauge may be installed; downstream of the filter (in the pipe
line) to indicate pressure differential and help you determine when
cartridge replacement may be necessary .
Cartridge Installation
To remove the filter's lid when the filter is under pressure, turn off
the inlet and outlet valves, press pressure relief button to relieve
pressure . Then remove eyebolts, lid, and notice the way the O-ring
is positioned . From time to time, this O-ring may be lubricated with
non-petroleum based lubricant for optimum performance . Filter
cartridges have double O-rings on the male ends to provide superior
sealing . From time to time, these O-rings may be lubricated with
non-petroleum based lubricant for better results . The other end
of the cartridge is closed, and a handle is part of the end cap for
convenience .
Filter cartridges have locking tabs on the male ends of the cartridges
to lock the cartridges in place . For proper installation, insert filter
cartridge into the cartridge adapter, which is located at the bottom of
the filter housing . Once the cartridge is pushed down all the way, ro-
tate cartridge clockwise to engage the locking tabs until the cartridge
has been locked in place .
To remove cartridge, rotate cartridge counterclockwise and pull
upward .
Vent and Pressure Gauge
A
1
⁄
4
" FNPT port and pressure gauge has been installed in the filter's
lid to indicate working pressure . A second gauge may be installed,
downstream of the filter in the pipe line to indicate pressure dif-
ferential and help determine when cartridge replacement may be
necessary .
Initial Start Up
Once the piping procedures are completed, shutoff valves have been
installed and the cartridge has been inserted and locked in place,
open outlet completely, start up pump and open inlet valve slowly to
check for leaks . If leaks occur, shut off pump, close inlet and outlet
valves, release pressure by pressing pressure release button, remove
lid and check the O-ring to be sure it is properly seated .
Caution
Do not attempt to remove lid without relieving pressure . To open
lid, close shutoff valves before and after filter, press pressure relief
button to relieve pressure . Once pressure has been relieved, remove
eyebolts and lid . To start up filter, replace lid, tighten eyebolts, and
open shutoff valves slowly to check for leaks . If lid O-ring does not
seat properly, close shutoff valves, relieve pressure, open lid, apply a
small amount of non-petroleum based lubricant to the O-ring to help
it seal, reposition O-ring and close lid .
Do not operate filter above 125psi (8.8 bar). In installations
where pressure is above 100psi (6.9 bar), install a pressure
release valve to release pressure at 125psi (8.8 bar) or less.
2
Introduction
Prior to shipment, Watts
®
Jumbo Cartridge Filter Housing have been
inspected to assure they are free from manufacturing defects . Before
installation, however, please check the lid's O-ring to ensure it is in
place and note the inlet and outlet labels for proper pipe connec-
tions . (See drawing on Page 3 .)
Note: Filter housing has two outlets to allow for same direc-
tion piping. A plug has been provided to use to close off the
pipe fitting not used.
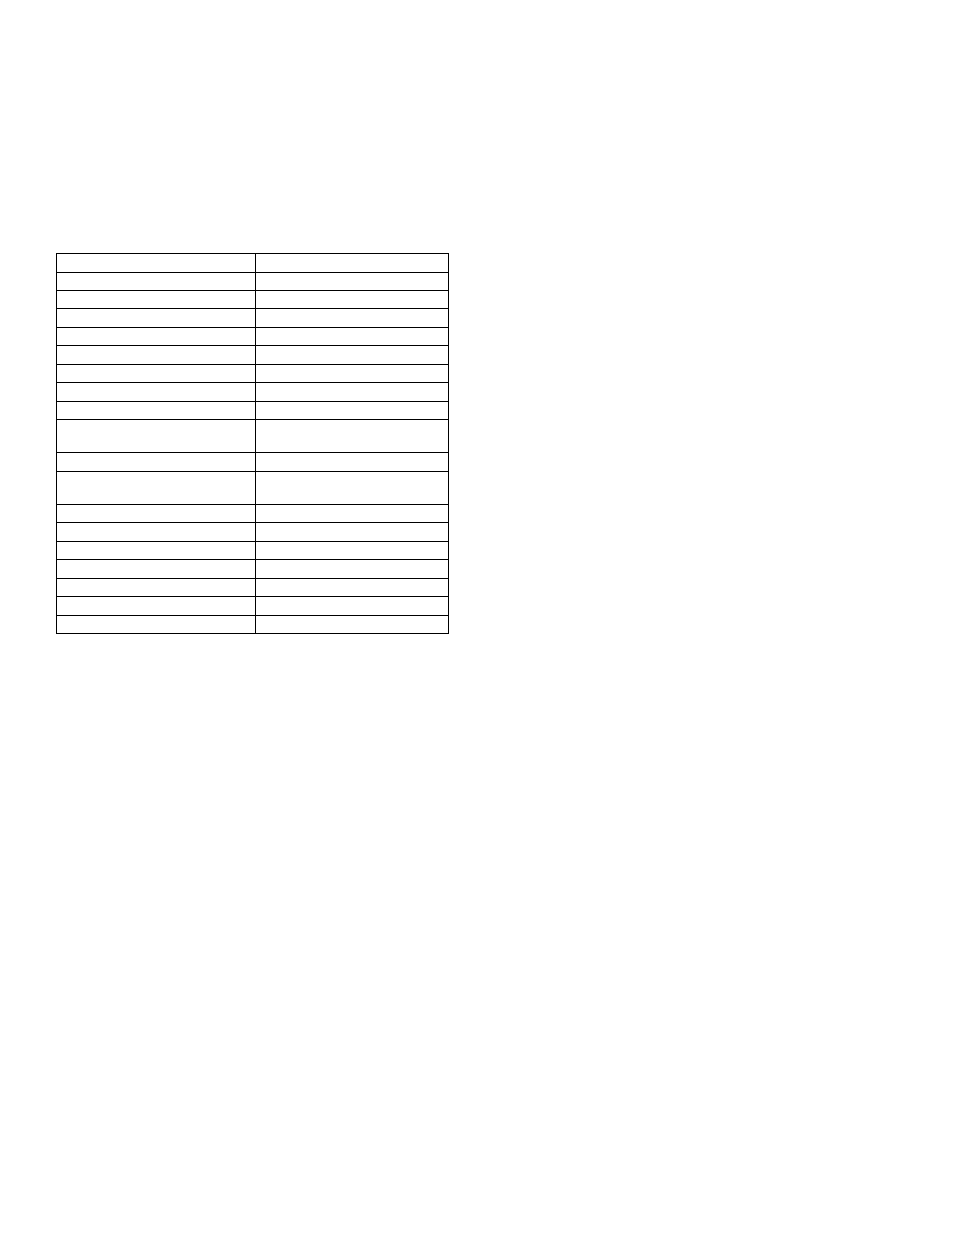
Material, body & cartridge end caps
Glass reinforced PP
Brass reinforced gauge port
1
⁄
4
" FNPT
Material, swing bolts
304SS
O-ring
EPDM
Lid closure
Swing bolt
Pipe fittings (One inlet and two outlets) PVC 2" SLIP Female PVC
Drain
1
⁄
2
" FNPS with drain plug
Overall height
42.7"
Width
15.4"
Maximum flow rate
(with pleated cartridges 5 micron and up)
150 GPM (34M3/hr)
Maximum flow rate (with depth cartridges) 100 GPM (22.7M3/hr)
Maximum flow rate
(with pleated 1 micron absolute cartridge)
50 GPM (11.3M3/hr)
Maximum flow rate (with carbon cartridge) 15GPM (3.4 M3/hr)
Maximum working pressure
125psi (8.75 bar)
Maximum temperature
125°F (52°C) @ 80psi
Cartridge change-out, sediment
30psi differential (max.)
Cartridge change-out, carbon
Every 6-12 months*
Shipping weight
47 lbs.
Carton dimensions (L x W x D)
16" x 16" x 40"
Specifications
* Depending on chlorine level and water usage .
Note: Flow rates are for guidelines only, and they are based
on micron rating, solids content and other factors. Users are to
determine the best flow rate for their application based on these
factors.