Sizes: 2 – Watts LF909 User Manual
Page 2
2
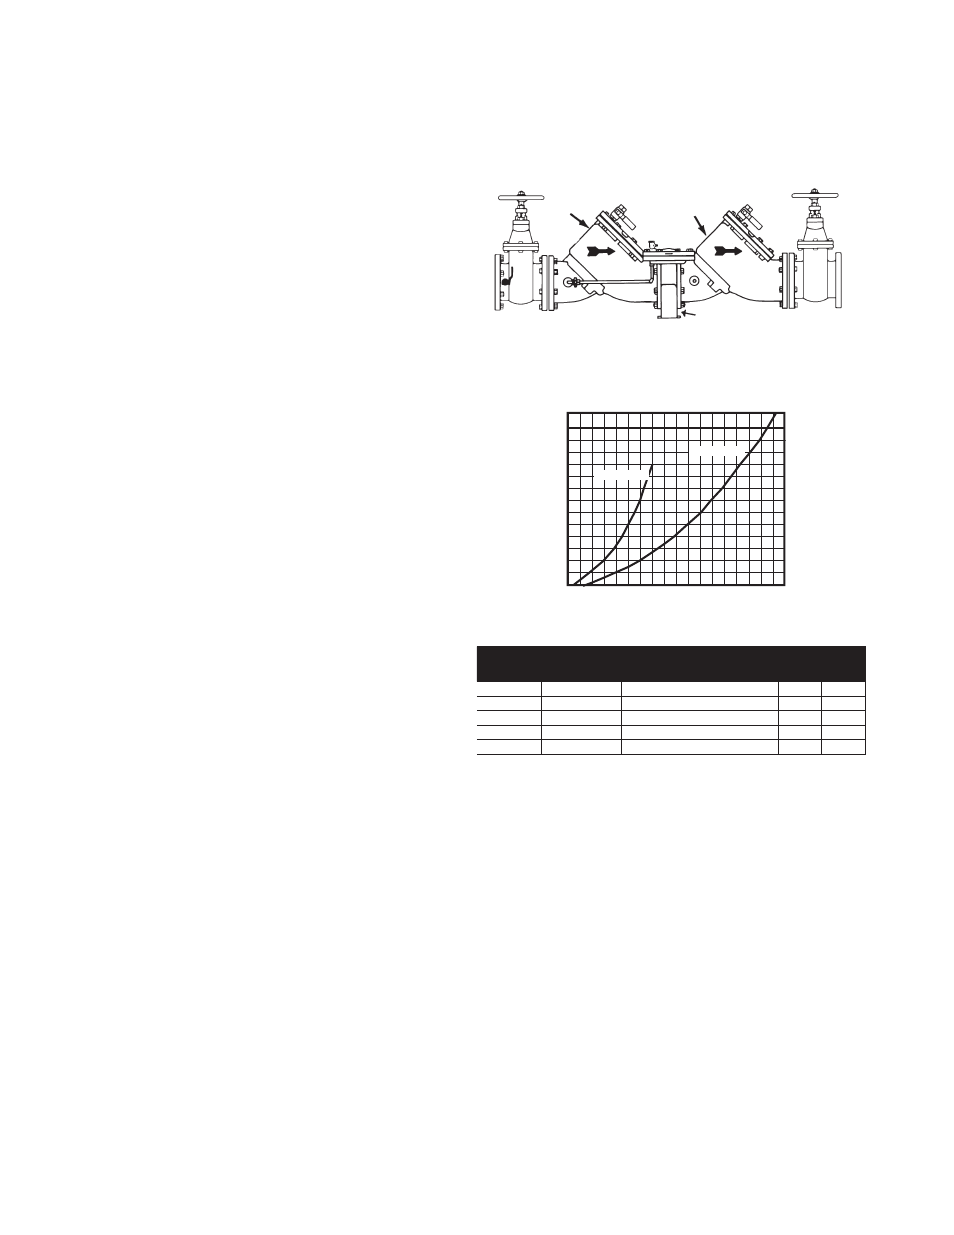
Figure 2
ValVE sizE
Typical FlOw RaTEs as sizEd By
FlOOR dRain ManuFacTuRERs
dRain sizE
in.
mm
in.
mm
2
1
⁄
2
”
65
55 gpm
2
50
3”
80
112 gpm
3
65
4”
100
170 gpm
4
100
6”, 8”, 10”
150,200,250
350 gpm
5
125
Figure 1
Series 909/LF909
Relief Valve Dis charge Rates
zO
nE
pRE
ssu
RE (
psi
G)
FlOw RaTE (GpM)
2
1
⁄
2
” – 3” 909
4” – 10” 909
175
150
125
100
75
50
25
0
0 100 200 300 400 500 600 700 800 900
Relief Valve
First
Check
Second
Check
Second
Shutoff
Valve
Inlet
Shutoff
Valve
Watts No. 909/LF909
2
1
⁄
2
" – 10" (65 – 250mm)
Basic Installation Instructions
Series 909/LF909
Sizes: 2
1
⁄
2
" – 10" (65 – 250mm)
6. The relief valve module on 2
1
⁄
2
" – 10" (65 – 250mm) 909/LF909
Series assemblies may be turned to discharge to the opposite
side. To do so, unbolt the relief valve and turn the relief valve dis-
charge port to the opposite side. Mount the high pressure hose
on the op po site. This should be done by a licensed journeyman
tradesperson, who is rec og nized by the authority having jurisdic-
tion and only when space is critical for testing or repair.
7.
ASSEMBLY: If the backflow preventer is disassembled during
installation, it MUST be reassembled in its proper order. The gate
valve with the test cock is to be mounted on the inlet side of the
backflow preventer. The test cock must be on the inlet side of
the wedge. Please see above. Failure to reassemble correctly will
result in possible water damage due to excessive discharge from
the relief port/vent and possible malfunction of the backflow pre-
venter.
8. Installation procedures must comply with all state and local
codes and must be completed by a licensed journeyman trades-
person who is recognized by the authority having ju ris dic tion.
9. Prior to installation, thoroughly flush all pipe lines to remove any
foreign matter.
10. START UP at Initial Installation and After Servicing: The down-
stream shutoff should be closed. Slowly open upstream shutoff
and allow the backflow preventer to fill slowly. Bleed air at each
test cock. When backflow preventer is filled, slowly open the
down stream shutoff and fill the water supply system. This is nec-
essary to avoid dislodging O-rings or causing damage to internal
com po nents.
11.
TEST: The 909/LF909 Series backflow preventer may be tested
by a certified tester at the time of installation in order to ascertain
that the assembly is in full working order and may be relied upon
to protect the safe drinking water as per applicable standard.