Getting started – Meade Instruments LX80 User Manual
Page 17
midpoint of the counterweight shaft. Tighten the
counterweight(s) lock knob to a fi rm feel. Replace
the safety cap.
Note: If the counterweight ever slips, the safety cap
prevents the counterweight from sliding entirely
off the shaft. Always leave the safety cap in place
when the counterweight is on the shaft.
6. Attach the optical tube to the dovetail mount.
All of Meade’s standard LX80 OTAs is equipped
with a dovetail that mates with the mount’s Vixen®-
style receiver.
•
Schmidt-Cassegrain OTAs: Dovetails on the 6, 8
and 10 inch OTAs are factory mounted and can be
immediately mounted onto the LX80.
•
Series 5000 ED APOs and Coronado SolarMax
OTAs: are equipped with Vixen®-style dovetails
mated to cradle ring style mounts. It is always
good practice to make sure that the cradle ring lock
knobs are tight and secured to prevent the tube
from slipping from the cradle.
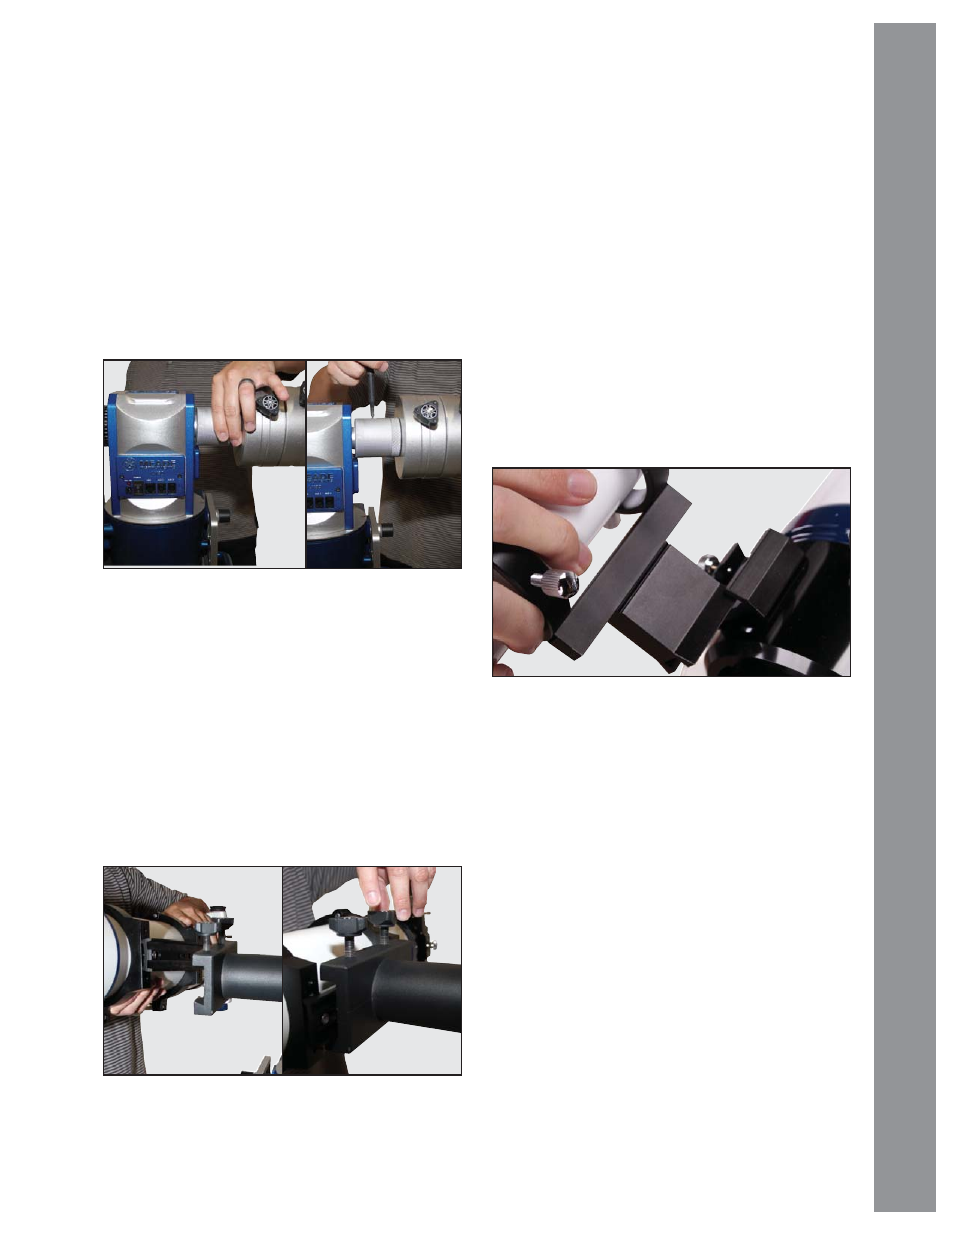
First lock the declination lock (see Fig 19) to
prevent the OTA from moving once it is installed in
the receiver. Next loosen the two dovetail receiver
lock knobs, pick-up the OTA and slide the tube’s
dovetail mount into the mount;s receiver. Maintain
your grip on the OTA so that it does not slide through
or off of the receiver; secure by tightening the two
(2) lock knobs to a fi rm feel.
7.
Assemble the viewfi nder. Attach the six
viewfi nder collimation screws to the viewfi nder
bracket leaving room to slide the viewfi nder tube
into the bracket. Slide the optical viewfi nder into
the bracket and adjust the collimation screws so the
viewfi nder is approximately centered in the bracket.
Orient the viewfi nder eyepiece as depicted in
(Page 8, Fig 1, 3).
Attach viewfi nder to the OTA
• Slide the viewfi nder bracket into the pre-installed
mounting adapter on the rear of the OTA so the
viewfi nder eyepiece points toward the rear of
the telescope. Tighten the locking screws to a
fi rm feel.
Note: The 80mm APO is not equipped with
a viewfi nder.
Coronado SolarMax II: both the 60mm and
90mm solar scopes include a built-in Sol-Ranger
projection viewfi nder mounted to the cradle ring
and are pre-aligned at the factory.
8. Insert the eyepiece.
Schmidt-Cassegrain
models: Unscrew the rear
silver dust cap and set aside in a safe place.
Replace it when you have fi nished observing to
prevent dust from entering the rear cell of the optical
tube assembly. Thread the accessory adapter onto
Fig 19: Tighten DEC lock
Fig 20: Slide dovetail into bracket and secure
Fig 21: Slide in fi nderscope and secure
17
Getting Started