Clarus Environmental Standard Riser Systems User Manual
Page 2
© Copyright 2012. All rights reserved.
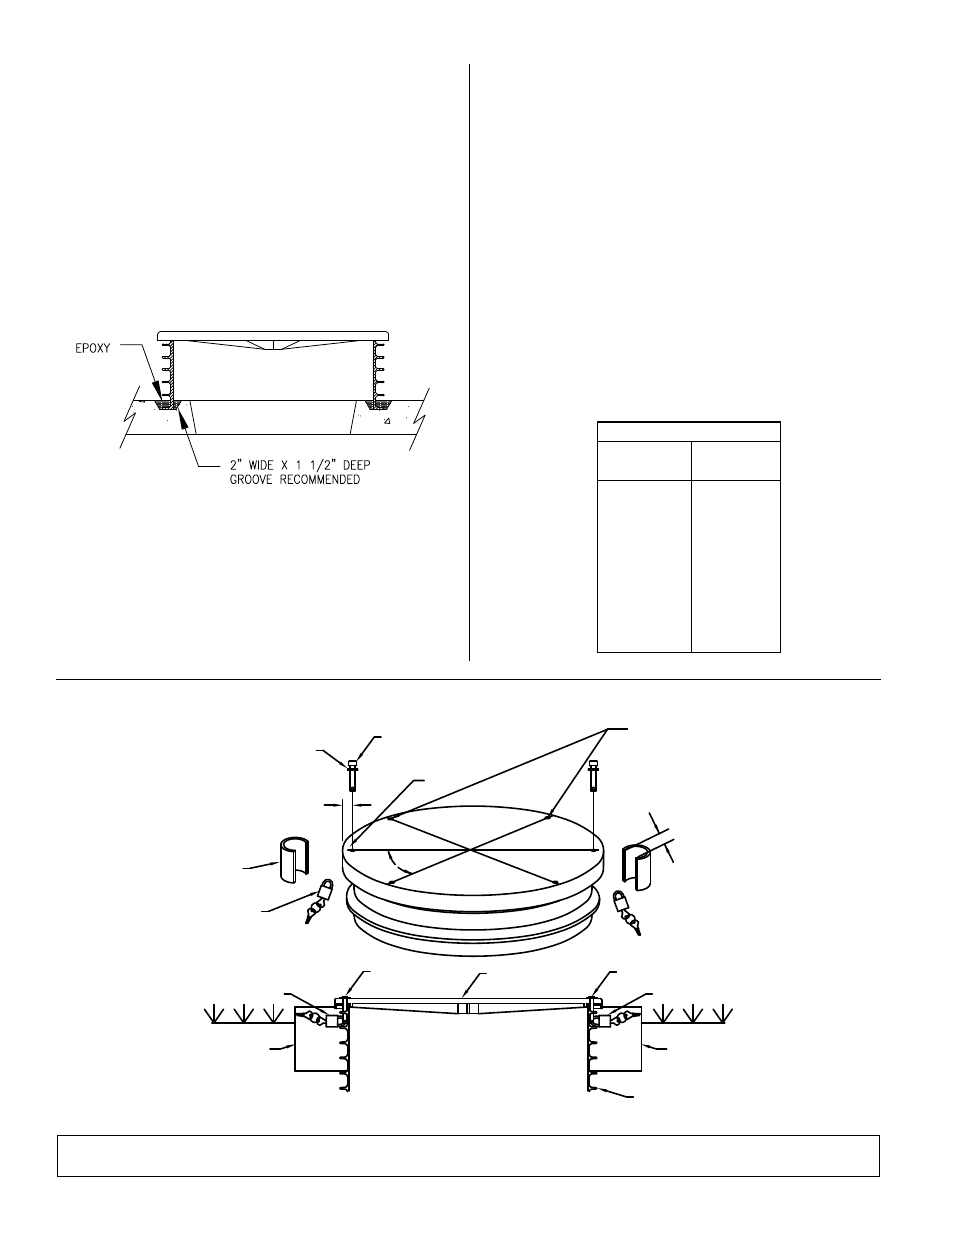
FIG. 5
Pipe Seals
Nominal
Hole Saw
Pipe Size
Diameter
3/8" IPS
1"
1/2" IPS
1-1/4"
3/4" IPS
1-1/4"
1" IPS
1-3/4"
1-1/4" IPS
2"
1-1/2" IPS
2-1/2"
2" IPS
3"
3" IPS
4"
4" IPS
5"
FIG. 4
SK1838
1"
(2 PLACES)
PIN HOLE
PIN
EXISTING LID MOUNTING HOLES
45°
WASHER
LOCK GUARDS (2)
LOCKS (2)
(4" DIA. BY 6"
PIN
LOCK
LOCK GUARD
LID
RISER
BY OTHERS)
(4 PLACES)
(BY OTHERS)
LOCK
LOCK GUARD
PIN
3"
All Clarus Environmental
®
products must be installed and maintained in accordance with all applicable codes.
Product information presented here reflects conditions at time of publication. Consult factory regarding discrepancies or inconsistencies.
FIG. 3
SK2294D
Lockable Latch (See FIG. 4):
Note: Does not apply to 18" dia. riser.
1. Center the lid on the riser and install the mounting
screws.
2. Drill two 7/16” holes 1” from the edge of the lid
approximately 45 degrees from the screws and 180
degrees from each other. The hole should penetrate the
lid and the first rib of the riser.
3. If the lock will be below grade, a 4” pipe or larger,
cut 6” long (furnished by others) with 3” on one side
removed, must be installed next to the riser to allow
access to the padlock. See lock guards in Fig. 4 below.
4. Install the stainless steel pins and washers into the 7/16”
diameter pin holes. Install padlocks (supplied by others)
through the hole in the end of the pins.
Pipe Seals (See FIG. 5):
1. Drill the appropriate size hole in the side of the riser tube.
2. Place the pipe seal in the riser with the largest diameter
inside the riser.
3. To ease pipe installation, lubricate the seal with a mild
soap solution such as dish washing liquid. After the pipe
is installed, clean off any lubricant.
Epoxy Mounting Risers (See FIG. 3):
1. Clean and dry the bottom flange on the riser and the
mounting groove in the septic tank: wash the top of the
tank with detergent and water. Clean the riser with PVC
cleaner or lacquer thinner to provide the best seal.
2. Fill the groove in the tank half way with adhesive (P/N
172-0019). Approximately 1 quart will work for a 24” or
30” diameter riser.
3. Position the riser down in the groove and apply pressure,
submerging the bottom of the riser into to adhesive.
Allow adhesive to dry to a firm, watertight seal.
4. After adhesive has set for 4 hours, backfill with dirt within
24 hours. Be careful not to damage the riser.