Layout at site 2, Lacing instructions 3, Tie down after lacing 4 – Anchor CENTURY MATE 30 & 40" WIDE EXPANDABLE User Manual
Page 4
Any objects with sharp projections which must
remain on site under the tent should be padded
and taped.
Spread drop cloths and unroll tent.
Snap web guys to tent top.
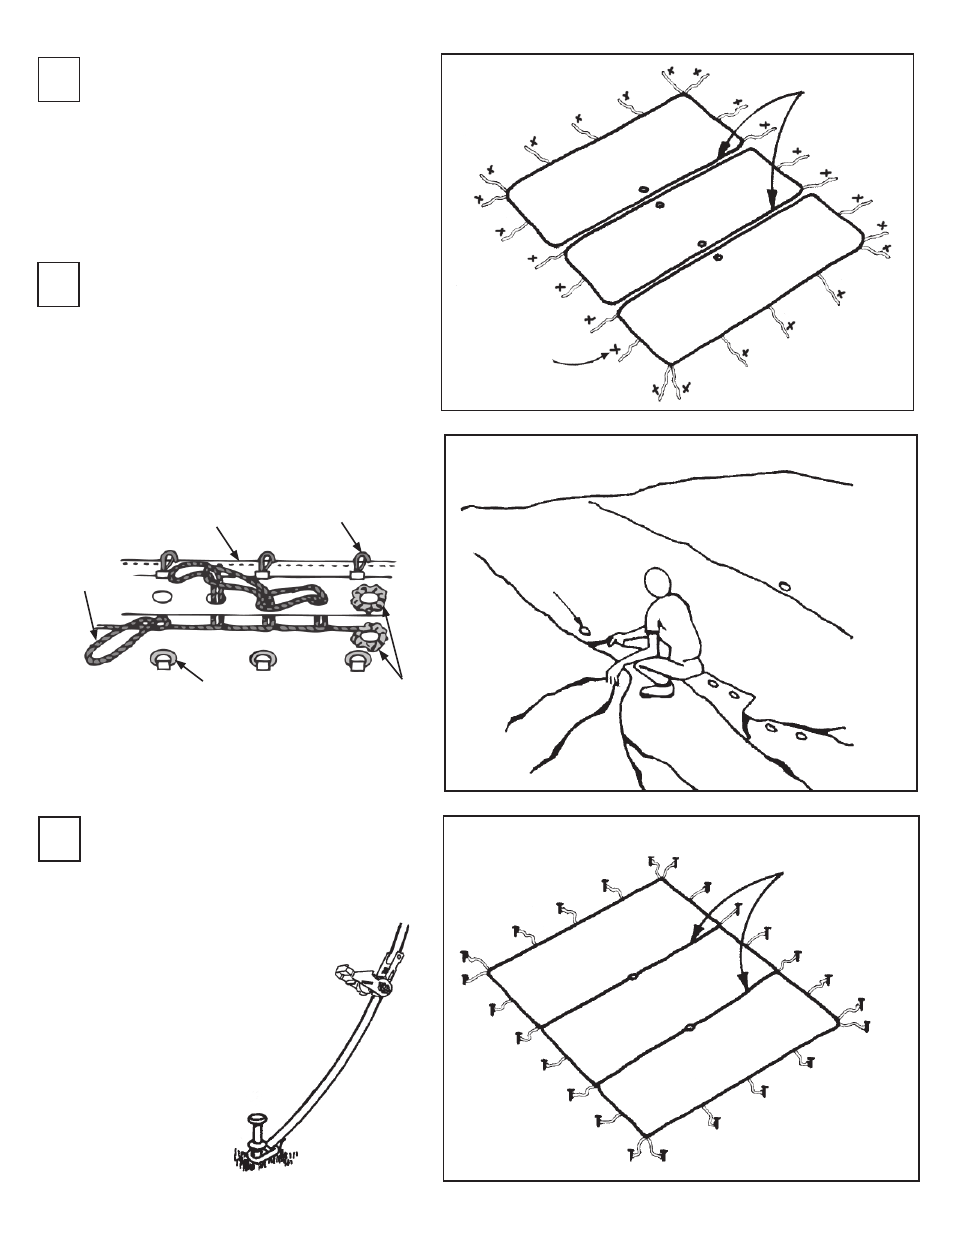
LAYOUT AT SITE
2
With tent sections on ground, overlap center
pole hole with grommet side on top. Starting
at ridge, push first loop through corresponding
grommet.
Continue lacing process and cover
lacing with protective flap and snap to rings or
rope as you move down tent section.
Tie off the last long lacing loop.
Attach snap to ring at eave. Repeat
lacing steps on opposite side.
LACING INSTRUCTIONS
3
After lacing and snapping sections, check guys
to be sure they allow plenty of slack for rais-
ing tent and enough for ratcheting after tent is
properly set up. (approximately 2’ of
slack)
Run stake through ring on
guy web.
Drive stakes at points previ-
ously located.
TIE DOWN AFTER LACING
4
LACE
STAKE
MARKINGS
END
MIDDLE
END
END
END
MIDDLE
CENTER
POLE HOLES
LACE
LACE
LOOP
FLAP
RING
SNAP
CENTER POLE
HOLES
4
- STAKE OUT (1 page)
- DOUBLE DECKER (2 pages)
- ORIGINAL PARTY TENT LINER (2 pages)
- FIESTA TENT LINER 10-30 WIDE (2 pages)
- NAVI-TRAC LINER 30-50 WIDE (2 pages)
- CENTURY TENT LINER (5 pages)
- EVENT AND VENUE LINER (8 pages)
- ANCHORSPAN LINER (2 pages)
- ANCHORSPAN AA 30FT-60FT (38 pages)
- ANCHORSPAN A 60FT-80FT (38 pages)
- EVENT SERIES - PROFILE SIZE: 20M - 220X100X4 - 3M UPRIGHTS (47 pages)
- EVENT SERIES - PROFILE SIZE: 220MM X 100MM, INSTRUCTION SUPPLEMENT - WINDOW / HARD WALL INSTALLATION (4 pages)
- EVENT SERIES - PROFILE SIZE: 220MM X 100MM, INSTRUCTION SUPPLEMENT - AMBASSADOOR WITH VINYL WALLS INSTALLATION (4 pages)
- EVENT SERIES - PROFILE SIZE: 220MM X 100MM, INSTRUCTION SUPPLEMENT - AMBASSADOOR AND HARDWALL INSTALLATION (4 pages)
- VENUE SERIES - PROFILE SIZE: 160MM X 100MM (28 pages)
- PZ (PARTY) SERIES - PROFILE SIZE: 94MM X 48MM (27 pages)
- PZ (PARTY) SERIES - PROFILE SIZE: 94MM X 48MM ADDENDUM - HIGH PEAK (5 pages)
- PZ (PARTY) SERIES - PROFILE SIZE: 94MM X 48MM ADDENDUM - HEX END (6 pages)
- NAVI-TRAC 30 WIDE HIP-END (21 pages)
- NAVI-TRAC 40 WIDE HIP-END (21 pages)
- NAVI-TRAC 50 WIDE HIP-END (21 pages)
- NAVI-TRAC 30 WIDE GABLE-END (21 pages)
- NAVI-TRAC 40 WIDE GABLE-END (21 pages)
- NAVI-TRAC 50 WIDE GABLE-END (21 pages)
- NAVI-TRAC FRAME LIFT (2 pages)
- NAVI-TRAC LITE PAVILLION - 12 TO 24 (16 pages)
- NAVI-TRAC LITE 20 WIDE (21 pages)
- NAVI-TRAC LITE 30 WIDE (20 pages)
- CENTURY FRAME TENTS 10X10, 15X15, 5M AND 20X20 (8 pages)
- CENTURY FRAME TENTS 20 AND 30 HEX (8 pages)
- CENTURY FRAME TENTS 30X30 WITH OPTIONAL WALLS (8 pages)
- CENTURY FRAME TENTS 20X30 WITH OPTIONAL WALLS (9 pages)
- FIESTA MARQUEE (5 pages)
- FIESTA MARQUEE STAIR STEP KIT (4 pages)
- FIESTA MARQUEE L-SHAPED (2 pages)
- FIESTA MARQUEE ROUND CORNER KITS (4 pages)
- FIESTA PAVILION 10, 12 & 14 WIDE X 15 LENGTH (8 pages)
- FIESTA FRAME TENT 8-16 (8 pages)
- FIESTA FRAME TENT 18-22 (10 pages)
- FIESTA FRAME TENT 24-30 (8 pages)
- FIESTA FRAME TENT 40 PLUS II RETROFIT (5 pages)
- FIESTA FRAME TENT CATENARY TOP FASTENING ASSEMBLY (2 pages)
- FIESTA FRAME TENT LIFT (4 pages)
- FIESTA FRAME TENT HIGH PEAK (4 pages)
- FIESTA PLUS II - 30 & 40 WIDE (8 pages)