Step 1, Step 2, Side view front view – Anchor EVENT AND VENUE LINER User Manual
Page 2
2
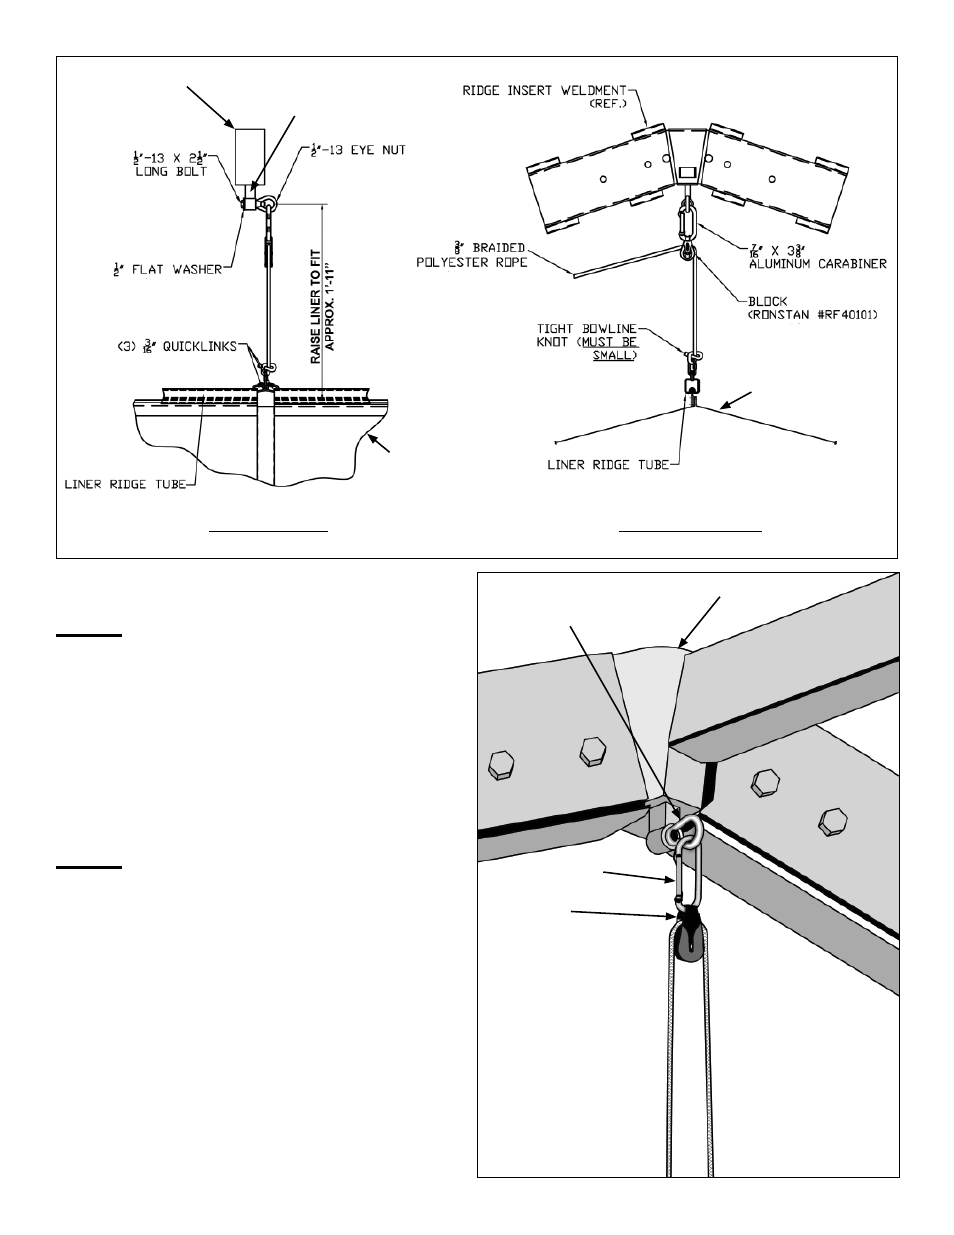
Bolt with eyenut thru
peak weldment upright
location.
Block
Carabiner
Step 1
The liner will be hoisted by ropes attaching to
eyenuts that are attached to the peak weldment
upright location as shown in Figure 1.
It will be easier to install these bolts and eyenuts
if it is done before the frame is raised or the
fabric is installed. Place one eyenut at each
peak weldment with all eyenuts facing the same
direction except at (1) end.
Step 2
Lay out liner pieces on drop cloths in their
respective placements. Check the pieces to
be sure velcros go together correctly and the
good side of the liner faces the ground. Please
note that gable ends are built into adjacent mid
pieces.
Figure 2
SIDE VIEW
FRONT VIEW
Ridge Insert Weldment
Ridge Insert Weldment
Ridge Insert Weldment
upright bracket
Figure 1
Liner
Liner
- STAKE OUT (1 page)
- DOUBLE DECKER (2 pages)
- ORIGINAL PARTY TENT LINER (2 pages)
- FIESTA TENT LINER 10-30 WIDE (2 pages)
- NAVI-TRAC LINER 30-50 WIDE (2 pages)
- CENTURY TENT LINER (5 pages)
- ANCHORSPAN LINER (2 pages)
- ANCHORSPAN AA 30FT-60FT (38 pages)
- ANCHORSPAN A 60FT-80FT (38 pages)
- EVENT SERIES - PROFILE SIZE: 20M - 220X100X4 - 3M UPRIGHTS (47 pages)
- EVENT SERIES - PROFILE SIZE: 220MM X 100MM, INSTRUCTION SUPPLEMENT - WINDOW / HARD WALL INSTALLATION (4 pages)
- EVENT SERIES - PROFILE SIZE: 220MM X 100MM, INSTRUCTION SUPPLEMENT - AMBASSADOOR WITH VINYL WALLS INSTALLATION (4 pages)
- EVENT SERIES - PROFILE SIZE: 220MM X 100MM, INSTRUCTION SUPPLEMENT - AMBASSADOOR AND HARDWALL INSTALLATION (4 pages)
- VENUE SERIES - PROFILE SIZE: 160MM X 100MM (28 pages)
- PZ (PARTY) SERIES - PROFILE SIZE: 94MM X 48MM (27 pages)
- PZ (PARTY) SERIES - PROFILE SIZE: 94MM X 48MM ADDENDUM - HIGH PEAK (5 pages)
- PZ (PARTY) SERIES - PROFILE SIZE: 94MM X 48MM ADDENDUM - HEX END (6 pages)
- NAVI-TRAC 30 WIDE HIP-END (21 pages)
- NAVI-TRAC 40 WIDE HIP-END (21 pages)
- NAVI-TRAC 50 WIDE HIP-END (21 pages)
- NAVI-TRAC 30 WIDE GABLE-END (21 pages)
- NAVI-TRAC 40 WIDE GABLE-END (21 pages)
- NAVI-TRAC 50 WIDE GABLE-END (21 pages)
- NAVI-TRAC FRAME LIFT (2 pages)
- NAVI-TRAC LITE PAVILLION - 12 TO 24 (16 pages)
- NAVI-TRAC LITE 20 WIDE (21 pages)
- NAVI-TRAC LITE 30 WIDE (20 pages)
- CENTURY FRAME TENTS 10X10, 15X15, 5M AND 20X20 (8 pages)
- CENTURY FRAME TENTS 20 AND 30 HEX (8 pages)
- CENTURY FRAME TENTS 30X30 WITH OPTIONAL WALLS (8 pages)
- CENTURY FRAME TENTS 20X30 WITH OPTIONAL WALLS (9 pages)
- FIESTA MARQUEE (5 pages)
- FIESTA MARQUEE STAIR STEP KIT (4 pages)
- FIESTA MARQUEE L-SHAPED (2 pages)
- FIESTA MARQUEE ROUND CORNER KITS (4 pages)
- FIESTA PAVILION 10, 12 & 14 WIDE X 15 LENGTH (8 pages)
- FIESTA FRAME TENT 8-16 (8 pages)
- FIESTA FRAME TENT 18-22 (10 pages)
- FIESTA FRAME TENT 24-30 (8 pages)
- FIESTA FRAME TENT 40 PLUS II RETROFIT (5 pages)
- FIESTA FRAME TENT CATENARY TOP FASTENING ASSEMBLY (2 pages)
- FIESTA FRAME TENT LIFT (4 pages)
- FIESTA FRAME TENT HIGH PEAK (4 pages)
- FIESTA PLUS II - 30 & 40 WIDE (8 pages)