Data sheet, Ace backstage co., inc, Stage pocket systems – ACE BACKSTAGE Super Stage Pocket User Manual
Page 5
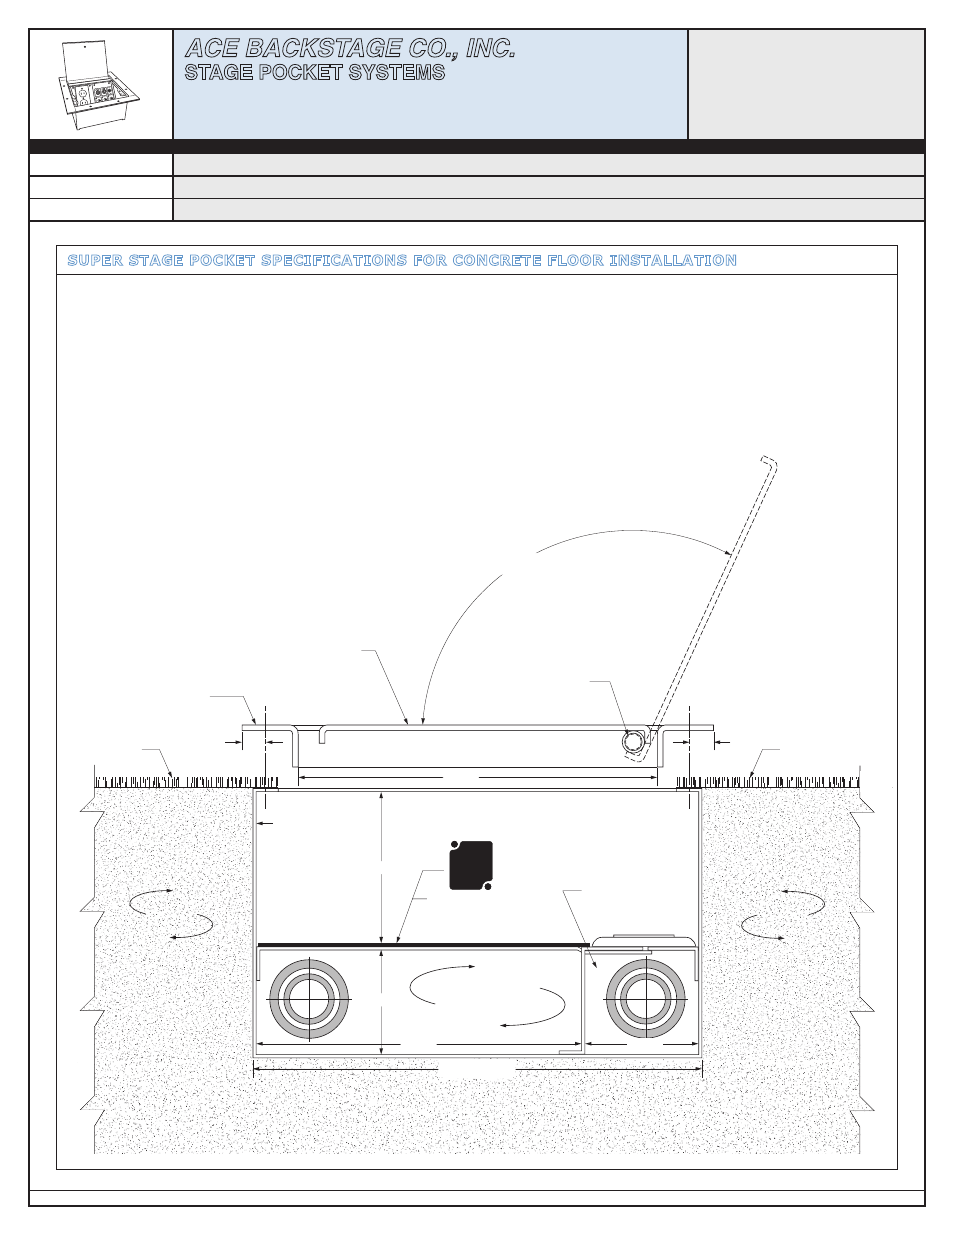
SUPER STAGE POCKET SPECIFICATIONS FOR CONCRETE FLOOR INSTALLATION
ACE BACK
STAGE CO., IN
C.
CLEAR C
OM
DMX12
PUSH
PUSH
3.375"
.500"
2.335"
7.250"
8.000"
2.530"
.500"
10.000"
SQUARE
TRIM BEZEL
MOUNTING
FLANGE &
LID ASSEMBL Y
NOMINAL
OPENING
REMOVABLE SPRING LOADED
HINGE PINS PERMIT EASY LID
EXCHANGE FOR CARPET, LOCKING,
AND STANDARD LID CONFIGURA
TIONS
CARPET
FLOOR
LEVEL
"CONNECTRIX" PANEL
SYSTEM
COMBINATION OF "#PNL-100",
"#PNL-120", OR "#PNL-140"
STAGE POCKET
PANELS
BARRIER ISOLA
TED
LOW VOL TAG E SECTION
CREATED WHEN #BRK102
BRACKET KIT ASSEMBLY
IS INSTALLED
BARRIER ISOLA
TED
AC SECTION CREA
TED
WHEN #BRK102 BRACKET
KIT ASSEMBLY
IS INSTALLED
SUPER STAGE POCKET
BACK BOX #BRK102BBX
CARPET
FLOOR
LEVEL
LID (BLIND HINGE), SPRING LOADED PINS,
AVA ILABLE IN STANDARD FLUSH , STANDARD
FLUSH LOCKING, OR RECESSED CARPET
CONCRETE
FLOOR
CONCRETE
FLOOR
5 of 6
Ace Backstage Co., Inc. Stage Pocket Systems | 24846 Avenue Rockefeller | Suite 200 | Valencia, CA 91355 | Tel: 661-295-5760 | Fax: 661-295-1122 | Web: www.acebackstage.com
ACE BACKSTAGE CO., INC.
STAGE POCKET SYSTEMS
24846 Avenue Rockefeller | Suite 200 | Valencia, CA 91355
Tel: 661-295-5760 | Fax: 661-295-1122
Email: [email protected] | Web: www.acebackstage.com
DATA SHEET
Stage Pocket
Data Spec Sheet
Revision: 1A.132-232
Model Numbers:
#132-xxyy, #232-xxyy (xx= Lid Type and yy= Finish Type)
Model Name:
Super Stage Pocket - Super Capacity Horizontal Panel Pocket
Model Description: Pocket with brushed metal or powder coat finish, choice of lid, with optional panel(s) and connectors
1) - Locate box and install conduit in accordance with local codes
2) - Secure box to reinforcing bars, mesh or otherwise to assure the box is fixed below the finished floor
3) - Grease the inside of the cement cover, the mating box flange and the box seams
4) - Attach the cover to the box and tape the seems
5) - Grease the outside of the cover
6) - Pour concrete
7) - After the concrete has set, remove the concrete cover
8) - Install wire and other devices as required