4 raise extension tray before towing, 5 feed roller control bar, Warning – Echo CH9540H Owners Manual v.7 User Manual
Page 17: English
PTO CHIPPERS
13
ENGLISH
OPERATION
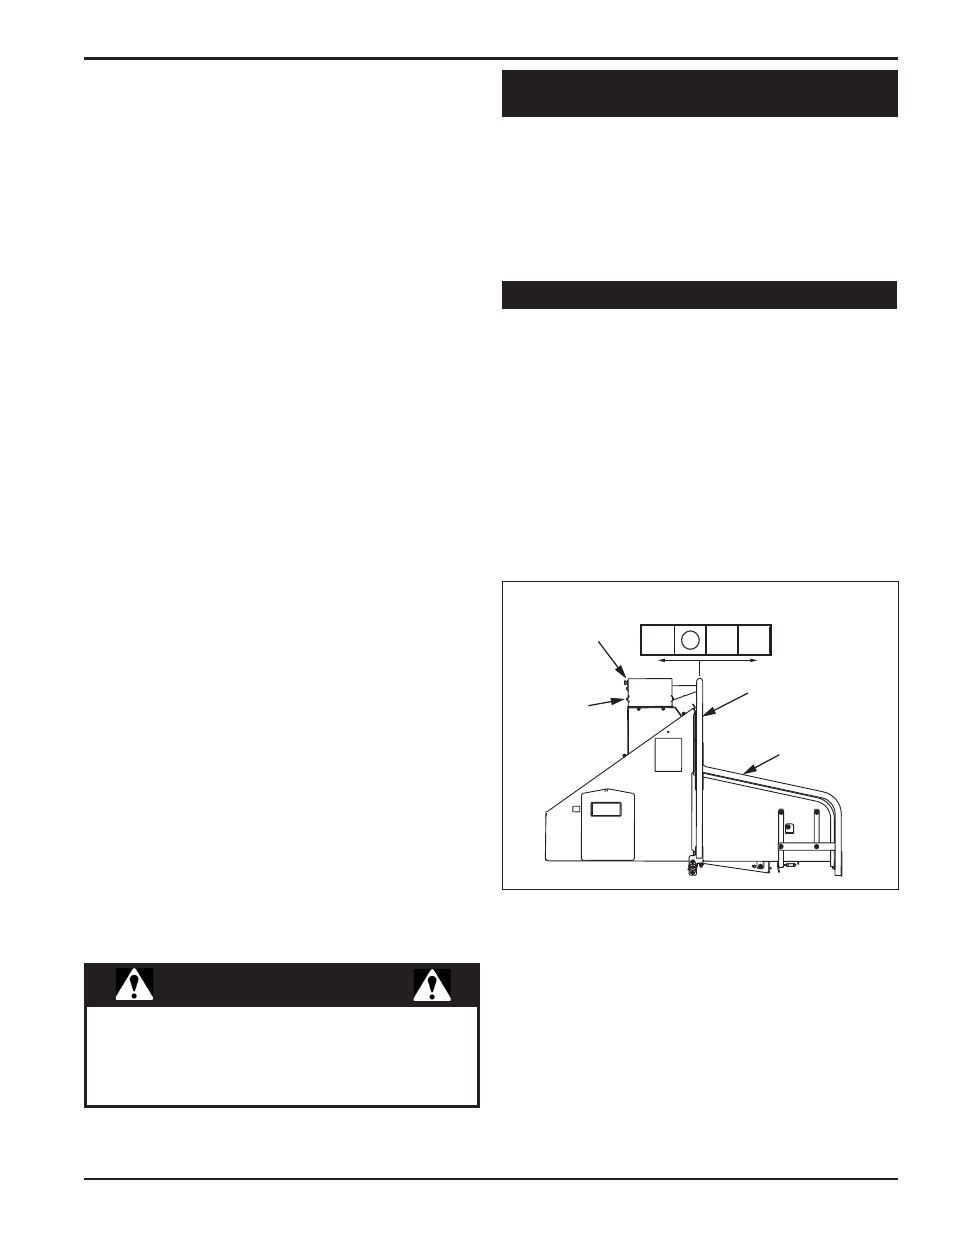
4.5 FEED ROLLER CONTROL BAR
R
REVERSE
R
F
FORWARD
STOP
REVERSE
RESET/OVERRIDE
BUTTON (WHERE
AVAILABLE)
CONTROLLER
LIGHT
FEED ROLLER
CONTROL BAR
SAFETY BAR
(WHERE
AVAILABLE)
4.4 RAISE EXTENSION TRAY BEFORE
TOWING
The machine chips a variety of materials into a more
readily decomposed or handled condition. The following
guidelines will help you get started.
1. Engage the hydraulic feed by pushing the feed roller
control arm into forward position.
2. Limbs fed in to the chipper chute must be 8 inches
(20 cm) in diameter or less. Trim side branches that
cannot be bent enough to feed into the chipper chute.
Hold small diameter branches together in a bundle and
feed in simultaneously.
3. Place limb, butt end first, into the chipper chute until it
contacts the chipper blades. The actual feed rate of the
limb into the chipper will depend on the type of material
fed and sharpness of the cutting blades.
4. Do not feed pieces of metal, rocks, bottles, cans,
or other foreign objects into the machine.
5. Feed brush from the side of the chipper chute, rather
than from the front. Step aside to avoid being hit by the
brush moving into the chipper.
6. If the chipper disk slows, stop feeding material. The
feed roller will stop automatically to process backed up
material. Feed material more evenly.
7. If the chipper jams, the feed roller will reverse
momentarily to remove the branch.
8. Do not use the clutch to clear a plugged rotor. This
may cause belt damage. Refer to the instructions for
clearing a plugged rotor in the Service and Maintenance
section.
9. Alternate greener material with dry material to
lubricate the chipping blades for longer life and better
performance. Chipping dead, dry material will create
heat and dull the chipping blades quickly.
10. Sharpen the chipping blades periodically. Check
the sharpness of the blades every 5-15 hours. Refer
to the Service and Maintenance section for sharpening
instructions.
WARNING
To prevent personal injury or property damage: shut off
engine and make sure that all moving parts have come to
a complete stop before servicing, adjusting, or repairing
machine. Disconnect the battery and remove ignition key
where applicable.
Raise the extension tray to an upright position before
towing the machine. Secure with the fastener located near
the top of the chute.
If your model is equipped with a safety bar, once the
extension tray is in an upright position, push the safety bar
down to lock the bar. To unlock, lower the extension tray
and push in the safety bar.
The Feed Roller Control Bar is used to manually control
the direction of the feed roller rotation.
• Move the feed roller control bar to FORWARD (F)
when you want the materials to feed into the chipper.
The controller light must be steady green.
• Move the feed roller bar to REVERSE (R) when you
want the chipper push materials back out of the feed
chute.
• Move the feed roller bar to STOP to halt the rotation
of the feed roller.
CE COMPLIANT MODELS ONLY
Push the Safety Bar in the event of an emergency and
forward feed will stop. Push the reset/override button to
resume forward feed after returning the safety bar to its
normal operating position.
Upon start-up, the controller light will glow a steady red.
Push the reset/override button to reset.
If false trips occur, the reset button can be held in for 5
seconds to override the system.