Motor maintenance, Drive maintenance and installation, Motor support adjustment – Aerovent IM-166 User Manual
Page 2: Bearing maintenance
2
Aerovent IM-166
Motor Maintenance
The three basic rules of motor maintenance are:
1. Keep the motor clean.
2. Keep the motor dry.
3. Keep the motor properly lubricated.
Blow dust off periodically (with low pressure air) to
prevent motor from overheating.
Some smaller motors are lubricated for life. Lubrication
requirements are normally attached to the motor. Use
the motor manufacturer’s recommendations for relubrica-
tion. If this information is not available, the following
schedule may be used. Motors less than 10 HP running
about eight hours a day in a clean environment should
be lubricated once every five years; motors 15 to 40
HP, every three years. For motors in dusty or dirty
environments or running 24 hours a day: divide the
service interval by 4. Do not over lubricate.
Drive Maintenance and Installation
V-belt drives need periodic inspection, retensioning, and
occasional belt replacement. When inspecting drives,
look for dirt buildup, burrs or obstructions that can
cause premature belt or drive replacement. If burrs are
found, use fine emery cloth or a stone to remove them.
Be careful that dust does not enter the bearings.
Check sheaves for wear. Excessive slippage of belts
on sheaves can cause wear and vibration. Replace worn
sheaves with new ones. Carefully align sheaves to avoid
premature sheave failure.
Inspect the belts for wear. If fraying or other wear is
observed to be mostly on one side of the belts, the
drives may be misaligned. Reinstall the drives according
to the following instructions:
1. Slip (do not pound) proper sheave onto corresponding
shaft.
CAUTION: Placing fan sheave on motor can over-
speed wheel and cause structural failure.
2. Align sheaves with straightedge extended along
sheaves, just making contact in two places on out-
side perimeters of both sheaves.
3. Tighten sheave bolts (or setscrews if appropriate).
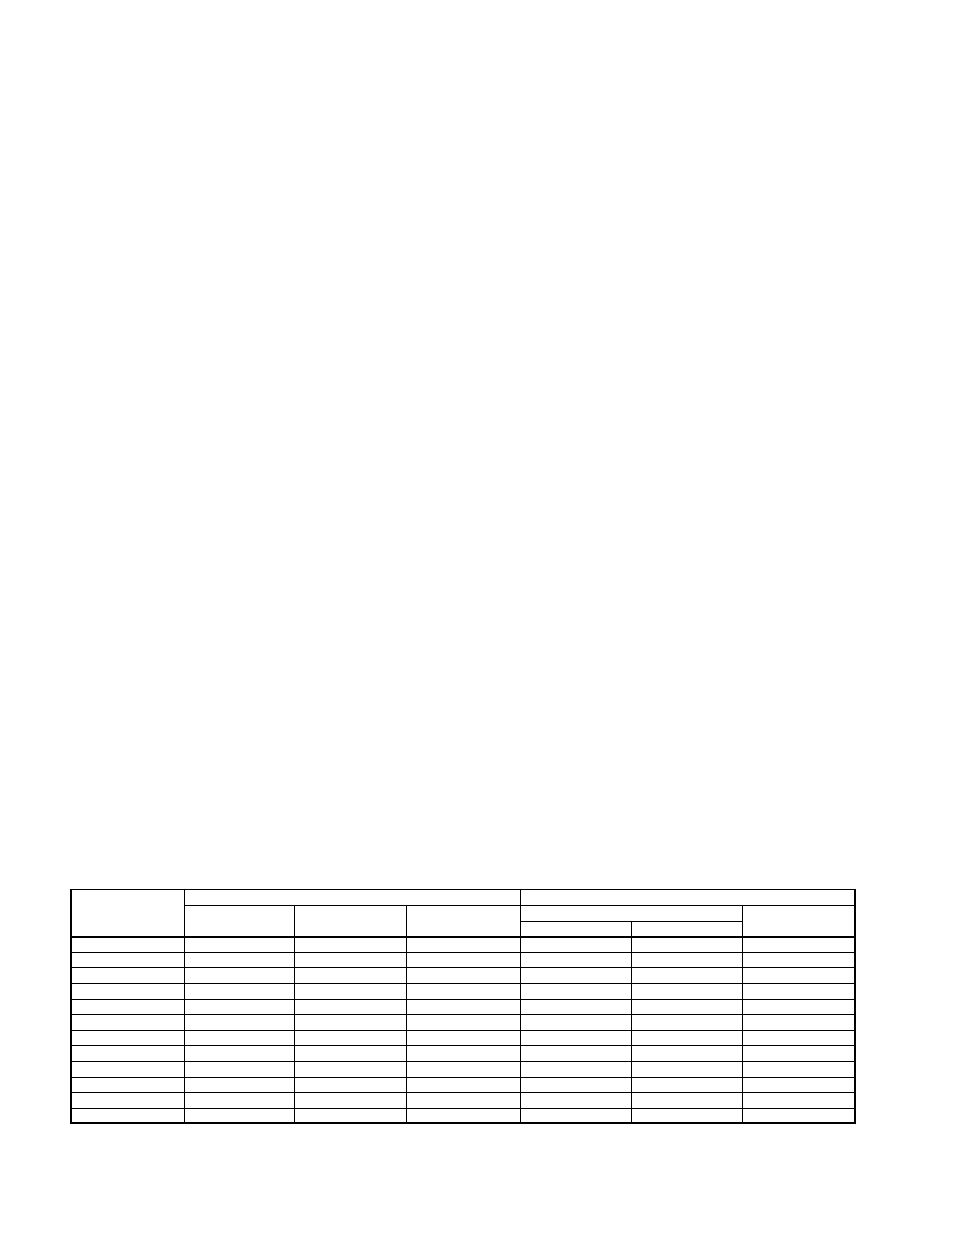
Table 1 can be used to determine the amount of
torque required.
4. Install a matched set of belts. Adjust the motor posi-
tion to obtain slack, install, and tighten belts. Using
a pry bar will damage belts.
5. Tighten belts to proper belt tension. Ideal tension is
just enough so that the belts do not slip under peak
load. When using drive tensioning data supplied by
V-belt drive manufacturers, new belts can be tensioned
to a value 50% greater than for normal operation. This
will reduce retensioning requirements after break-in.
Recheck sheave alignment after tensioning.
6. After initial installation of belts, recheck belt tension
again after a few days. (New belts require a break-in
period of operation.)
7. When replacing belts, replace the entire set. After
initial replacement and tensioning, recheck belt ten-
sion after a few days. (New belts require a break-in
period of operation.) Never use belt dressing on any
belts.
8. Fans that have motors and drives mounted at the
factory are trim balanced prior to shipment. This is
not possible on units that are shipped without motors
and drives. The addition of drive components in the
field can create unbalance forces. Aerovent recom-
mends final balancing of the unit after the drive
components are installed. Failure to do so may void
the warranty.
Motor Support Adjustment
Two different types of motor mounts, post and saddle,
are used on AMX Mixed Flow fans. Which mount to use
depends on the size of the fan and motor.
On the post type motor mount, the motor plate is
supported on four threaded rods. Belt tension is adjust-
ed by loosening the four nuts on top of the motor plate
and raising the motor plate by adjusting the four nuts
underneath it. The top nuts should then be tightened to
hold the motor plate in place.
On the saddle type motor mount, the motor pivots
on one side and adjustment of belt tension is achieved
by loosening the nuts on top of the motor plate on the
other side, then raising the motor plate by adjusting the
nuts underneath the motor plate. The nuts on top of the
motor plate should again be tightened to hold the motor
plate in place. Several holes are provided on the pivot
side, and the pivot point can be raised for gross belt
adjustment. If this adjustment is made, however, the
motor plate should be as parallel as possible to the fan
centerplane. Care should be taken to maintain drive
alignment and proper belt tension.
Bearing Maintenance
Proper lubrication of the fan drive bearings helps assure
maximum bearing life. All fans are equipped with decals
indicating relubrication intervals for normal operating
FASTENER
TAPER BUSHINGS
SIZE
BROWNING SPLIT
QD
GRADE 2
GRADE 5
GRADE 8
IN IRON
IN ALUM. HUB
FOR DRIVE
#10
—
—
—
—
—
5
1
⁄
4
-20
5.5
8
12
7.9
7.5
9
5
⁄
16
-18
11
17
25
16
13
15
3
⁄
8
-16
22
30
45
29
24
30
7
⁄
16
-14
30
50
70
—
—
—
1
⁄
2
-13
55
75
110
70
—
60
9
⁄
16
-12
—
—
—
—
—
75
5
⁄
8
-11
100
150
220
—
—
135
3
⁄
4
-10
170
270
380
—
—
—
7
⁄
8
-9
165
430
600
—
—
—
1-8
250
645
900
—
—
—
1
1
⁄
4
-7
500
1120
1500
—
—
—
Table 1. Tightening Torque (Ft.-Lbs.)
Tolerance: +5%
For wheel setscrews use Grade 2 values.
The above torque values are for nonlubricated fasteners.