Inspection and receiving, Handling and rigging, Unit storage – Aerovent IM-391 User Manual
Page 2: Installation
2
Aerovent IM-391
INSPECTION AND RECEIVING
All Aerovent products are carefully constructed and
inspected before shipment to insure the highest standards
of quality and performance. Compare all components with
the bill of lading or packing list to verify that the proper
unit was received. Check each unit for any damage that
may have occurred in transit. Any damage should be
reported immediately to the carrier and the necessary dam-
age report filed.
HANDLING AND RIGGING
Handling of all air moving equipment should be conducted
by trained personnel and be consistent with safe handling
practices. Verify the lift capacity and operating condition of
handling equipment. Maintain handling equipment to avoid
serious personal injury.
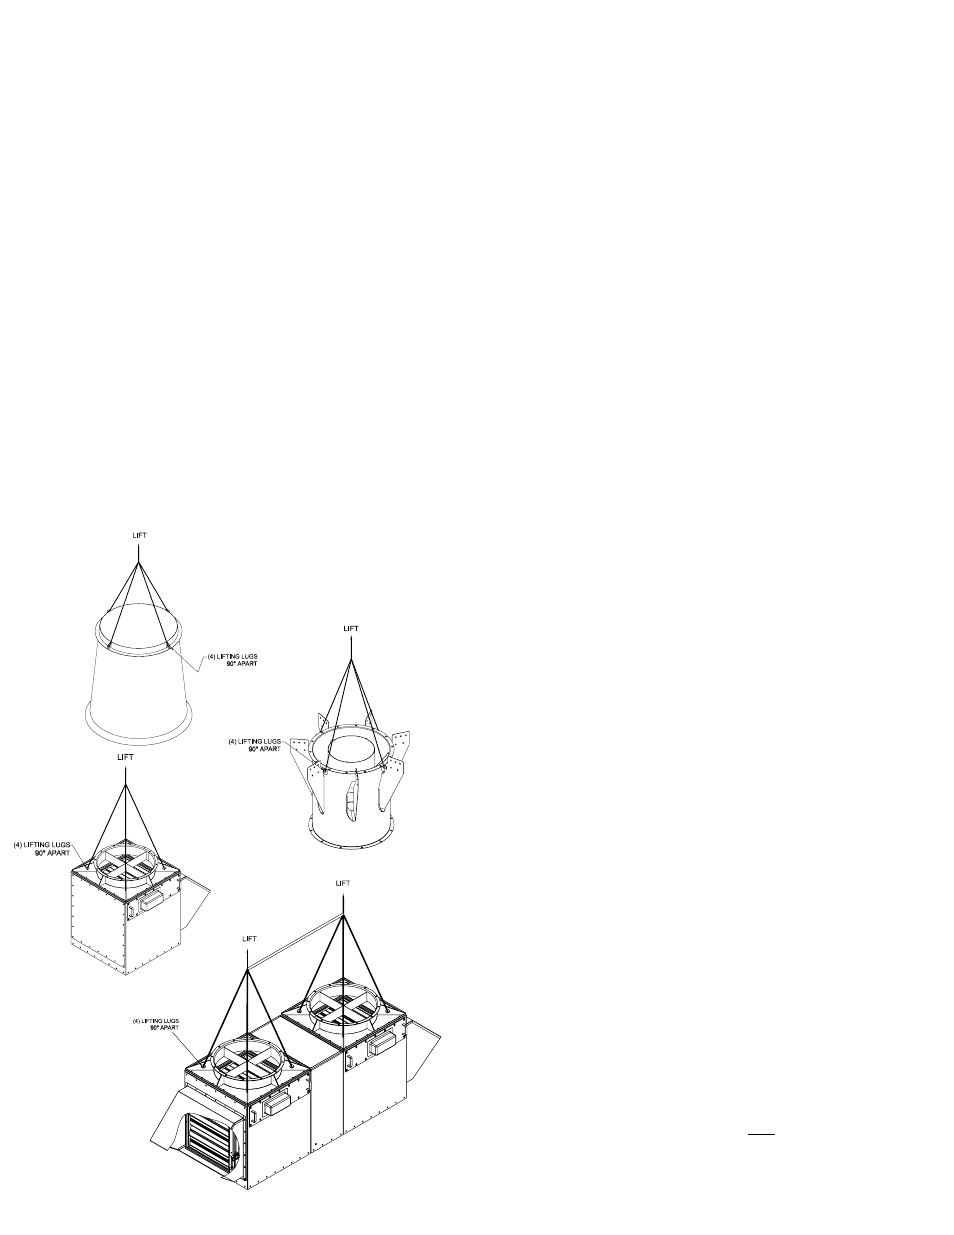
Units shipped may be lifted with slings and spreader bars.
Use well-padded chains, cables or nylon straps (see Figure
1). On most units, lifting lugs are fashioned to protect the
fan and fan housing from damage. Never lift a fan by the
inlet or discharge flange, shafting or drives, wheel, motor
or motor base, or in any other manner that may bend or
distort parts.
Mixing plenum boxes configured for multiple fans mounted
on a common unit are modular in design and may be
broken down into smaller segments for ease of installation
and handling.
UNIT STORAGE
If fan installation is to be delayed, store the unit in an
environmentally stable and protected area. During storage,
the fan should not be subjected to vibration from external
sources or bearing damage may occur. The unit should be
reasonably protected from any accidental impacts. Cover
the fan to protect coatings and to prevent any foreign
material or moisture from entering the inlet or discharge.
Take care to protect the motor, drives and bearings.
Extended storage requires monthly inspections. Check for
corrosion or damage to the unit and for debris within the
fan.
Bearings tend to take on moisture if the atmosphere in
which they are stored is not at a constant temperature. To
avoid corrosion, it is necessary to keep the bearings full
of grease and to rotate them periodically. Even when full
of grease, bearings will take on moisture, so it is necessary
to purge the bearings with new grease to expel moisture
every thirty days. It is recommended that the bearings be
purged with grease while being rotated by hand. Do not
use high pressure greasers as they may ruin the bearing
seals.
The drives and belts should be removed if the fan is to
be stored for a prolonged period. The drives should be
labeled for service and stored in a dry place. Belts should
be removed, coiled without kinks, placed in a heavy car-
ton, and stored in a dry, well-ventilated place. To prevent
belt deterioration storage conditions should not exceed
85°F and 70% humidity. If belts show signs of deteriora-
tion, they should be replaced prior to startup.
Motors should be stored in a clean, dry, vibration-free
location. The packaging should be opened up enough to
allow air circulation around the motor. The winding tem-
perature should be kept slightly above that of the sur-
roundings to prevent condensation. This can be accom-
plished by energizing the internal heaters, if the motor is
so equipped, or by using space heaters. If it is impossible
to heat the windings, the motor should be wrapped
tightly with a waterproof material which also encloses sev-
eral bags of desiccant. Replace the desiccant regularly to
prevent moisture problems. The motor rotor should also be
rotated regularly (monthly) to assure the bearing parts are
well greased.
Start-Up – When the unit is removed from storage, all fan
bearing grease should be purged and replenished with
fresh grease as per the lubrication decal. The motor should
be measured to verify that the resistance is still at a sat-
isfactory level compared to the value recorded prior to
storage.
INSTALLATION
Pre-Installation Checklist
Prior to fully assembling and installing, inspect the fan and
ancillary components to ensure it is in working order.
• Check all external and internal hardware on the fan,
wheel, bearings, drive motor base and accessories for
tightness.
• Rotate the fan wheel by hand and assure no parts are
rubbing. Adjust components prior to installation as ad-
justments are easier while lower to grad.
• Check proper wheel clearances to be sure near toler-
ance. The wheel will need to be realigned after instal-
lation, therefore, clearances should be near tolerance.
Figure 1. Lifting Locations