Programming functions - level 2 (cont.) – Bunn Dual SH User Manual
Page 22
Page 22
PROGRAMMING FUNCTIONS - LEVEL 2 (cont.)
Setting Pulse Brew - BY EXAMPLE:
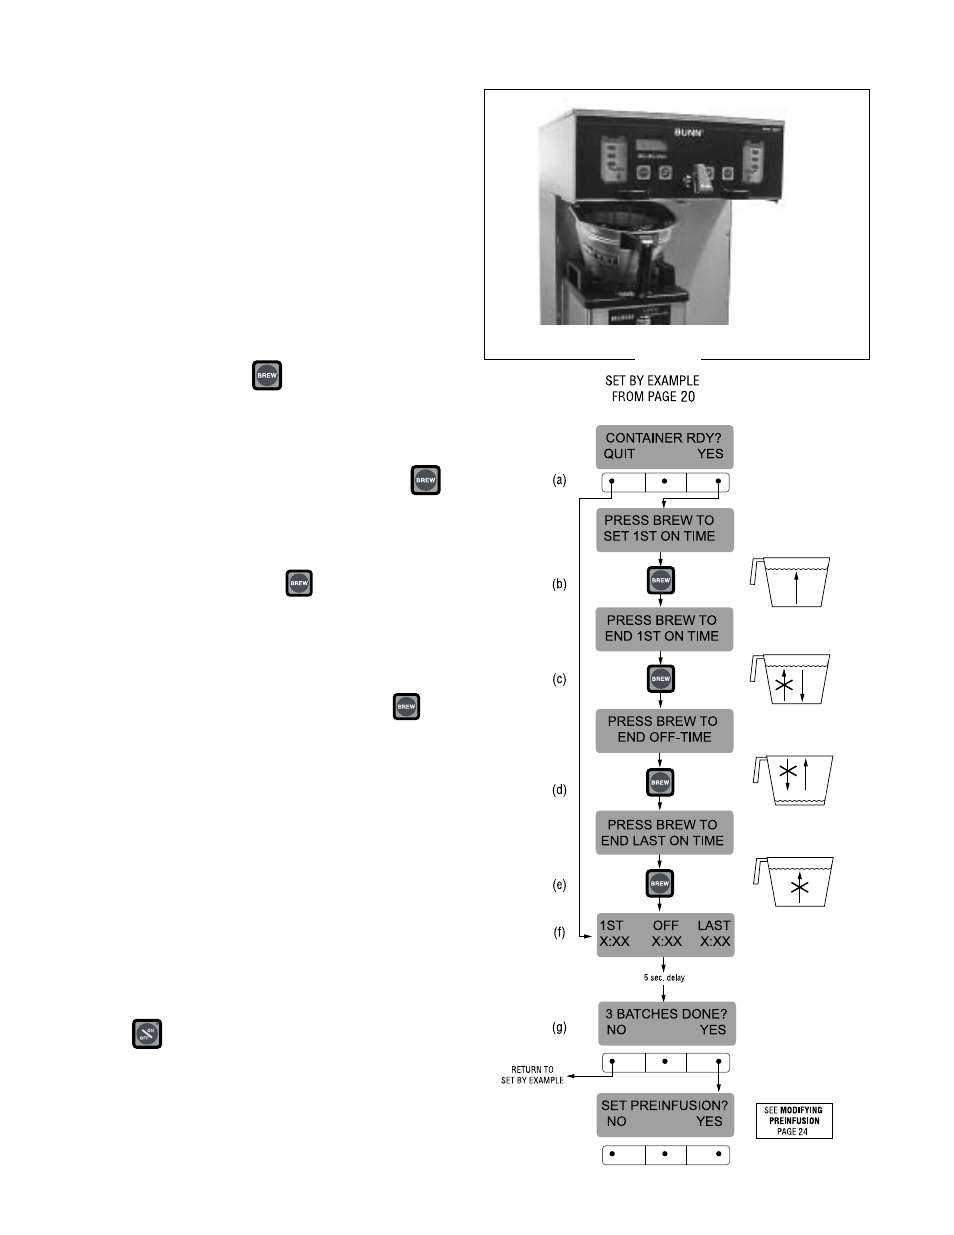
1. This display should read CONTAINER READY?
Place a container under the left side sprayhead.
Place a brew funnel containing a filter and grounds
on top of the container so that the spray and cof-
fee bed can be viewed. (See Fig. 1)
2. Choose the batch size to be set by pressing the
pad next to the indicator light on the left brew side.
The batch size indicator selected will be flashing.
3. If everything is in place, press YES in the CON-
TAINER READY? screen. The display should read
PRESS BREW TO START 1ST ON TIME.(a)
4. Press and release the
pad. The brew water
will start to flow into the funnel and the water level
will rise.(b)
5. Watch the flow of water. When it reaches the de-
sired level in the funnel, press and release the
pad again to end the 1ST ON TIME.(c)
6. The spray will stop and the brew funnel will start
to empty. When the water level in the funnel drains
to the desired level, press
again to end the
OFF-TIME. This also begins the spray of water for
the final setting.(d)
7. The brew water will begin again and the water level
in the funnel will rise. Watch the flow of water.
When it reaches the desired level, press
to
end the LAST ON TIME.(e)
8. The display should now show the 1st, off and last
times for the batch size just programmed. After a
5 second delay, the display will read 3 BATCHES
DONE? (f and g)
9. If other batches need to be modified, press NO.
The display will go back to SET BY EXAMPLE.
Press YES, then press a different batch size pad
and repeat steps 1 through 8. Repeat until all the
desired batch sizes are set for the left side. (g)
10. When finished press YES in 3 BATCHES DONE?.
The display will then read SET PREINFUSION.
Another alternative is to press and release either
of the
pads located on the front panel of the
brewer to exit SET PULSE BREW and return to
the MAIN SCREEN.
NOTE: Pressing ® before reaching the final setting
screen exits the setup and retains the old values.
P2288
FIG. 1
29877 080301
P2410