Self-cleaning surfaces, Caution, Removing and fitting the appliance door – Neff B44M42N3GB User Manual
Page 20: Risk of injury, Removing the appliance door, Open the left and right-hand hinge lock (fig. a), Hinge lock closed (fig. c), Hinge lock open (fig. d), Open the appliance door a little (fig. e), Left lock: clockwise
20
Self-cleaning surfaces
The rear wall and ceiling of the cooking compartment are
coated with self-cleaning enamel. This coating absorbs and
disintegrates splashes from baking and roasting while the oven
is in operation.
Large splashes only disappear after the oven has been used
several times.
Colour variations on the self-cleaning surfaces have no effect
on the self-cleaning function.
Caution!
Damage to surfaces on self-cleaning areas due to applying
oven cleaner.Never clean the self-cleaning surfaces with oven
cleaner.
If oven cleaner accidentally gets onto self-cleaning surfaces,
remove it immediately with a sponge and plenty of water.
Caution!
Damage to surfaces on self-cleaning areas due to the use of
abrasive and acidic cleaning agents and aids.
Do not use cleaning agents containing abrasive substances or
acids.
Do not use abrasive cleaning aids such as steel wool or
scourers.
Removing and fitting the appliance door
You can remove the appliance door to clean it more
thoroughly.
:
Risk of injury!
The hinges of the appliance door may snap shut with great
force. Always fully turn the two locks for fitting and removing the
appliance door.
:
Risk of injury!
If the appliance door has been removed without turning both
locking levers to their limit stops, the hinge may snap shut. Do
not reach into the hinge. Call the aftersales service.
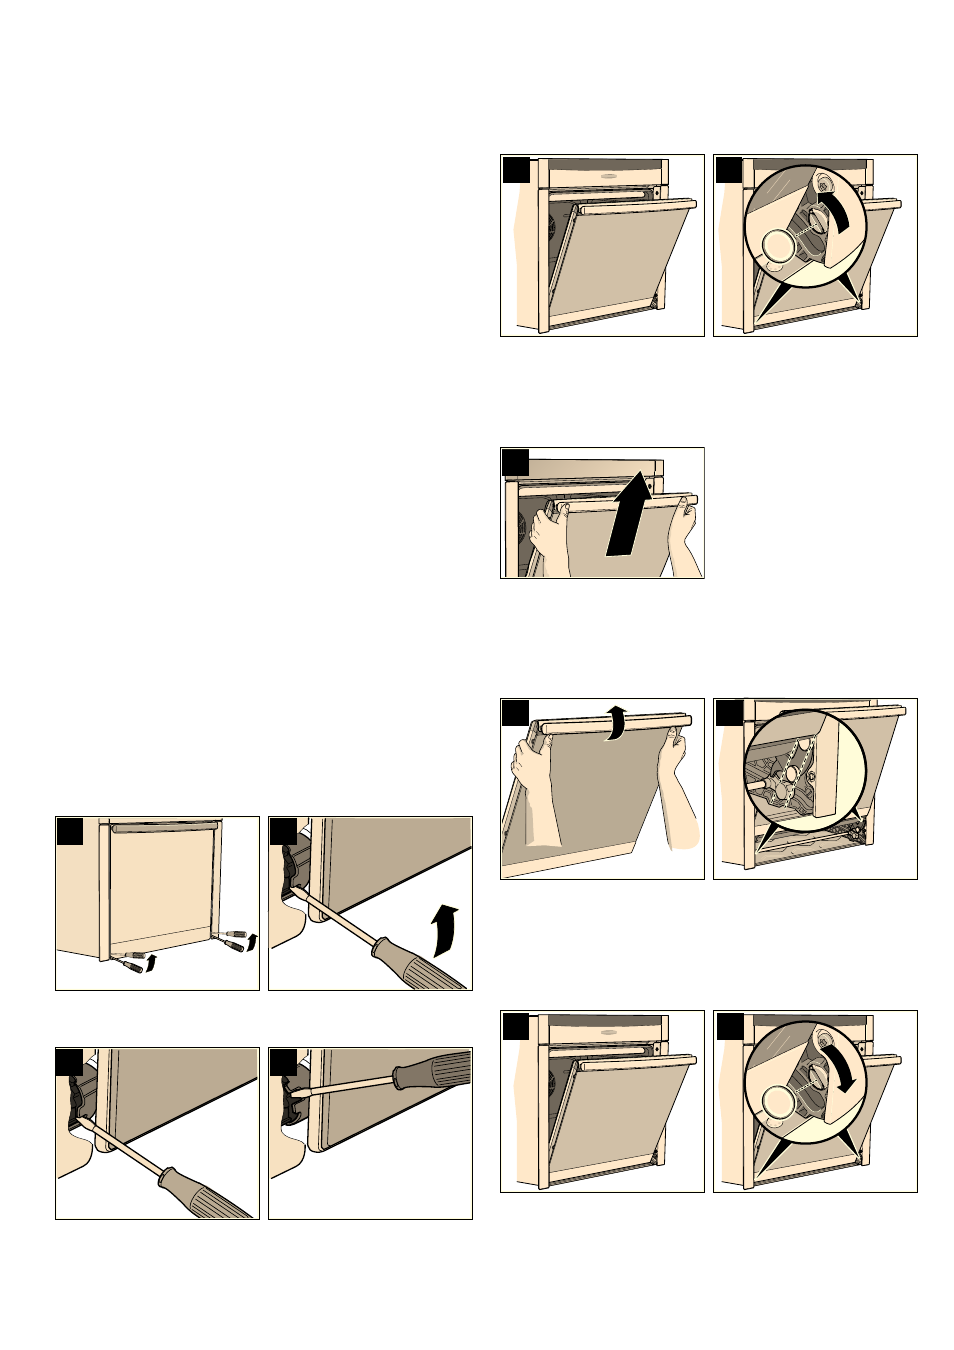
Removing the appliance door
1.
Open the left and right-hand hinge lock (Fig. A).
To do this, push the hinge lock (Fig. B) fully upwards on both
sides with a screwdriver.
Hinge lock closed (Fig. C)
Hinge lock open (Fig. D)
2.
Open the appliance door a little (Fig. E).
3.
Using a coin, fully turn both the left and right-hand locks on
the inside of the appliance at the bottom (Fig. F).
Left lock: clockwise
Right lock: anti-clockwise
4.
Close the appliance door a little, until you feel the locks
engage.
The door can now no longer be opened or closed.
5.
Lift the door handle slightly using both thumbs and lift out the
appliance door (Fig. G).
Fitting the appliance door
1.
Hold the appliance door and raise the door handle slightly
with both thumbs (Fig. A).
2.
Fit the appliance door in the left and right-hand guide rollers
simultaneously (Fig. B).
3.
Ensure that the appliance door does not tilt unevenly and that
it is properly fitted in place (Fig. C).
4.
Use a coin to release both locks on the appliance door
(Fig. D).
Left lock: anti-clockwise
Right lock: clockwise
$
%
&
'
(
)
*
$
%
&
'