Using your ice cream maker, Comousar elaparato, Par ah ace rh ela do – Aroma AIC-234 User Manual
Page 7
5.Coloque
elbote
enla
cubetade
maderay
asegúresede
queel
conoencaje
enel
centrode
lacubeta
(vea
“Dibujo
3”).
6.Deslice
elextremo
rectangularde
lamanivela
manualo
el
motoreléctrico
enel
agujerorectang
ularde
bordede
la
cubeta(vea
“Dibujo
4”).
Elextremo
opuestode
la
manivelacaerá
dentrodel
extremoabierto,
dondeestá
el
cerrojo(vea
“Dibujo
6”).
Suavementelevante
elcerrojo
a
finde
queel
cerrojo
dealambre
pasesobre
elextremo
redondeadode
lamanivela
manualo
delmotor
(talvez
necesiterotar
elbote
conla
manopara
quela
tapadera
quedeajustada
almoto
ry/o
ala
manivela(vea
“Dibuj
o5
”).
5
USING YOUR ICE CREAM MAKER
To Make Ice Cream:
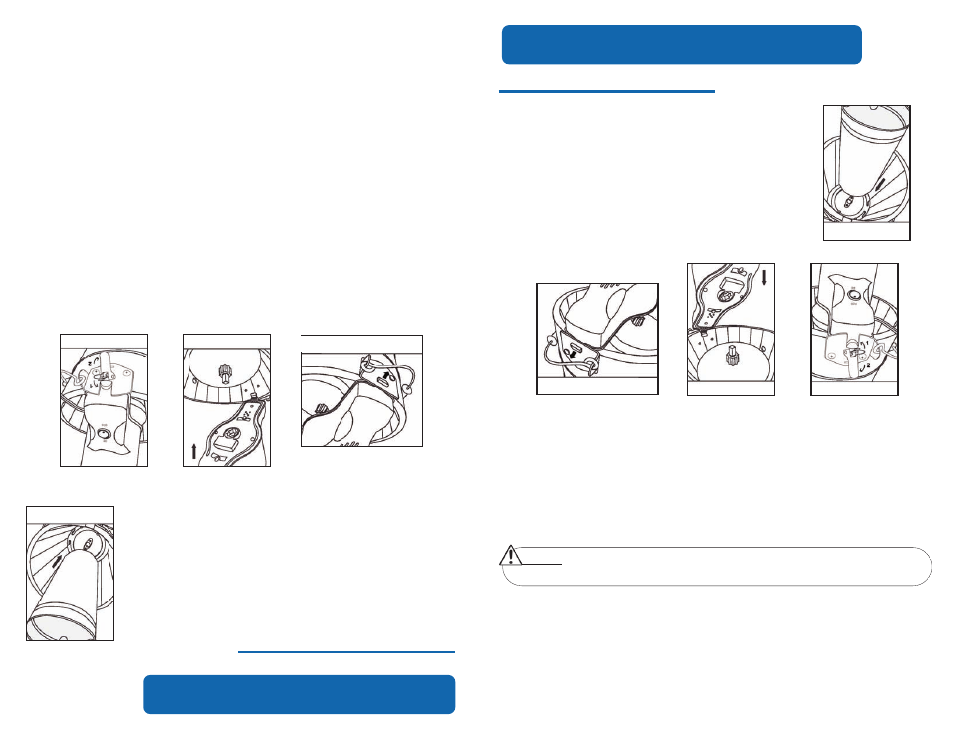
5. Place the mixing canister in the wooden bucket and
make sure it engages the cone in the center of the
bucket (see “Figure 3”).
6. Slide the rectangular end of the hand crank or electric
motor into the rectangular hole on the rim of the bucket
(see “Figure 4”). The opposite end of the crank or
motor will drop into the open end, where the latch is
located (see “Figure 6”). Gently lift the latch so that the
wire goes over the rounded end of the hand crank or
motor. The mixing canister may need to be rotated by
hand so that the lid fits into the motor/hand crank (see
“Figure 5”).
Figure 3
Figure 6
Figure 4
Figure 5
7. If you are using the electric motor, plug the power cord into a working
electrical outlet.
8. Fill the wooden bucket with a small layer of ice (about 6 cups), evenly
distributed around the base of the canister. Be sure that the ice added into
the bucket is broken into small, coarse pieces. A mallet or hammer may be
used to break the ice into smaller pieces, if needed. For each batch of ice
cream, expect to use 1-2 medium bags of ice.
9. Cover the first layer of ice evenly with a thin layer of rock salt (about
1/2 cup).
10. Repeat steps 8 through 9, layering the ice and salt until it reaches the
bottom of the drainage hole on the side of the wood bucket.
COMOUSAR
ELAPARATO
Par
ah
ace
rh
ela
do:
7.
Conecte
elcordó
neléctrico
enel
tomacorriente
siestá
usandoel
motor
eléctrico.
8.
Llenela
cubetade
maderacon
unacapa
dehielo
(6tazas
aproximadamente).Asegúres
eque
elhielo
queusted
pongaen
lacubeta
estéquebrado
enpiezas
pequeñasy
gruesas.Tal
veznecesite
usarun
mazo
oun
martillopara
romperel
hieloen
pedazospequeños
ygru
esos.Para
cadabote
delhelado,
seespera
usar1
o2
bolsasmedianas
dehielo.
9.
Agregueuna
capade
salde
piedraencima
delhielo
(1/4taza
aproximadamente).
10.Repite
lostramites
8y
9hasta
queel
hieloy
salllegue
alnivel
delagujero
de
drenaje.
11.Agregue
aguafrío
ala
cubetahasta
queel
partesuperior
delagua
se
igualecon
elagujero
dedrenaje.
12.Conforme
elhielo
sederrita
de2
a3
pulgadas,agregue
máshielo
ysal
de
piedra.
13.Gire
lamanivela
oponga
afuncionar
elmotor.
Mientrasel
botedé
vueltas,
revuelvay
mezclejuntos
lasal
yel
hielo.Utilice
elagitador
deplástico
cada
10ó
15minutos,
omás
amenudo
sies
necesario,mientras
estéen
usola
máquinapara
hacerhelado.
5
Dibujo3
Dibujo4
Dibujo6
Dibujo5
NOTE:
• Adding more ice will cause the mixture to leak out of the drainage hole.
11. Add cold water to the ice/salt mixture until the water level reaches the
bottom of the drainage hole.
12. As the ice melts down 2 to 3 inches, you may add more ice and more rock
salt to the mixture.
13. Begin cranking with the hand crank mechanism or turn on the electric
motor. As the mixing canister turns, stir and mix the salt and ice together. Use
the plastic stirrer every 10-15 minutes, or as needed, while the ice cream
maker is in use.