Fasnseal vent kit installation instructions, Figure 18, Figure 19 – DuraVent FasNSeal Single-Wall User Manual
Page 18
18
FASNSEAL VENT KIT
INSTALLATION INSTRUCTIONS
1. Examine all components for possible
shipping damage prior to installation
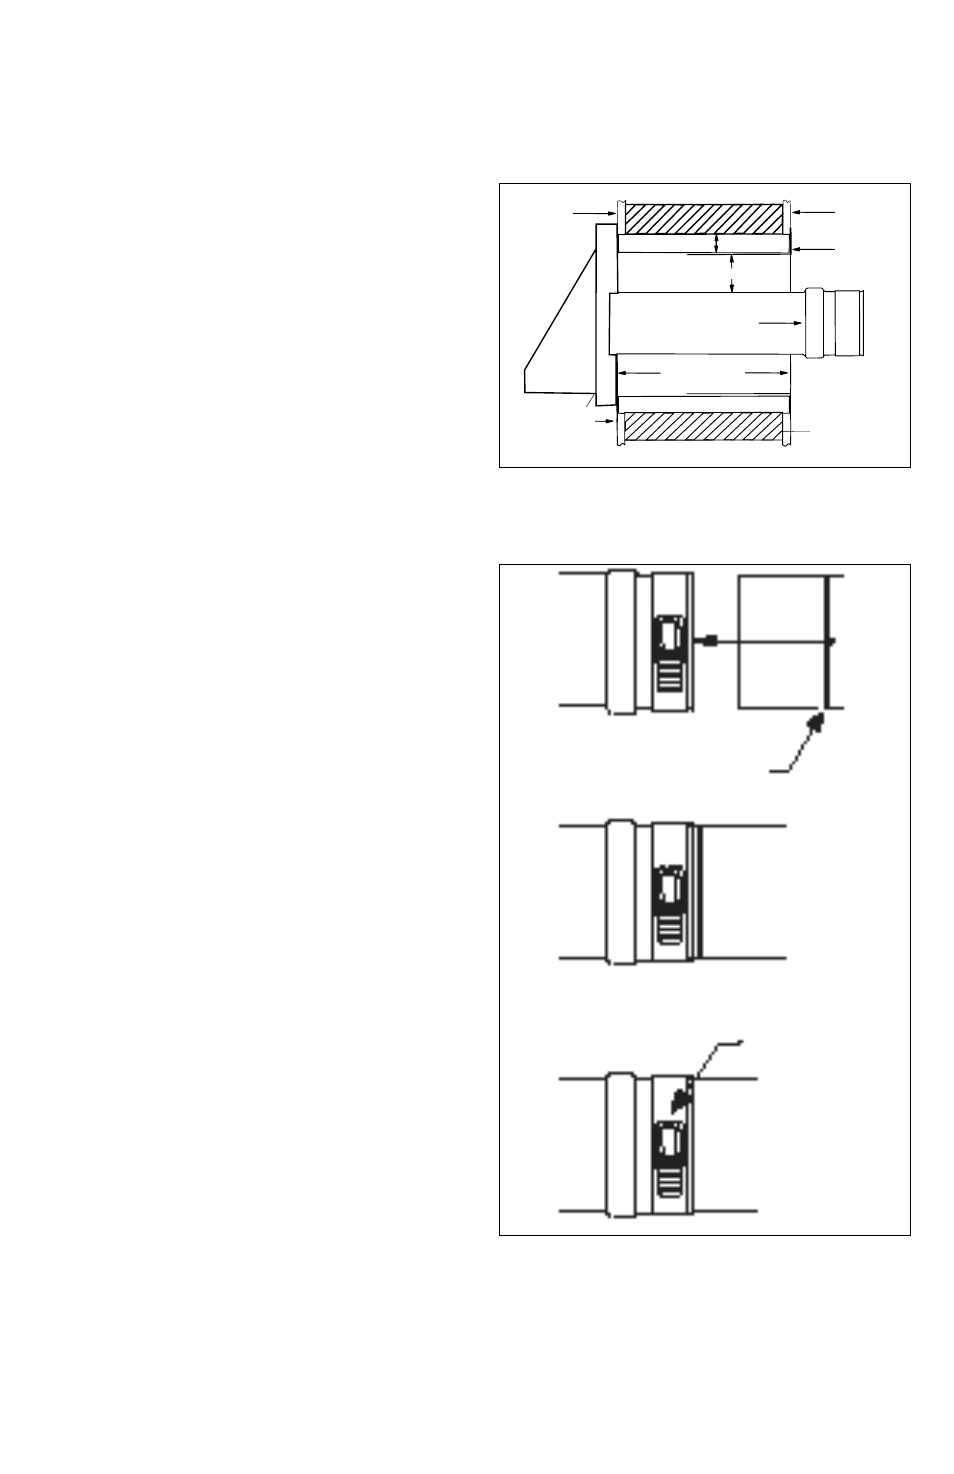
2. Determine the location and cut an opening
for the wall thimble (refer to Figure 18).
• Position Part A into the opening so that
angled hood is located on the outside of the
structure.
• Apply a bead of silicone between the
structure and mounting plate before nailing
or screwing Part A to the outside surface of
the building.
• From the inside, slide the sleeve of Part B
onto the sleeve of Part A until the plate of
Part B is flush against the inside wall. Fasten
with screws or nails.
3. Slide the 12-inch long appliance adapter or
12-inch standard vent length over one end of
the elbow. Insert the other end of the elbow
into the wall thimble.
• For kit FSWMK4 pull the appliance adapter
over the vent collar and secure it with the
built-in locking band.
For kit FSWMKB3 insert the male end of the
standard vent length into appliance collar
and secure it with the built-in locking band.
• Adjust the elbow to achieve the desired
pitch.
• Fasten the locking band located on the wall
thimble using 1/4” drive rachet with 5/16
socket.
When installing the elbow, it is important
to make sure that each end is inserted past
the silicone gasket. To ensure the elbow fully
engages each gasket, at least two inches of
the elbow must be inserted. This minimum
requirement is met as soon as the double
lines etched into the ends of the elbow are
covered (refer to Figure 19).
If you are unable to install the elbow past the
indicated lines, additional vent lengths must
be installed. Prior to initial start up, check the
PART A
OUTSIDE
BUILDING
SURFACE
INSIDE
BUILDING
SURFACE
PART B
2" x 6" STUD
(COMBUSTIBLES)
4.5" +/- 9.0"
1.0"
1.5"
TO APPLIANCE
Figure 18
INSERT THE ELBOW UNTIL THE FLARED
END OF THE FEMALE PROFILE COVERS
BOTH ETCHED LINES
CORRECT
INCORRECT
TIGHTEN CLAMP
UNTIL SNUG (DO NOT
OVERTIGHTEN)
Figure 19