AZEK Straight Rail User Manual
Prepare for post sleeves, Straight rail installation guidelines for, Hardware
STRAIGHT RAIL INSTALLATION GUIDELINES for
AZEK Premier
AZEK Trademark
AZEK Reserve
Page 1
(1) Handrail
Hardware
1
Parts
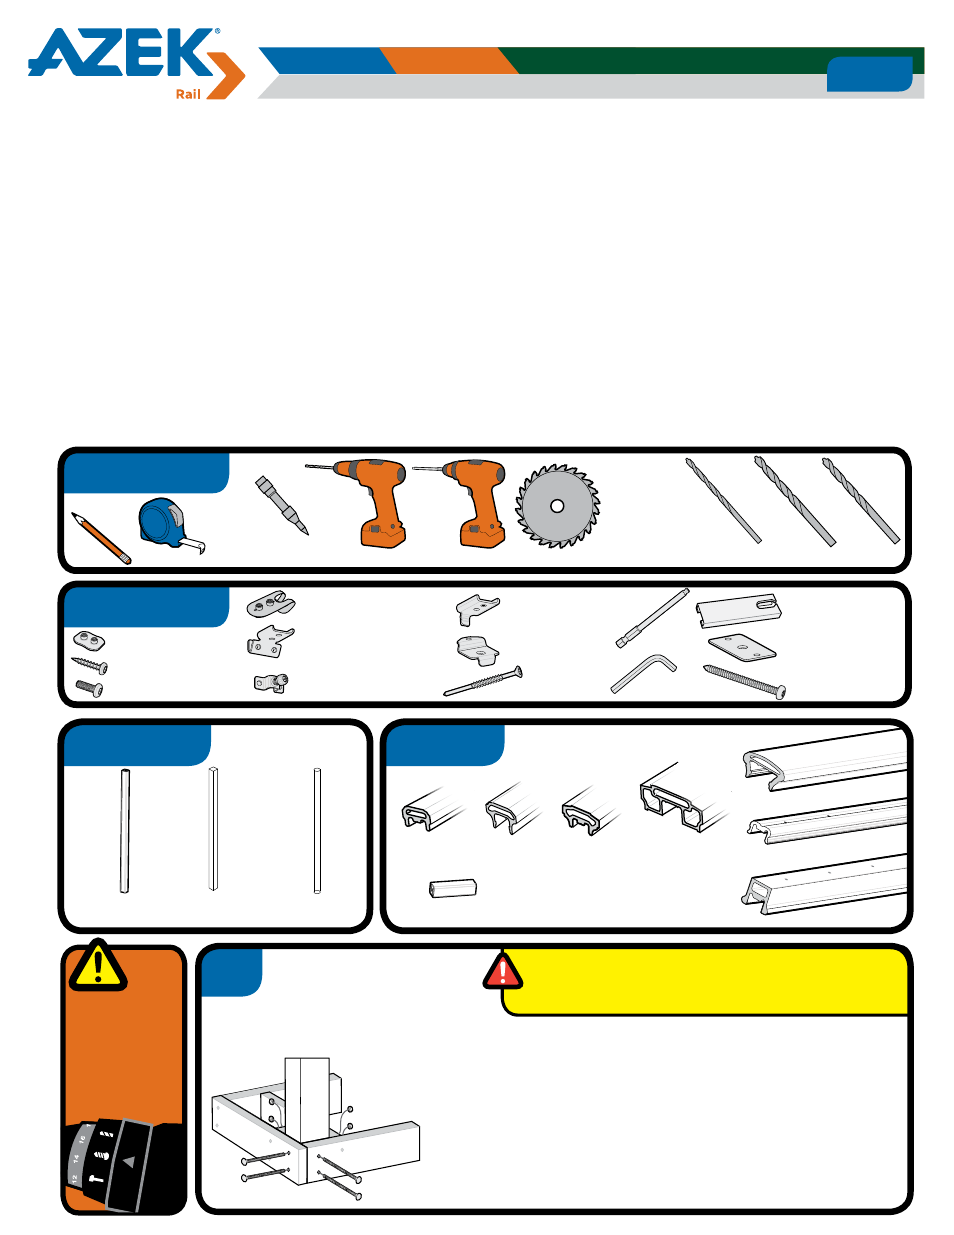
Tools Required
Pencil
Measuring
Tape
Drill
Recommended:
Impact Driver
Mitre Saw
fitted with a
high tooth
count finish
carpentry blade
1/8”
Drill
Bit
5/16”
Drill
Bit
(2) Top Rail
Straight Bracket
(2) Threaded
Plates
(2) Spring Clip Threaded
Plate Retainer
(2) Bottom Bracket
Base
(2) Bottom Bracket
Flange + Set Screw
.
(5) 1” #8 Wood
Screws
(8) 5/8” #10 Machine
Screws
(1) Spring Clip
Installation Tool
Trademark Profiles Shown
Throughout Instructions
Balusters
(13) 6’ Kit or (18) 8’ Kit
US:
(1) 4 3/8”
Center Support
Canada:
(1) 2 3/8”
Center Support
Premier
Top Rail
Reserve
Top Rail
(1) Top Retainer
(1) Bottom Rail
Premier
Bottom
Rail
Reserve
Bottom
Rail
(1) 3/16” Allen Key
(1) T-25 Bit
(2) Baluster Swing
Brackets
(1) Center Support
Bracket
Baluster Screws
(28) 6’ Kit
(38) 8’ Kit
(8) 2 1/2” #10 Wood
Screws
Prepare for
Post Sleeves
3/16”
Drill
Bit
• The 4 x 4 should be completely “boxed in” around all 4 corners of the
firmest attachment.
• Make sure posts are level and plumb.
• If post is twisted or oversized, trim as necessary so post sleeve slides
easily over post. (Do not force sleeve over post)
• Post sleeves may also be used over wood posts installed with Surface
Mount Bracket or over Tallboy Surface Mount Bracket.
• Post sleeves should not be notched for installation.
• If installing using a Surface Mount Bracket or Tallboy Surface Mount
Bracket, please refer to those specific installation instructions.
• IMPORTANT: Must check with local building code for proper installation
of wood post and decking attachment.
WARNING: Post sleeves are not designed to be used in
structural applications. Therefore, they should not be used
where they may be subject to weight bearing applications
such as supports for a roof of a porch or deck.
IMPORTANT
Make sure that the
DRIVE TOOL/DRILL
is configured or set
to use the SCREW
setting when driving
and/or tightening all
FASTENERS.
© 2013 AZEK Building Products. All rights reserved
• Please read all instructions completely before starting any part of the installation.
• Each AZEK Premier and AZEK Trademark railing kit comes complete with all parts, hardware and installation guide to install one
complete rail section (excluding posts.)
• Each AZEK Reserve railing kit comes complete with all parts, hardware and installation guide to install one complete rail section
(excluding handrail and posts.)
• Railing sections have been pre-cut to 6 ft., 8 ft. or 10 ft. lengths. Check to ensure that the kit is complete.
• AZEK Rail should be installed using the same good building principles used to install wood or composite railing and in accordance with
the local building codes and the installation guidelines included below. AZEK Building Products Inc. accepts no liability or responsibility
for the improper installation of this product.
• AZEK Rail may not be suitable for every application and it is the sole responsibility of the installer to be sure that AZEK Rail is fit for
the intended use. Since all installations are unique, it is also the installer’s responsibility to determine specific requirements in regards to
each Rail application.
• AZEK Building Products recommends that all applications be reviewed by a licensed architect, engineer or local building official before
installation. If you have any questions or need further assistance, please call AZEK Customer Service at 877-ASK-AZEK (877-275-2935)
or visit our website at www.azek.com.
• AZEK Railing is tested as a whole system and should be used that way. It is not intended to be used in conjunction with other railing
systems or fasteners.
• The following Installation Guidelines are applicable for installation of AZEK Premier, AZEK Trademark, and AZEK Reserve Rail Systems
(except AZEK Reserve over post applications).
• IMPORTANT: Make sure the DRIVE TOOL/DRILL is configured or set to use the SCREW setting when driving and/or tightening all FASTENERS.
• SAFETY: Always wear goggles when handling, cutting, drilling and fastening materials.
• NOTE: Check local code requirements prior to installation.
1
Tools Required
Hardware
Pencil
Measuring Tape
Automatic
Center Punch
Drill
Recommended: Impact Driver
Mitre Saw
fitted with a
high tooth
count finish
carpentry blade
1/8”
Drill
Bit
5/16”
Drill
Bit
(2) Top Rail
Straight Bracket
(2) Threaded Plates
(2) Spring Clip Threaded
Plate Retainer
(2) Bottom Bracket
Base
(2) Bottom Bracket
Flange + Set Screw
.
(5) 1” #8 Wood Screws
(8) 5/8” #10
Machine Screws
(1) Spring Clip
Installation Tool
(1) 3/16”
Allen Key
(1) T-25
Bit
(2) Baluster Swing
Brackets
(1) Center Support
Bracket
Baluster Screws
(8) 2 1/2” #10 Wood
Screws
Prepare for
Post Sleeves
3/16”
Drill
Bit
• The 4 x 4 should be completely “boxed in” around all 4 corners of the
firmest attachment.
• Make sure posts are level and plumb.
• If post is twisted or oversized, trim as necessary so post sleeve slides
easily over post. (Do not force sleeve over post)
• Post sleeves may also be used over wood posts installed with Surface
Mount Bracket or over Tallboy Surface Mount Bracket.
• Post sleeves should not be notched for installation.
• If installing using a Surface Mount Bracket or Tallboy Surface Mount
Bracket, please refer to those specific installation instructions.
• IMPORTANT: Must check with local building code for proper installation
of wood post and decking attachment.
WARNING: Post sleeves are not designed to be used in
structural applications. Therefore, they should not be used
where they may be subject to weight bearing applications
such as supports for a roof of a porch or deck.
IMPORTANT
Make sure that the
DRIVE TOOL/DRILL
is configured or set
to use the SCREW
setting when driving
and/or tightening all
FASTENERS.
Rail Packs
Baluster Packs
(1) Handrail
(1) Top Retainer
Composite: 2.5 balusters per LFT
Metal: 2.75 balusters per LFT
Center Support
(1) 4 3/8”
For 2” gap below bottom rail,
cut Center Support to 2 3/8”
Premier
Bottom Rail
Reserve
Bottom Rail
Premier
Top Rail
Reserve
Top Rail
(1) Bottom Rail
Trademark Profiles shown throughout Instructions
Composite
Square
Metal
Square
Metal
Round
15
per
pack
20
per
pack
Recommended Pilot Point