Vaddio IN-Wall Enclosure for Sony BRC-Z330 User Manual
Page 2
IN-Wall Enclosures
IN-Wall Enclosures - Document 341-744 Rev E
Page 2 of 4
UNPACKING:
Carefully remove the product and all of the parts from the packaging and identify the following parts:
One (1) Back Box Enclosure
One (1) Camera Platform
One (1) Face Frame
One (1) Set Mounting Hardware and Screws
Four (4) 8-32 X ¼” White Pan Head Screws (for Face Frame attachment)
Four (4) 10-32 x ¼” Flat Head Screws (for Camera Platform attachment)
Four (4) Self-Drilling Drywall Anchors
Four #8 x 1.25” Screws for Wall Anchors
One (1) ¼” x 20 Camera Mounting Screw (for those cameras that use ¼” x 20 screws)
-OR-
Four (4) M3x6mm Camera Mounting Screws for Polycom EagleEye Cameras (non-Sony)
One (1) Manual
Deep Back Box Enclosure
The 3-15/16” deep metal wall box uses the maximum depth of a standard 2” x 4” framed wall cavity and minimizes
the camera’s protrusion into the room. The extra depth accommodates the Vaddio EZIM for use with Cat. 5 cabling,
or the EZCamera Shoe for the EVI-D70/80/90, EVI-D100 and Canon VC-C50i. Each Enclosure is outfitted with
three (3) conduit knockouts (2-sides, 1-top) and a cable pass-through in the back box and camera platform.
Before Installing
When locating the IN-Wall enclosure, consider viewing angles, lighting conditions, possible line of site obstructions
and check for in-wall obstructions where the camera is to be mounted. Pick a mounting location to optimize the
performance of the camera. Please read the step-by-step instructions fully before starting the installation.
INSTALLATION INSTRUCTIONS:
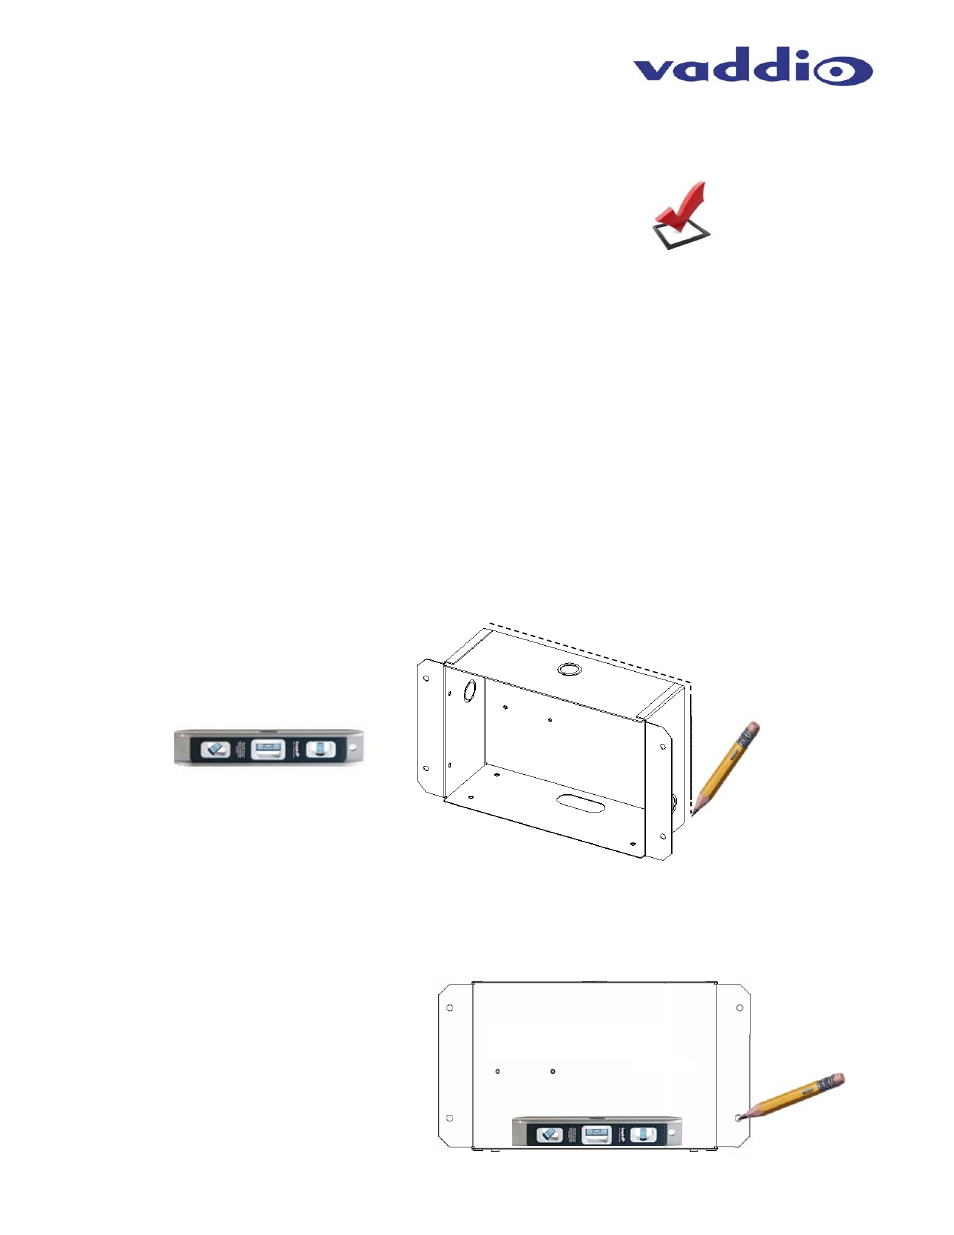
1) Position the back box enclosure against the wall, level the box and trace the outline of the box on the wall with
a pencil.
2) Prior to cutting the drywall, check for studs, conduits or obstructions that could interfere with the installation.
After verification, cut out the area marked on the wall with a drywall saw.
3) Place the enclosure into the wall opening for a dry fit and mark the four holes for the spiral wall anchors through
the mounting flanges. The integrator can use any wall anchor of their choice or use the supplied wall anchors.
Drawing:
Use a level to position the enclosure
and trace a line around the back of
the enclosure once the box is level.
Cut this area out only after verifying
that no studs or obstructions exist
behind the drywall.
Figure 3:
With the box in the opening and the box level, mark
the four wall anchor locations.
Remove the box and install the wall anchors -
reinstall the box pulling the cables through the
conduit opening.
Check for a level enclosure and adjust the opening
as needed.
Note: Cameras are
not included with the
IN-Wall mounts.