Control reference guide – Panasonic RPWF6000 User Manual
Page 4
RQT881
1
00
6
7
RQT881
1
ENGLISH
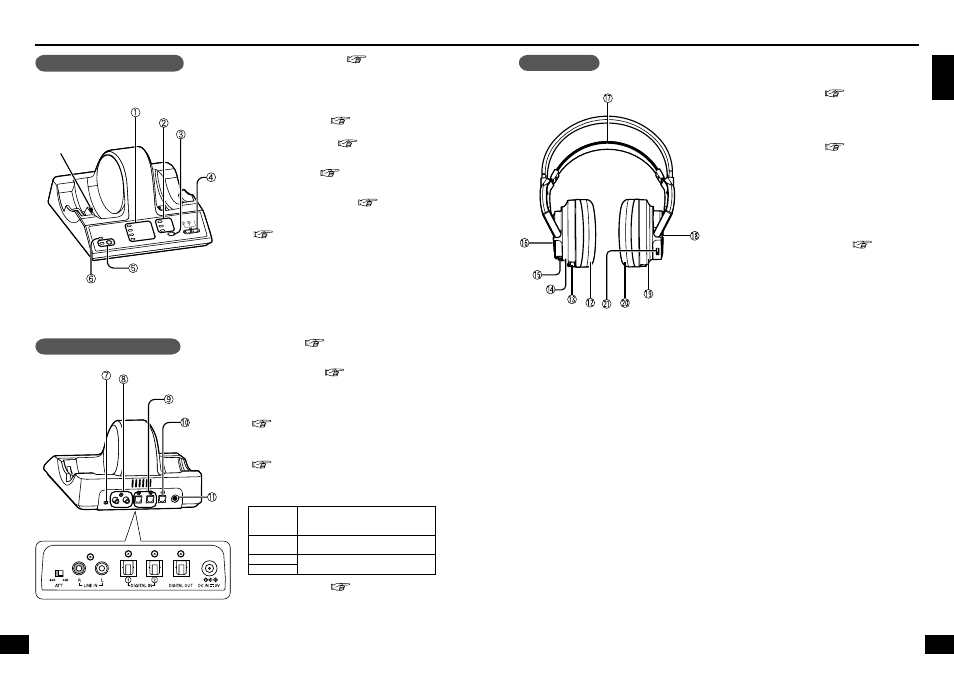
Transmitter’s rear panel
Headphones
g
ATT control (
page 13)
Switch to [0 dB] when sound from an analogue input
is low. The standard setting is [-8 dB].
h
LINE IN terminal (
page 12)
To connect to the audio out terminals of AV equipment
such as a video cassette recorder or television (not
included).
i
DIGITAL IN 1, 2 terminal (optical digital input)
(
page 11)
To connect to digital equipment such as a DVD player
or a television (not included).
j
DIGITAL OUT terminal (optical digital output)
(
page 11)
The same digital signal as the input signal selected
with the INPUT SELECT control is output.
● When ANALOG is selected, the same digital signal
as the input signal to DIGITAL IN 2 is output.
INPUT
SELECT
control
DIGITAL OUT
DIGITAL 1 The same signal as the signal input
to DIGITAL 1
DIGITAL 2 The same signal as the signal input
to DIGITAL 2
ANALOG
k
DC IN 9V terminal (
page 8)
To connect to the supplied AC adaptor.
(Use only the supplied AC adaptor. Use of other AC
adaptors with, for example, a different plug polarity is
dangerous and can damage the unit.)
l
Ear pad (left)
m
Charging terminal
n
Left housing
o
BATT (battery) knob (
page 8)
p
Battery compartment lid
Press BATT to open the battery compartment lid.
Use the supplied rechargeable battery or “LR6, AA”
alkaline dry cell batteries (not included).
q
Free-adjusting band (
page 10)
The power turns on automatically and the OPR lamp
lights when you put on the free-adjusting band.
r
OPR (operation) lamp
Pull up the free-adjusting band and check that the OPR
lamp glows red. You can now use the headphones.
s
Right housing
t
Ear pad (right)
u
ID button, VOL control
VOL: When adjusting the volume (
page 14
)
Control reference guide
6
7
Transmitter’s front panel
a
DECODE MODE lamp (
pages 14 to 15)
(DOLBY DIGITAL, DOLBY PRO LOGIC II,
DTS, MPEG-2 AAC)
The transmitter automatically distinguishes the recording
method of the input signal and the DECODE MODE lamp
lights.
b
SURROUND lamp (
page 16)
(MUSIC, CINEMA, VOICE)
c
SURROUND button (
page 16)
Switch between MUSIC, CINEMA, VOICE and OFF
in SURROUND MODE.
d
INPUT SELECT (
page 14)
Switch between DIGITAL 1, DIGITAL 2 and ANALOG
input.
e
ID/TUNING button, lamp (
page 16)
Use when the radio waves are weak.
f
OPR/CHARGE (operation/charge) lamp
(
page 9)
● It glows red when the headphones are being
charged.
● It glows green when the transmitter is in operation.
● It goes out when the charging finishes or when
there are no audio signals input for approximately 5
minutes.
Charging terminal