Tap series, Taylor – AFX TAP225PCMV User Manual
Page 2
TAP SERIES
Taylor
Model 225 Ceiling Mounted Fixture
2 of 2 8060509 r0
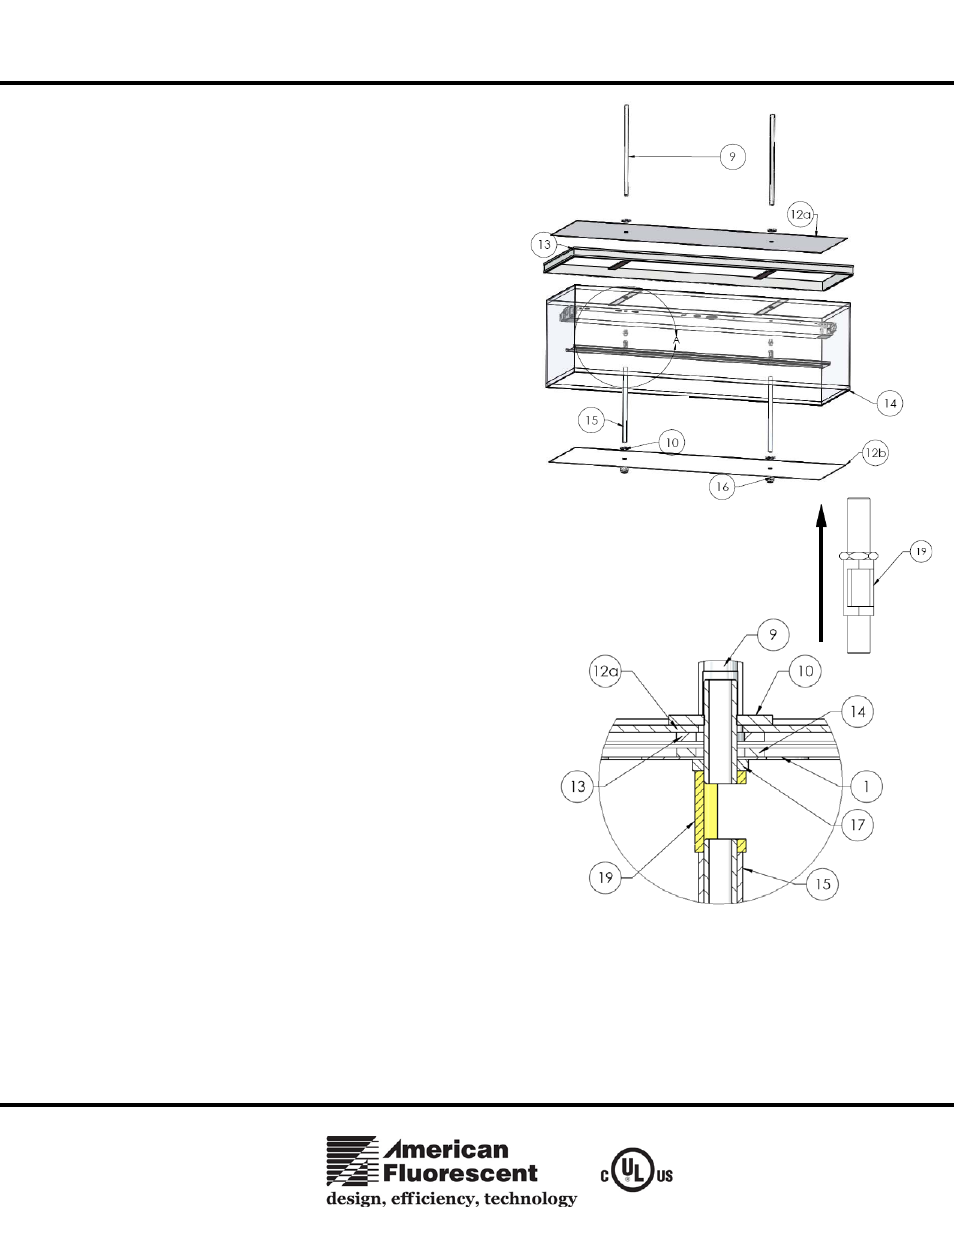
DETAIL B
FIG. 3
5. Frame and Diffuser Assembly (FIG 3 and DETAIL B)
A. Align holes from channel, diffuser mounting bracket, frame
bracket and upper diffuser (12a) with hickey assembly (19)
with hexnut facing up and thread.
B. Assemble the Linen Diffuser (14) with the polished chrome
frame (13) on top aligning the mounting brackets. Next, place
the acrylic diffuser (12a) with the matte side facing up.
C. Thread washer (10) onto hickey assembly (19) and loosely
tighten.
D. Feed black and white power wires into hickey assembly on
either side and pull wires through center opening of hickey
assembly (19).
E. Thread hickey assembly into one stem (9) at a time until both
stems are secure.
F. Tighten hickey assembly (19) from the inside of the channel.
6. Wiring the Fixture
A. Connect the ballast black wire with the black wire from stem,
connect the white ballast wire to the white wire of the stem
using the provided wire nuts.
B. Re-install the channel cover (2) as it is shown in Detail A.
Install white stems (15) into bottom of hickey assembly (19) at
the threaded nipples inside the channel. Place threaded nipple
at bottom of stem (15) and thread washer (10) onto nipple.
Install the lower diffuser (12b) with matte side facing down
and secure with finial (16).
C. To connect the power service in-line wires. Remove the
thumbnuts (8) and canopy (7). With the wire nuts provided,
connect the power service in-line black wire to the black wire
from the swivel bracket assembly (A), with the use of the wire
connectors provided. Connect the power service in-line white
wire to the white wire of the stem bracket assembly (A). Connect
the ground wire and the power service in-line ground wire to the
plate.
D. Replace the canopy (7) and fasten the two thumb nuts (8).
E. RESTORE POWER
Limited Factory Warranty
American Fluorescent Corporation hereby warranty that this fixture is free from defects in materials and workmanship when installed and used under normal operating conditions for a
period of 2 years from date of purchase. This warranty covers all component parts and extends only to replacement of defective fixture or components; it does not cover failure due to
improper installation, misuse, mishandling or damage incurred in transit.
B