Cleaning the unit and components, Cleanup, Start – Wagner SMART Power Roller System User Manual
Page 8: Unit, Unit roller arm, Roller arm
English
8
Cleanup -
Cleaning the Unit
and Components
Start
You will need:
• A waste container
• A minimum of one gallon of warm, soapy
water if you used latex paints
• A minimum of one quart of mineral spirits if
you used oil-based paints
Note: Cleaning time and the amount of
cleaning solution you use may vary depending
upon the type of material used.
IMPORTANT: Make sure your floors and
furnishings are covered with drop cloths
during cleanup.
IMPORTANT: DO NOT SUBMERGE THE
ROLLER HANDLE INTO ANY LIQUIDS!
Note: A light paint film residue may remain in
the paint hose after cleaning. This is normal
and will not affect the future performance of
your unit.
Note: Switch the unit OFF (0) prior to removing
any accessories or components.
Note: A Roller Cleanup Kit™ is available for
separate purchase. See Accessories, page 32
for ordering information.
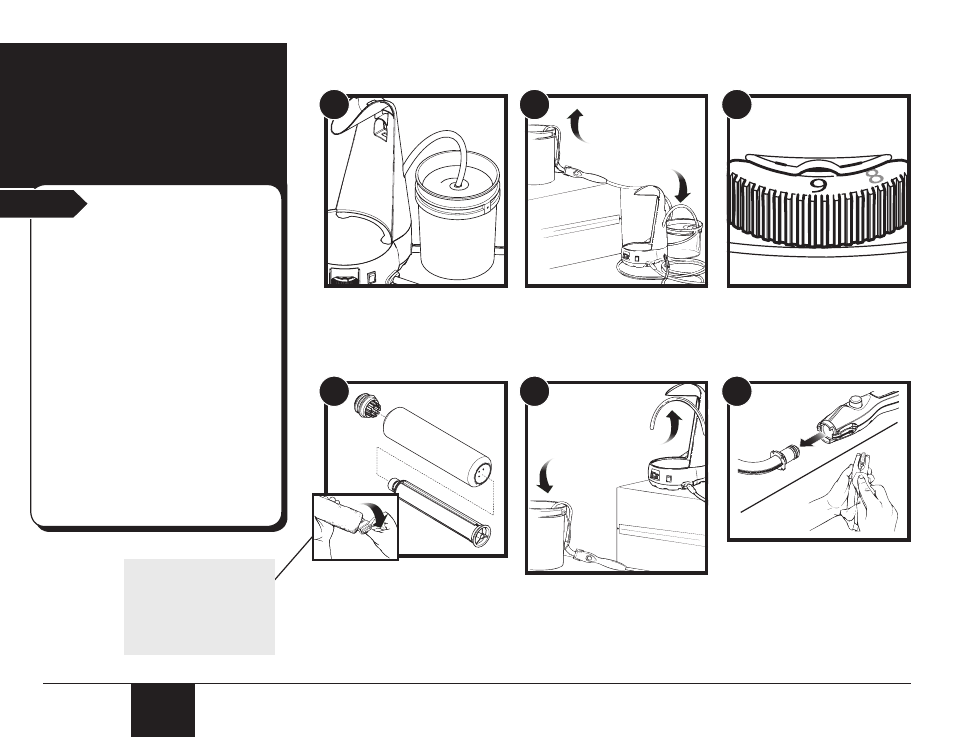
1. Submerge suction tube into a
bucket of the appropriate cleaning
solution.
4. While unit is self-cleaning,
disassemble the roller assembly*,
and thoroughly clean the roller
cover, core, and cap by hand.
If using the Smart Edge Roller,
clean the roller cover by hand. A
spray bottle with the appropriate
cleaning solution can assist in
cleaning the harder-to-reach
areas.
2. Elevate roller arm and hang from
an empty bucket.
Note: The unit must be lower than the
arm in order for air to be completely
purged from the paint hose.
5. Remove suction tube from
solution, raise unit above roller
arm, and run motor until all
cleaning solution is purged from
the unit.
Turn variable speed dial to 0
(OFF). Unplug power cord.
6. Press quick-release tabs and
remove the roller arm from the
roller handle.
Remove any remaining paint with
the appropriate cleaning solution
and a damp cloth.
IMPORTANT: If you used mineral
spirits to clean your unit, you must
repeat all the steps on this page
using warm, soapy water.
3. Turn variable speed dial to 9.
Fully press and release the handle
button to run the appropriate
cleaning solution through the
hoses and roller arm.
9
1
2
1
4
2
5
3
UNIT
UNIT
ROLLER
ARM
CLEANING
SOLUTION
ROLLER
ARM
9” Roller Only:
* Insert thumb to first
knuckle, pry and pull the
cap from the roller cover.
Once the cap is removed,
push the core out the
other end.
6