Helpful painting tips, Safety, Safety helpful painting tips – Wagner SMART Power Roller System User Manual
Page 6: 9” roller selection, Spatter shield, Prepping the room, Painting the room, Using the smart edge roller, Changing accessories
Safety
Safety
Helpful
Painting Tips
9” Roller Selection
Your Smart Power Roller comes equipped with two 9” roller
covers.
• 3/8” roller cover (comes assembled to the roller arm) -
use this roller on smooth surfaces.
• 3/4” roller cover (packaged loose in the box) - this
thicker roller is designed for use on textured surfaces,
such as celings or textured walls.
Spatter Shield
The spatter shield is an ideal attachment whenever painting
an overhead surface, as it will catch any drips that may fall
from the roller. It is optional when painting a wall or other
vertical surface.
Prepping the Room
Remove all pictures, mirrors, and decorations from the walls
and draperies from the windows. Remove all nails, hardware
and switch and receptacle covers. Cover furniture and floor
with drop cloths.
Surface Preparation
• Always remove wallpaper before painting. Wash off old
adhesive and rinse with water. Allow the walls to dry
before painting.
• Wash and rinse dirt, grease and oil build-up off the walls
with soap and water.
• Fill all nail holes, joints and cracks with patching paste.
Let dry and sand the surface until smooth. Clean sanded
area with a damp cloth.
• Spot prime all patched areas and any marker and/or pen
marks before applying first coat.
Tip: Write the important information from your paint can -
color, formula, brand and paint type - on the back of a switch
plate for future reference.
Painting the Room
Tip: If you need more than one gallon of paint to do
the room’s walls, mix them together to ensure color
uniformity.
• Always make sure to open a window or door to
ensure proper ventilation. If you are painting both the
ceiling and walls in your room, start with the ceiling
first and then move to the walls.
Ceilings:
• To minimize spills and spatters, use the spatter guard
and paint across the short width of the ceiling.
Walls:
• Use the Smart Edge Roller for any edges that need
to be painted around, or tape off around base and
window and door trim.
• Paint one wall at a time.
• Pick an area to start where you can saturate the
roller cover and evenly distribute the paint. Working
in three-foot sections, begin by cutting-in around
windows, doors, cabinets, base and other breaks in
the wall surface with the Smart Edge Roller.
• Press and release the handle button until paint
appears through the roller cover.
• Start painting at one end of a wall and roll out the
letter “W”. Fill it in with crosswise strokes, working
your way across the wall in 3’ x 3’ sections. Finish
the sections by painting one solid swipe from ceiling
to floor. This will give you a nice even paint finish.
• Press and release the handle button as needed for
more paint. Be careful not to over-saturate the roller
cover as it may drip, slide on the wall or spatter.
• Make sure to run the roller cover over the areas you
cut-in around the trim and baseboards to even out
the texture.
• If you need to stop and take a break; finish painting
the entire wall, or stop at a break in the wall such as
a doorway or corner to prevent lap marks.
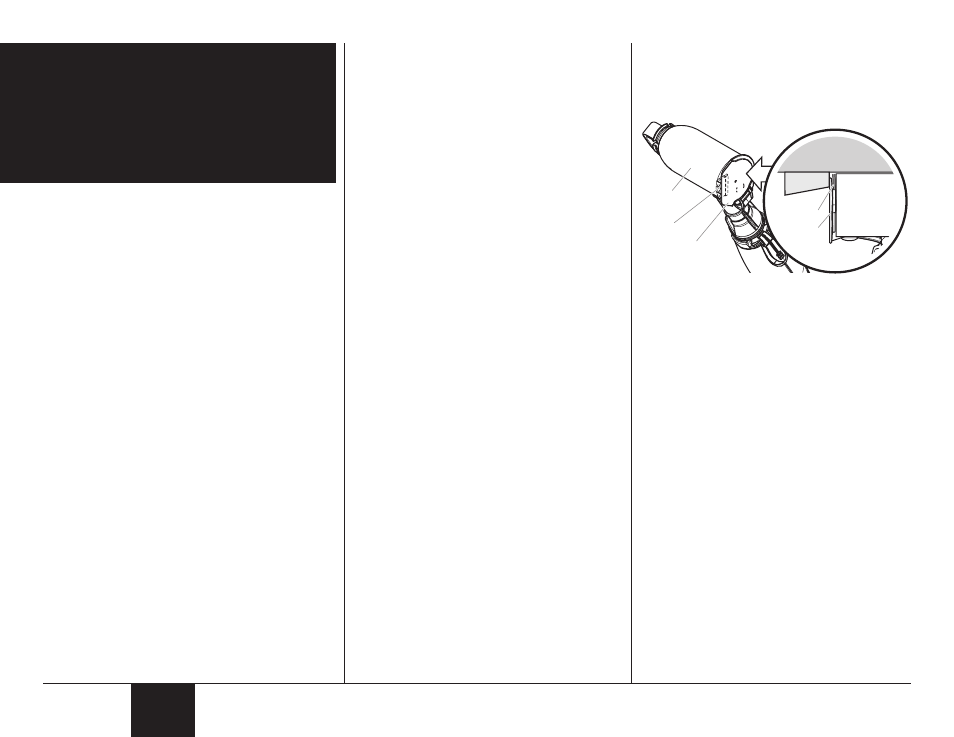
Using the Smart Edge Roller
The Smart Edge Roller is designed for trim-rolling
corners and edges. The roller guard will protect any
edge from unintentional paint, while the trim brush
will paint the gap that is typically left unpainted by
conventional rollers. When the Smart Edge Roller is
used properly, there is no need for taping, or to go back
and finish any edge work with a brush.
• The trim brush can be swiveled into different
positions, depending upon the position of the edge
being rolled against.
• Always make sure the trim brush is facing toward
and running parallel to the surface being painted.
• Maintain a consistent rolling angle to ensure the trim
brush maintains contact with the surface. Contact
will be maintained as long as the edge of the guard
stays flat to the surface.
Guard
Trim brush
Roller
Guard
Trim
brush
Roller
Molding
Wall
• For particularly tight corners (i.e. where two walls
meet), you may need to go back and fill any gaps
with a brush.
• Periodically inspect the outer face of the roller guard
for any paint residue. Make sure the outer face of
the roller guard stays clean.
• In order for the trim brush to fully cover the gap, you
will need to move the roller in a gentle up-and-down
“brushing” motion, much like you would do with a
regular paint brush.
• The guard can be flipped out of the way when not
rolling up against an edge.
Changing accessories
IMPORTANT: When removing or changing any
accessories from the handle, it is likely that some
paint will drip from the handle and the accessory.
• Turn the variable speed dial to 0 (OFF) prior to
removing any accessories or components, and make
sure your floors and furnishings are protected from
dripping paint.
• To minimize dripping paint from the handle and
accessories, follow the steps below.
1. Press the quick-release tabs on the handle
(or the extension).
2. Pull the handle and the accessory apart,
making sure to keep the connecting ends
pointed up.
English
6