Searching in the phone book, Call log options, The call log – placed, missed & received calls – Avaya Tandberg 150 MXP User Manual
Page 19: Accessing the phone book, Phone book features (i)
D 14126.01
01.2008
19
TANDBERG 150
MXP
USER GUIDE
TANDBERG 150
MXP
USER GUIDE
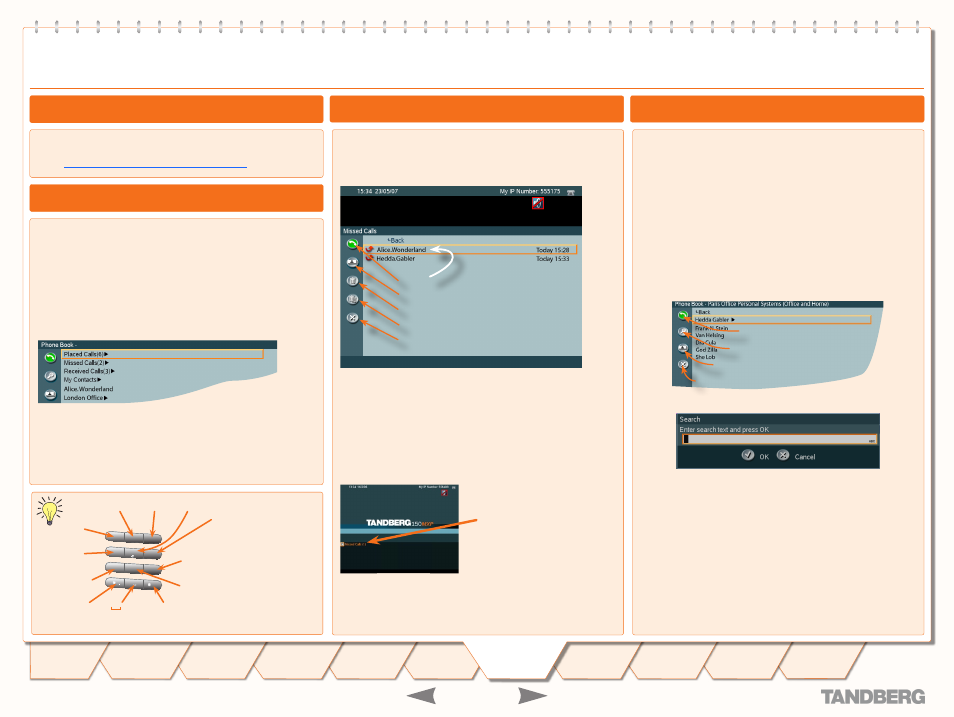
The Call Log – listing Placed Calls, Missed Calls and Received
Calls – is essentially a set of lists of your system’s call history.
The lists contain the most recent numbers placed, missed, and
received, limited to a maximum of 30 numbers for each list. The
numbers remain in these lists until the system is restarted or
the list is deleted manually.
Missed Calls lists all calls that were not received – either
because you declined the call or just because you were not
there when the call attempt took place.
Navigate in the menu in the usual manner:
Use
Vertical Cursor
keys to move up and down in the menu.
Press
OK
or use the
Right Cursor
key to expand items with an
arrow appended.
To access the Phone Book, press the
Phone Book
button
on the keypad or select the
Phone Book
icon in the
Call
menu
– see
Making a Video Call Using the Phone Book
for more.
Let us consider an expanded log of Missed Calls as an
example. The Placed Calls log and the Received Calls log are
exactly similar – with identical features.
Expand
Missed Calls
as explained in the Call Log frame to the left.
Call
this
number now
Copy to my Contacts
Delete the selected entry
Delete all entries of this call log
Cancel (exit the menu)
Navigate in the menu in the usual manner:
Use the
Left Cursor
key to move the leftmost column.
Use
Vertical Cursor
keys to move up and down.
When you have located the icon representing what you want to
do, press
OK
.
tIP!
Any member of these lists already listed in your Phone
Book will appear with the name you have assigned to them and
not just with the number.
The number of
unreviewed missed
calls is shown in the
Welcome screen
tIP!
The contents of your Phone Book may have been arranged
in a tree structure with several subfolders. Use the
back
line to
navigate back up in the tree structure.
The My Contacts may contain up to 200 entries and the entire
Phone Book (which may include server based Global Directories)
can be virtually unlimited in size. Hence, using the
Cursor
keys
as the only navigation device can easily be a cumbersome
experience. What to do?
Enter Quick Search by Letters. Whenever you are inside the
Phone Book navigating in the list of entries, the numerical
keypad automatically switches from
123
mode to
ABC
mode.
To locate a specific entry, just type in the first letter as with a
cellular phone – see the lower left frame on this page.
If you need to refine your search, use the Search function:
In the Phone Book use the
Cursor
keys to move to the Task
column and then down to the
Search
icon.
Search icon
Call Now icon
Copy to My Contacts icon
Cancel/Back
Press
OK
to open the
Search
dialogue box:
Enter the search string (the name) and press the
OK
key or
move down to the
OK
icon and press the
OK
key.
(To leave the menu cancelling your search, press
Cancel
or move down to the
Cancel
icon and press
OK
).
Use the
Cursor
keys to move to the requested entry, if needed.
To dial the selected entry, move the cursor to the green
Call
Now
icon and press
OK
.
TIP!
When a search in the Phone Book is made by means of
the Search function, contacts matching the search text are
displayed only. Navigate to and click on the
Back
line
to return to the initial view.
Toggle between
ABC
and
abc
mode by
pressing the
#
key. To
switch to
123
mode,
press the
#
key for
one second.
Call Log Options
Accessing the Phone Book
Searching in the Phone Book
The Call Log – Placed, Missed & Received Calls
Phone Book Features (I)
1
2
3
abc
def
4
5
6
jkl
mno
ghi
7
8
9
tuv
wxyz
pqrs
0
a/A
- @ 1
GHI4Н М О П
PQRS7ß
.
*
+ :;’/ \? = &_( )
ABC2БАВГДЕЖ
DEF2ИЙЛК
JKL5
MNO6СТУФХЦШ
WXYZ9
TUV8ЩЪЬЫ
123/ABC/abc #
0