Troubleshooting, Lpax display installation, Environment and cleaning – Red Lion LPAX/MPAX User Manual
Page 4: Ordering information
Once assembled, the LPAX and MPAX have all the same functions and
capabilities of our PAX Series Intelligent Panel Meters. Therefore, you will find
the appropriate PAX information packed with the MPAX Module. Simply
follow the instructions to wire and program the display for your application.
TROUBLESHOOTING
For technical assistance, contact technical support.
2.0 INSTALLING THE DISPLAY
3.0 WIRING AND PROGRAMMING THE DISPLAY
LPAX DISPLAY INSTALLATION
The LPAX display is intended to be mounted into a panel or
enclosure. The display is provided with a gasket to provide a
water-tight seal. The recommended minimum panel thickness
for NEMA 4/IP65 sealing is 0.060" (1.57 mm).
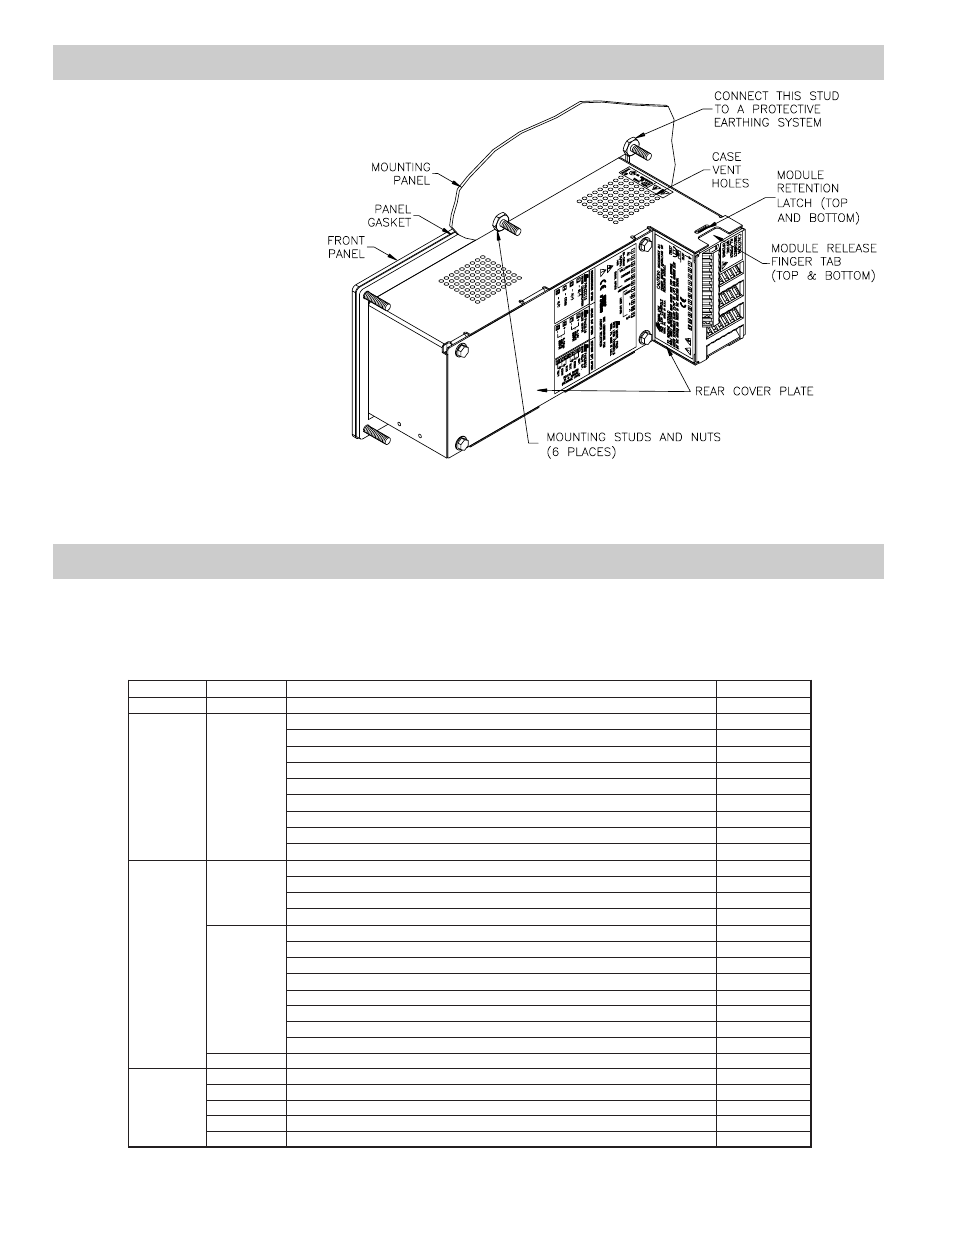
For panel mounting, prepare the panel cut-out to the
dimensions shown. The supplied template may be used to
mark the cut-out and hole locations on the panel. After
the panel cut-out has been deburred, slide the panel
gasket over the rear of the display and onto the
mounting studs. Insert the display into the panel
cut-out as illustrated in Figure 3. Install six # 10-32
keps nuts (supplied) and tighten evenly for uniform
gasket compression. Do not over-tighten the nuts.
By using additional mounting accessories, the
LPAX can be surface-wall mounted, suspended, or
bottom mounted. Separate installation instructions
are provided with the mounting accessories.
Environment And Cleaning
The display should be installed in a location that
does not exceed the maximum operating temperature
and provides good air circulation. Placing the system
near devices that generate excessive heat should be
avoided.
The bezel should be cleaned only with a soft cloth
and neutral soap product. Do NOT use solvents.
Continuous exposure to direct sunlight may accelerate
the aging process of the bezel.
Figure 3, Installing The LPAX Into A Panel
SFCRD200
Crimson 2 PC Configuration Software for Windows 98, ME, 2000 and XP
SFCRD**
Accessories
Listed Separately
Custom Units Label
LX
*
PAXCDC50
PAXCDC4C
PAXCDC40
PAXCDC30
Profibus-DP Communications Card
Extended Modbus Communications Card with Dual RJ11 Connector
Modbus Communications Card
DeviceNet Communications Card
Optional
Plug-In
Cards
MBLPAX00
SHRLPAX0
PAXCDL10
Analog Output Card
PAXCDL
Mounting Bracket for LPAX
Shroud for LPAX
PAXCDC2C
PAXCDC20
Extended RS232 Serial Communications Output Card with 9 Pin D Connector
RS232 Serial Communications Output Card with Terminal Block
MB
SHR
PAXCDC1C
PAXCDC10
Extended RS485 Serial Communications Output Card with Dual RJ11 Connector
RS485 Serial Communications Output Card with Terminal Block
PAXCDC
ENC90000
PAXCDS40
Quad Setpoint Sourcing Open Collector Output Card
NEMA 4 Enclosure for LPAX
ENC9
PAXCDS30
Quad Setpoint Sinking Open Collector Output Card
Analog
Input
Module
Display
PAXCDS20
Quad Setpoint Relay Output Card
TYPE
MPAXT010
MPAXS010
MPAXP010
MPAXD010
PAXCDS10
Dual Setpoint Relay Output Card
PAXCDS
Thermocouple and RTD Module, DC/24 VAC Powered
Strain Gage Input Module, DC/24 VAC Powered
Process Input Module, DC/24 VAC Powered
Universal DC Input Module, DC/24 VAC Powered
MPAXT000
MPAXS000
MPAXP000
MPAXH000
MPAXD000
LPAX0500
Thermocouple and RTD Module, AC Powered
Strain Gage Input Module, AC Powered
Process Input Module, AC Powered
AC True RMS Voltage and Current Module, AC Powered
Universal DC Input Module, AC Powered
5-Digit, Large Display for Analog MPAX Modules
MPAX
LPAX
PART NUMBERS
DESCRIPTION
MODEL NO.
ORDERING INFORMATION
* See the LPAX Accessory Bulletin or our web site for available units labels.
** Crimson software is available for download from http://www.redlion.net/