A.R.I. DG 101 EN User Manual
Page 2
A.R.I FLOW CONTROL ACCESSORIES Ltd.
Kfar Charuv 12932 Israel Tel. 972-4-6761803 Fax. 972-4-6763402
WWW.ARIVALVES.COM [email protected]
MAINTENANCE INSTRUCTIONS DG-10 1”
EnM-DG101-10
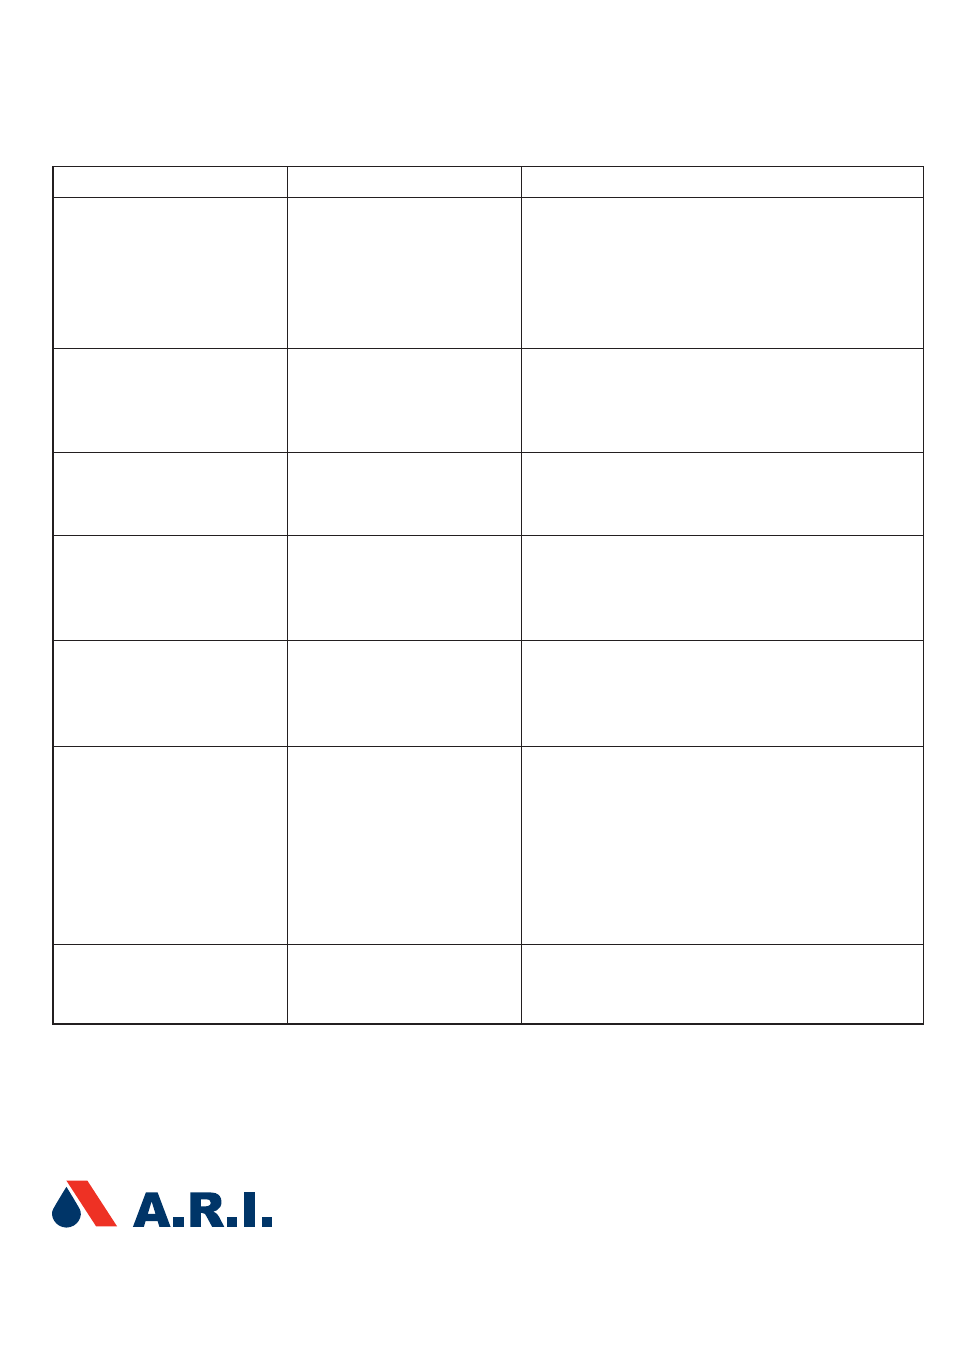
TROUBLESHOOTING
Easy to replace: gently pry off the outlet with
screwdriver Pressure insert the new right angle
using a plastic hammer.
Replacement part can be ordered from A.R.I.
Note:
The part is not mandatory for the function
of the valve.
Valve was hit or mishandled.
Right angle outlet is broken.
CORRECTIVE ACTION
CAUSE
SYMPTOM
D040 has 3/8” female thread.
2” D040 has 1¼” female thread.
End of pipe must be left open in order for valve to
function.
End user needs to connect a
drainage pipe from the valve
outlet in order to drain
excess water.
Outlet thread size needed in
order to attach a drainage
hose.
ARI offers an approved 316 stainless screen that
threads into the 2" valve.
GSM in California has made one for the 1” valve.
This is an above ground
installation.
Built-in plastic screen is not
accepted by health
department.
We provide several alternatives for those who do
not want plastic.
Offer the cast iron or
stainless steel body.
Also offer the bronze or
stainless steel base.
Plastic body and/or base not
acceptable.
Open the valve. Clean and check integrity of the
sealing mechanism and O-ring seals.
This is normal at start up
and during pressure test.
Could be debris in the
sealing mechanism.
Valve spits water.
Check for cross-threading.
Replace bottom of valve or offer the cast metal
base.
Plastic threads stripped.
Valve leaks from threads.
Check line pressure. It needs at least 3 psi to seal
tight.
Is the valve on a booster pump? Can be installation
issue if valve is level with the water level in a tank -
there is no pressure to seal.
Open valve and clean sealing mechanism, check
the rolling seal and o-rings for wear or tear.
Replace if necessary.
Line pressure issues,
(inadequate pressure),
or debris lodged in seal or
o-rings.
Valve is continuously
leaking.