Ridetech 11329100 User Manual
Page 3
7. Bolt the sway bar arm to the bar
using 3/8” x 1” Button head screws
with flat washers and lock washers.
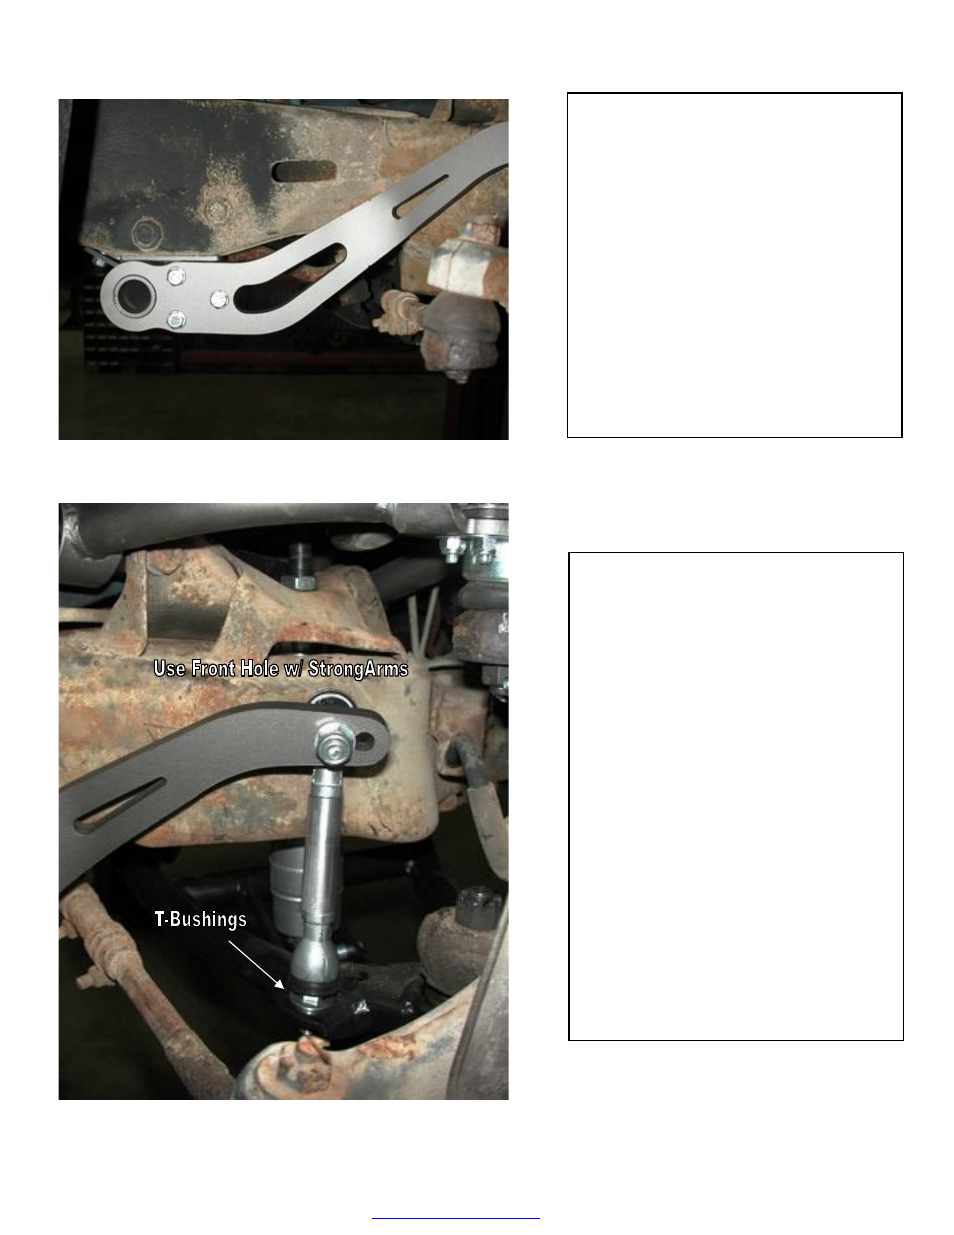
8. Fasten the 90 degree end of the
PosiLink to the sway bar arm using a
10mm Nylok nut and flat washers
Note: There are two holes in the
sway bar arm. For Shockwave and
CoolRide arms use the front hole.
For coils spring arms use the rear
hole.
9. Two T-bushing will be used on
each side to attach the straight end
of the PosLink to the lower control
arm. Secure with a 10mm Nylok
nut.
10. Check PosiLink alignment
through full suspension travel to
ensure that it does not bind.
PDF created with pdfFactory trial version
See also other documents in the category Ridetech For the car:
- 13076799 (5 pages)
- 13056799 (5 pages)
- 13027199 (8 pages)
- 13017199 (7 pages)
- 13006799 (4 pages)
- 12226799 (5 pages)
- 12186799 (5 pages)
- 12176799 (7 pages)
- 12167199 (6 pages)
- 12087199 (8 pages)
- 11456799 (9 pages)
- 11446799 (6 pages)
- 11436799 (6 pages)
- 11406799 (5 pages)
- 11396799 (5 pages)
- 11386799 (8 pages)
- 11376799 (6 pages)
- 11366799 (6 pages)
- 11267199 (7 pages)
- 11257199 (8 pages)
- 11177199 (8 pages)
- 11167199 (7 pages)
- 11167197 (7 pages)
- 11037199 (7 pages)
- 11027199 (7 pages)
- 19004901 (4 pages)
- 19004900 (4 pages)
- 19003005 (4 pages)
- 19003004 (4 pages)
- 19003003 (3 pages)
- 19003002 (4 pages)
- 19002005 (4 pages)
- 19002004 (4 pages)
- 19002003 (3 pages)
- 19002002 (4 pages)
- 12014099 (4 pages)
- 11014099 (4 pages)
- COIL-OVER Stud Top Assembly (1 page)
- COIL-OVER (2 pages)
- 12106509 (2 pages)
- 12103510 (4 pages)
- 12103509 (4 pages)
- 11326110 (6 pages)
- 11323510 (4 pages)
- 11323509 (4 pages)