Install door - continued – JELD-WEN JII101 Custom Wood & Fiberglass Exterior Folding Door Systems User Manual
Page 6
ASSEMBLY AND INSTALLATION INSTRUCTIONS
for Custom Wood & Fiberglass Exterior Folding Door Systems (JII101)
6
4. Hold the door
vertically and set
the lower hinge
of the pivot panel
onto the pivot pin
previously installed
in the sill. Ensure
that the pivot pin
does not bend.
5. Align the top of the
panel with the top
pivot hinge already
installed in the head
and fasten with
screws the top pivot
hinge onto the
door.
SECOND DOOR
(HINGE PANEL)
1. Hold the first
door in the open
position. Place the
second door next to
first and align the
tops of the doors
and the hinges.
2. In some cases, the
roller hinges will be
on the second door,
making this the
carrier panel.
THIRD DOOR (CARRIER
PANEL)
1. Place the bottom
roller bearing into
the main guide
track with the pin
toward the exterior.
2. Holding the door
vertically, screw the
top roller hinge
onto the door.
3. Slide the door
against the
preceding door in the open position. Using a slotted screwdriver
adjust the screws at the bottom of top roller hinge until the third
door is flush with second (first) door at the top.
4. Make sure the center pull handle is to the inside and join door
hinges.
5. Repeat the above procedures for additional hinge and carrier panels
until all doors are hung for that direction. When completed, repeat
for the opposite direction.
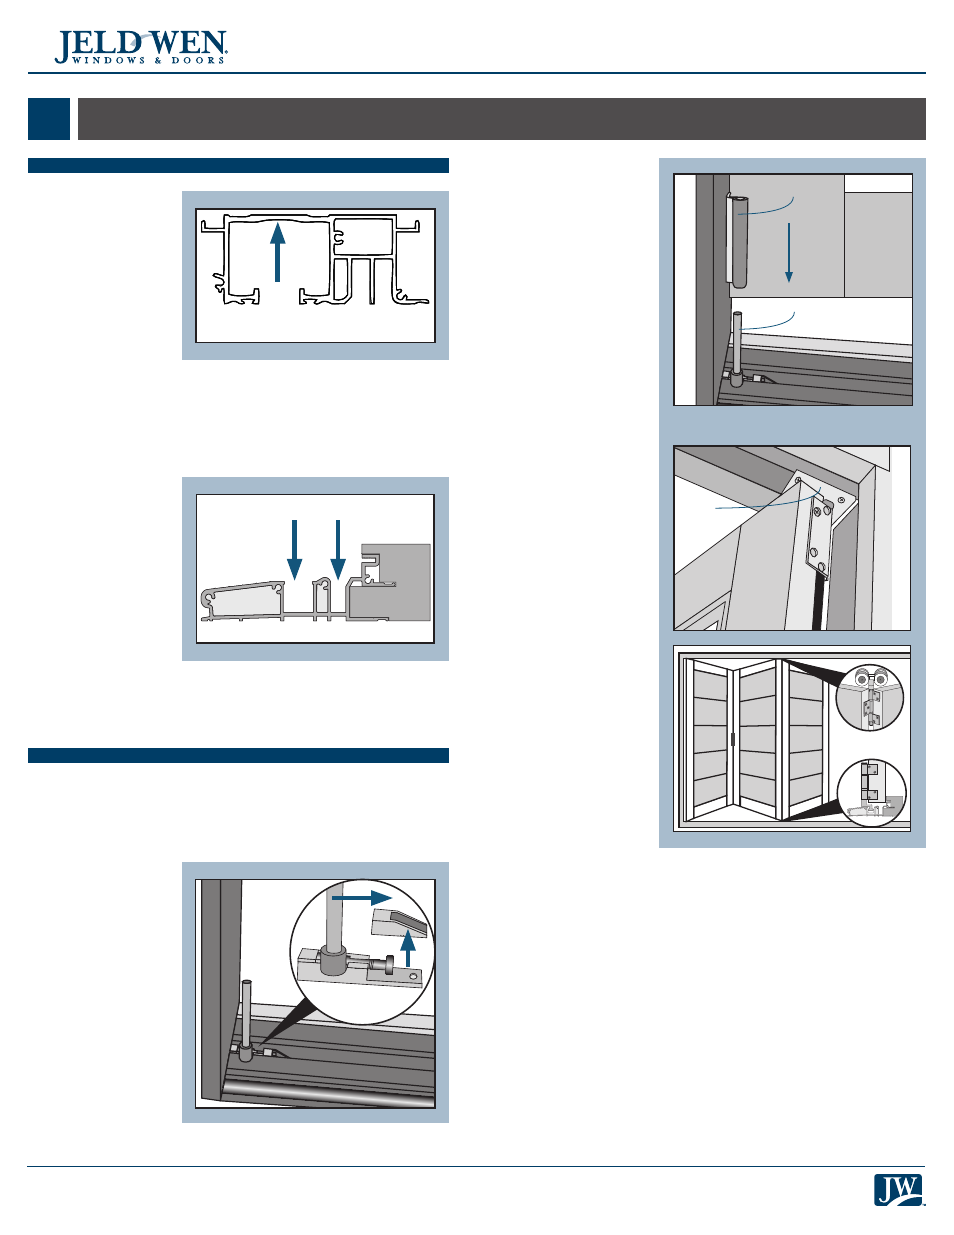
FASTEN FRAME
1. To secure the head,
fasten through each
pre-drilled hole. If
not pre-drilled, drill
fastener holes through
the center of the top
roller track every 3"
on center for the
first 15" out from
the jambs and then
every 16" on center.
Fastener holes should
not go through, but next to shims. Move shims accordingly to be next
to fastener holes if necessary.
2. Secure the top roller track to the header using the provided #12 x 3"
flat head screws through the pre-drilled holes.
Note!
To avoid damage to the rollers, clean all debris from the top
roller track.
3. To secure the sill,
pre-drill fastener holes
through the bottom
flush bolt guide
channel or main guide
track (only if fasteners
will not impede
rollers). Drill holes 4"
from jamb at both
ends, and then 8" on
center for the first 16"
and then every 16".
Use the same fastener
pattern as for the flush bolt guide channel and drill fastener holes.
4. Put a generous amount of silicone sealant in each hole and drive a
screw through each hole.
5. Secure the side jambs behind the weather-stripping every 16".
INSTALL PANELS
Study the door configuration before installation. Begin panel
installation from the pivot panel at jamb end and continue away from
jamb in each direction according to configuration. Doors are numbered
from the outside, left to right.
FIRST DOOR (PIVOT PANEL)
1. To gain access to the
installation holes in the
lower pin, first pull the
top cover up and then
slide the pin assembly
from the base.
2. Set the lower pivot
pin base in the sill as
shown and fasten with
a provided #8 x 1" pan
head screw through the
pre-drilled hole in the
sill closest to the jamb.
3. Slide the pin assembly
back into the base
and snap the top
cover back on and
fasten through the
remaining hole with the other screw.
Flush bolt
guide
channel
Main guide
track
Top roller
track fastener
locations
6
INSTALL DOOR - CONTINUED
Hinge
panel
(2nd)
Carrier
panel
(3rd)
Pivot
panel
(1st)
Top pivot
hinge
Panel
Exterior
Exterior side
shown
2
Interior
Lower hinge
Lower pivot
pin
1
2