Install stationary panel, Install operating panel – JELD-WEN PDS013 Custom Sliding Patio Doors User Manual
Page 3
Custom Sliding Patio Door Assembly
Page 3
PDS013 02/10
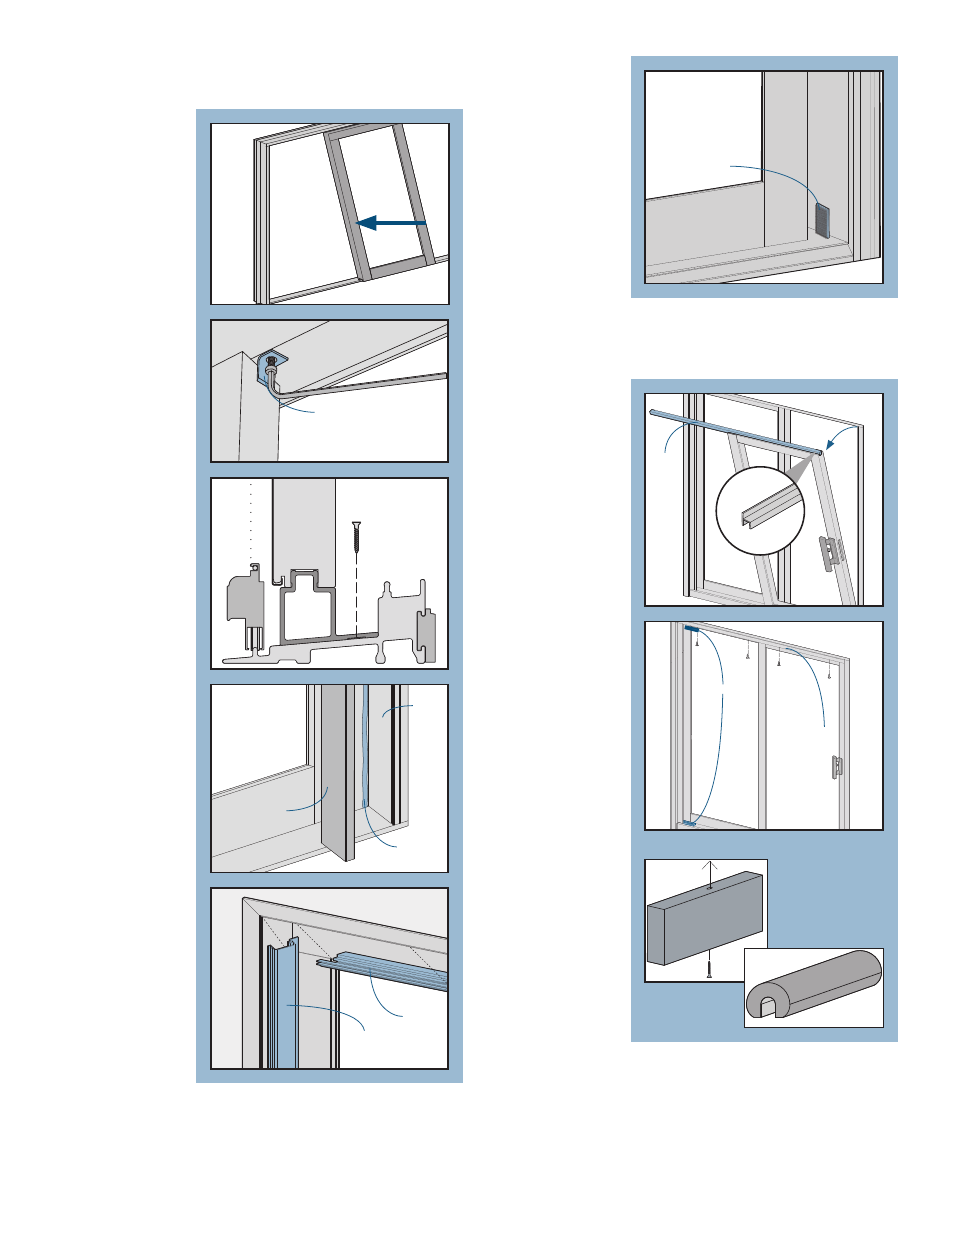
iNsTALL sTATioNARy PANEL
1. From the exterior, install the stationary panel into the exterior
frame track as follows:
• Tip the panel
into the header
track.
• Swing the
bottom of the
panel up and
over the sill
track.
• Slide the panel
tightly up
against the
side jamb.
2. Use a #8 x 3/4"
screw to secure
the panel to the
head jamb with
the fixed panel
clip (already
installed into the
top rail of the
panel).
3. Secure the panel
at the sill with
four #7 x 3/4"
screws spaced
evenly across
bottom of panel.
4. From the interior,
apply a bead of
silicone where
the stationary
panel meets the
jamb from head
to sill.
5. Set the interior
stationary side
filler into place
against the bead
of sealant and
secure with 1 1/4"
nails spaced every
6"- 8". Set nails
below surface
and putty, if
desired.
6. On the exterior,
use #7 x 3/4"
screws to secure
the exterior
head and side
fillers into the
operating panel
head and side
jamb. Locate the
screws behind the weatherstrip. The filler pieces should sit flush to
the exterior side of the frame on the operating panel jambs.
7. Place the pile
weatherstrip pad
on the operating
side jamb where
it meets the sill.
This pad is critical
to preventing air
infiltration.
iNsTALL oPERATiNg PANEL
Handling patio door panels can be heavy and awkward. Please use
the help of other people while performing the next steps.
From the interior,
1. Orient the upper
panel track so it
sits on top of the
panel with the
vertical lip facing
the interior. Set
the bottom of the
panel into the
sill track and tilt
up into a vertical
position.
2. Close and lock
the door.
3. Secure the
stationary side of
the upper panel
track with
#7 x 3/4" screws.
4. Unlock the door
and open all the
way.
5. Secure the
operating side of
the upper panel
track with
#7 x 3/4" screws.
Close and lock
the door.
6. Snap the rounded
rubber bumper
onto the sill
track against the
stationary side
jamb.
7. Drill a hole in
rectangular
rubber bumper
with a 9/64" drill
bit and secure in
place against the
stationary side
jamb with a
#6 x 1 1/2" screw.
8. Install the interior
head stop.
Frame
Sealant
Interior
side
filler
Panel
Interior
Clip
Stationary
panel
Bumper(s)
Head Jamb bumper
sill Track bumper
Interior
head stop
Head
track
Weatherstrip
Exterior
side
filler
Exterior
head
filler
Interior
Exterior